Hanna Instruments HI 95734 User Manual
Page 7

7
A microprocessor controlled special tungsten lamp emits radiation which is first optically conditioned
and beamed to the sample contained in the cuvet. The optical path is fixed by the diameter of the
cuvet. Then the light is spectrally filtered to a narrow spectral bandwidth, to obtain a light beam of
intensity I
o
or I.
The photoelectric cell collects the radiation I that is not absorbed by the sample and converts it
into an electric current, producing a potential in the mV range.
The microprocessor uses this potential to convert the incoming value into the desired measuring
unit and to display it on the LCD.
The measurement process is carried out in two phases: first the meter is zeroed and then the actual
measurement is performed.
The cuvet has a very important role because it is an optical element and thus requires particular
attention. It is important that both the measurement and the calibration (zeroing) cuvets are
optically identical to provide the same measurement conditions. Whenever possible use the same
cuvet for both. It is necessary that the surface of the cuvet is clean and not scratched. This to avoid
measurement interference due to unwanted reflection and absorption of light. It is recommended
not to touch the cuvet walls with hands.
Furthermore, in order to maintain the same conditions during the zeroing and the measuring
phases, it is necessary to close the cuvet to prevent any contamination.
18
CALIBRATION PROCEDURE
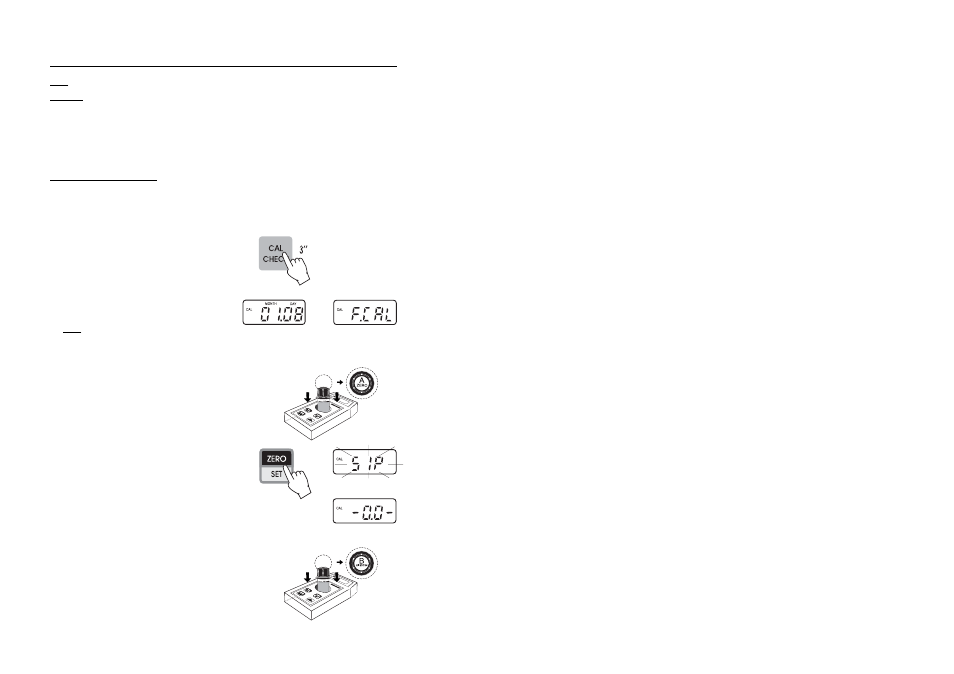
• Select the parameter code for free chlorine “734f”
or total chlorine “734t” by holding ZERO/SET
(see page 14).
• Enter the calibration mode by holding CAL CHECK
for three seconds.
• The date of the last calibration appears (e.g.:
month “01”, day “08”). “F.CAL” means that
the factory calibration is selected.
Note: at this point it is possible to reset the
instrument to restore FACTORY CALIBRATION,
see instructions page 20.
• Place the CAL CHECK™ Standard Cuvet A into
the holder and ensure that the notch on the cap is
positioned securely into the groove.
• Press ZERO and “SIP” will blink on the display.
• After a few seconds the display will show “-0.0-”.
The meter is now zeroed and ready for calibration.
• Remove the cuvet.
• Place the CAL CHECK™ Standard HI 95734-11
Cuvet B into the holder and ensure that the
notch on the cap is positioned securely into the
groove.
Note: it is possible to interrupt calibration procedure at any time by pressing ON/OFF.
Warning: do not validate or calibrate the instrument with standard solutions other than the Hanna
CAL CHECK™ Standards, otherwise erroneous results will be obtained.
For accurate Validation and Calibration results, please perform test at room temperature: 18 to 25°C
(64.5 to 77.0°F).
or
CALIBRATION PROCEDURE
