Eskimo 15300 User Manual
Page 5
5
Check for parts online at
www.GetEskimo.com or call 800-345-6007 M-F 8-5 CDT
Operator's Manual
ESKIMO
®
QuickFlip
™
1
SHELTER SKIN INSTALLATION
6. Unfold the skin and locate the Eskimo
®
logo near the zippered
door, which is in the front of the sled. With the outer part of
the shelter skin lying facing down, locate the (3) pole sleeves
on the bottom front, right side, and left side of the shelter skin.
Slide the remaining frame support pole (15017) through the
(3) pole sleeves. SEE FIGURE 4
7. Slide the remaining (2) pole caps (15295) onto the ends of
the frame support pole (15017) from the previous step.
8. Attach the frame support pole (15017) with the attached pole
caps (15295), from the previous step, into slot #4 on each of
the (2) hinges (15062). Use (2) ¼-20 x 2-1/4” bolts, and (2) ¼-20
nylock nuts to complete this step. REFER BACK TO FIGURE 4
9. It is now time to drape the shelter skin over the top of the
frame. Start by lifting the rear of the shelter skin over the top
of the front frame support. Make sure that you are evenly
working the shelter skin over the supports. Continue working
the shelter skin over the rest of the frame supports until the
shelter skin lies evenly over the entire shelter. SEE FIGURE 5
Note: Attaching the skin can be a difficult task and is
easiest with two people to ensure proper installation
and desired fit.
10. Once the shelter skin is on the frame, move to the inside of
the shelter and attach the hook and loop retainers to the
frame supports. There will be four hook and loop retainers
per frame support.
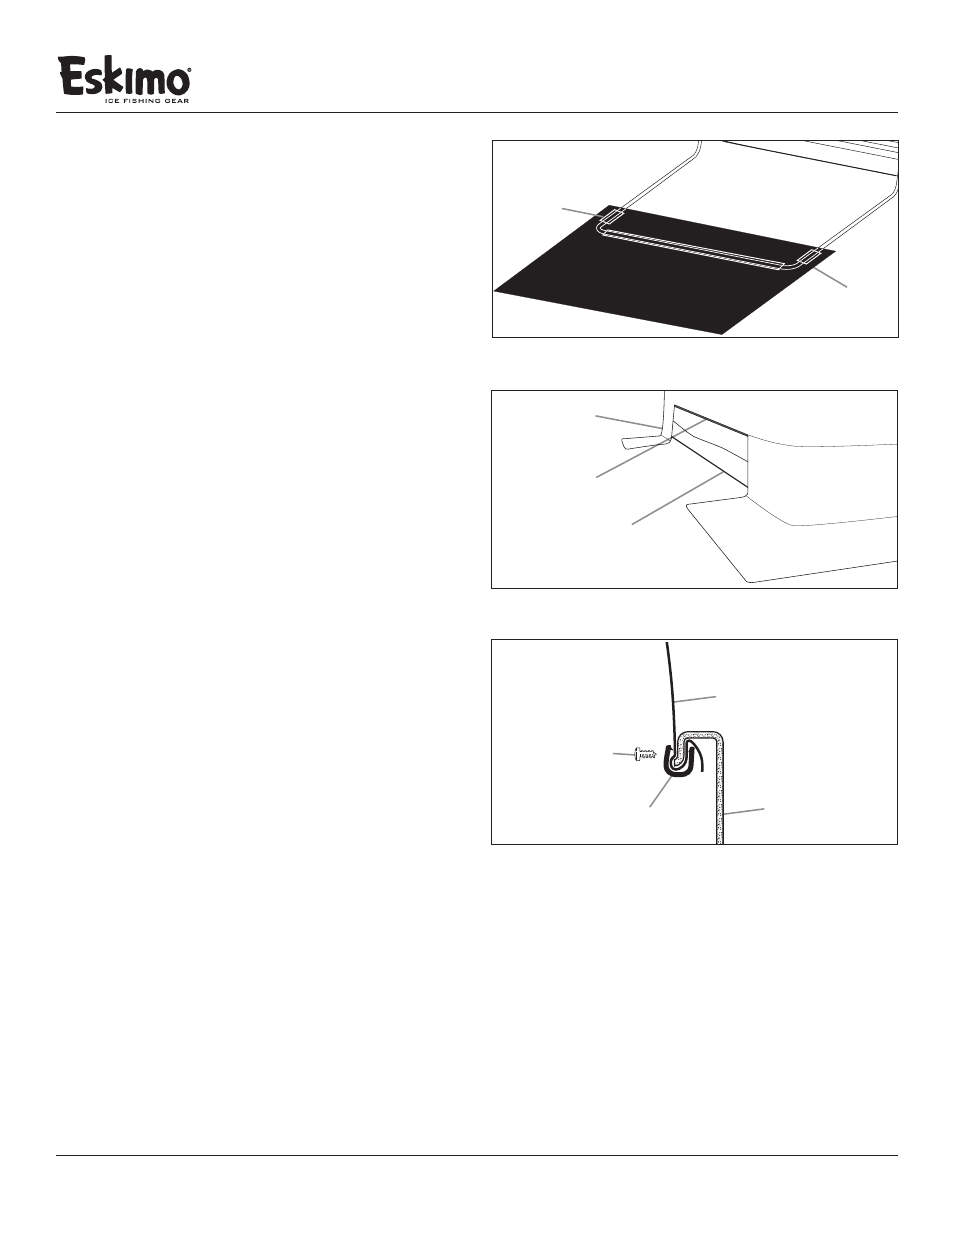
11. After attaching all of the hook and loop retainers you are
ready to install the edge trim to the rear of the shelter. Move
to the outside of the shelter and start by identifying the edge
trim piece (69654) from the parts box. Locate the center of
the edge trim piece by folding it in half. Line up the center
of the edge trim to the best of your ability with the center of
the rear of the shelter.
12. Pull the skin taut and push the edge trim over lip of the sled
with the shelter skin between the two. It is important to keep
the skin taut and work the edge trim evenly around both sides
of the shelter until all edge trim is in place. SEE FIGURE 5
Note: When pulling the shelter skin tight, DO NOT lift the
lower frame support off the ground. Make sure all spreader
poles are properly installed before the edge trim is attached
to ensure a proper fit. Using a rubber mallet may be helpful
while attaching the edge trim to the sled lip.
13. Secure the edge trim in place using the (12) #6 x 3/8” sheet
metal screws provided. A cordless drill and Phillips head bit is
recommended for this step, but is not necessary. SEE FIGURE
6
Note: Screws should be spaced evenly apart. This step does
mean you will put very small holes in your shelter skin to
keep the edge trim and skin securely attached to the sled lip.
This will in no way affect the performance of your shelter.
FIGURE 4
skin
fabric sleeve
edge trim
FIGURE 5
skirt
sled
skin
sled
edge trim
#6 - 3/8” screw
FIGURE 6