Pid-g, Maintenance menu flow chart 5ppm, Exit – ENMET PID-Guard User Manual
Page 17: Pv: 0 20, Cal ok same mv bad sens span, Alarm1, Alarm2, Alarm3, Ma span, Zero cal ok
PID-G
UARD
ENMET Corporation
15
Normal Gas Display
F
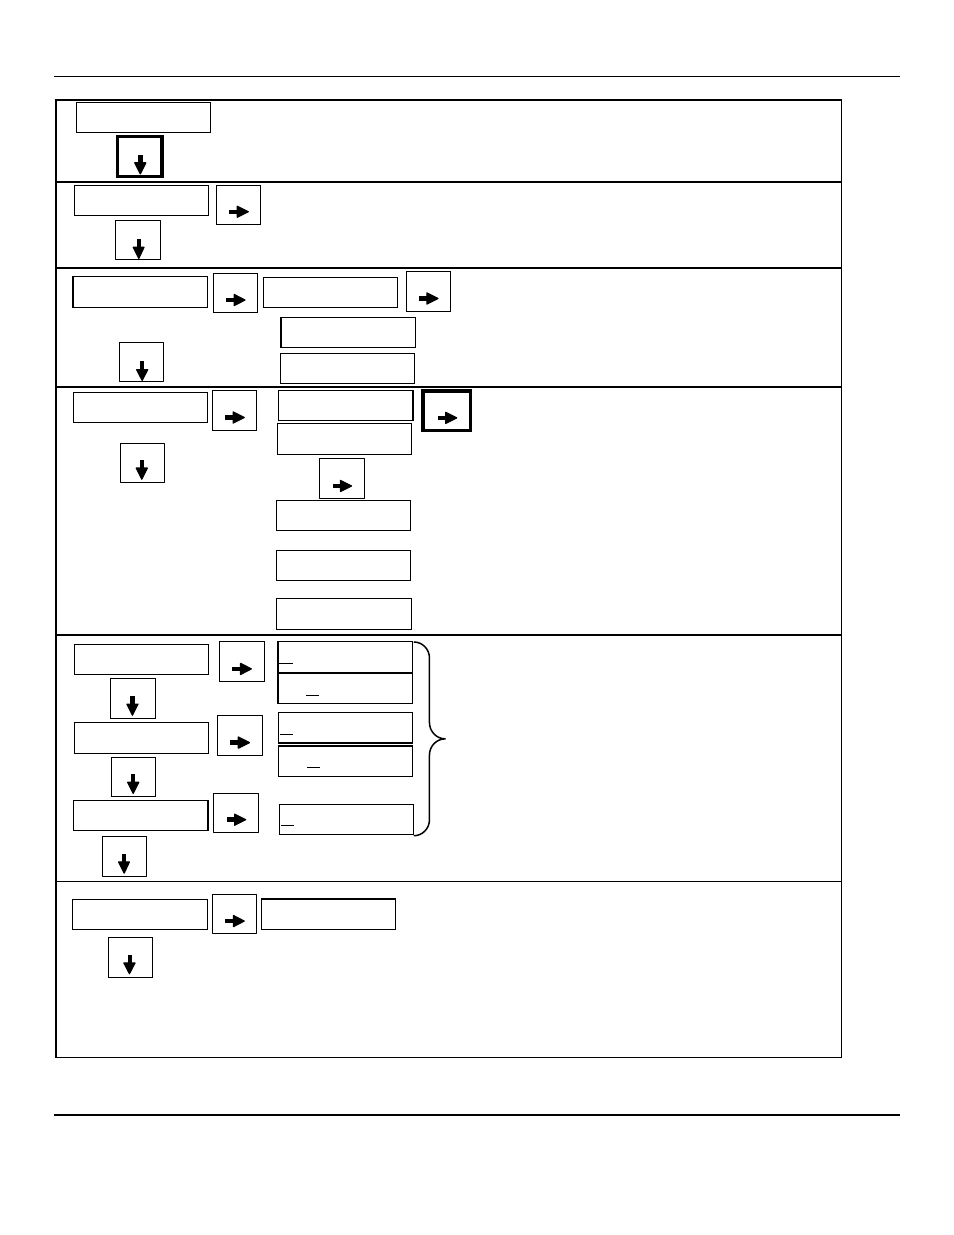
IGURE
7: PID-G
UARD
Maintenance Menu Flow Chart
5ppm
M
ENU
Press and H
OLD
the M
ENU
button for 2 – 4 seconds to enter the Maintenance Menus
Exit
S
ELECT
Press the S
ELECT
button to return to the Normal Gas Display.
See Section 5.2.1
M
ENU
Press the M
ENU
button to advance through Maintenance Menus cycle
OR
OR
M
ENU
PV:
0
20
Apply Cal Gas until signal value becomes stable
(about 1 to 4 minutes) See Figure 6
Press S
ELECT
to enter the cal signal:
If cal is good display will indicate OK or Same
If cal is not within preset “range” display will
indicate Bad Sens
Cal OK
Same mV
Bad Sens
Span
S
ELECT
S
ELECT
S
ELECT
You can Press and H
OLD
the S
ELECT
button to
change the Calibration Gas Level
See Section 5.2.3
Alarm1
M
ENU
Alarm2
M
ENU
Alarm3
S
ELECT
S
ELECT
S
ELECT
0020
0005
0005
0010
0010
To change Alarm set points:
Press Menu button until Alarm to be changed is displayed
Press Select button to display the set point
The M
ENU
button changes digit indicated by underscore
cursor
The S
ELECT
button locks underscored digit and moves to
next digit
If change is not within range display returns to first digit
If change is within range display moves to next menu
See Section 5.2.4
M
ENU
mA Span
M
ENU
S
ELECT
0050
To change mA Span set point:
Press Menu button until mA Span is displayed
Press Select button to display the set point
The M
ENU
button changes digit indicated by underscore cursor
The S
ELECT
button locks underscored digit and moves to next digit
See Section 5.2.5
To return to Normal Gas Display:
Press M
ENU
button until EXIT is displayed
Then press S
ELECT
button
OR
Zero
Cal OK
If the Zero signal is not within Preset Specs the
PID-G
UARD
will
display Bad ZERO
S
ELECT
M
ENU
Bad ZERO
If the Zero signal is within Preset Specs the
PID-G
UARD
will
display Cal OK,
See Section 5.2.2
PV:
0
S
ELECT
Press the S
ELECT
button to initiate Zero adjustment