Elenco Fiber Optics Voice Data Kit User Manual
Page 16
- 11 -
11111111 M
M
M
Maaa
akkkkiiiinnnngggg Y
Y
Y
Yoooouuuurrrr OOO
Ow
w
w
wnnnn IIIIm
m
m
maaa
aggggeeee CCCCoooonnnndddduuuuiiiitttt
Coherent image conduits can contain thousands of fibers
.................................................................................................................................
In this experiment you will construct a coherent fiber optic bundle from individual fibers that you
cut to length, fasten together and polish. Then you'll see how your craftsmanship stacks up against
other fiber arrays or bundles.
M
M
M
M aaa
a tttt eeee rrrr iiii aaa
a llll ssss N
N
N
N eeee eeee dddd eeee dddd ::::
10 .5 mm (.02 inch) diameter plastic optical fibers, 1 meter (39.4 inches) long
9.5 mm (3/8 inch) diameter black heat shrink tubing, 2.5 cm (1 inch) long
2000 grit polishing paper (dark gray color)
3
µm polishing film (pink color)
Single-edge razor blade or sharp knife*
Blow dryer*
Toenail clippers*
Water, light oil or glycerin*
Paper towels*
* Not contained in this kit.
FFFF
OO
O
O LLLL LLLL OOO
O W
W
W
W
TTTT
HHHH EEEE SSSS EEEE
SSSS
TTTT EEEE PPPP SSSS
::::
•
Using a sharp knife or razor blade, cut all
the .5 mm (.02 inch) diameter fibers into
30 mm (1.25 inch) lengths.
•
Insert all of the 30 mm lengths into the
9.5 mm heat shrink tubing, keeping the
fibers straight and as parallel to each other
as possible.
•
Try to get all of the fiber tips flush with
each other on one end. It may help to grip
the heat shrink lightly and tap the fiber
ends on a flat surface so they are all about
even.
•
Use the blow dryer to carefully heat the
heat shrink tubing so it contracts and
holds the fibers in place. Apply hot air evenly and from all directions.
•
Use the toenail clippers to cut the fibers on
both ends so their tips are as even as possible.
•
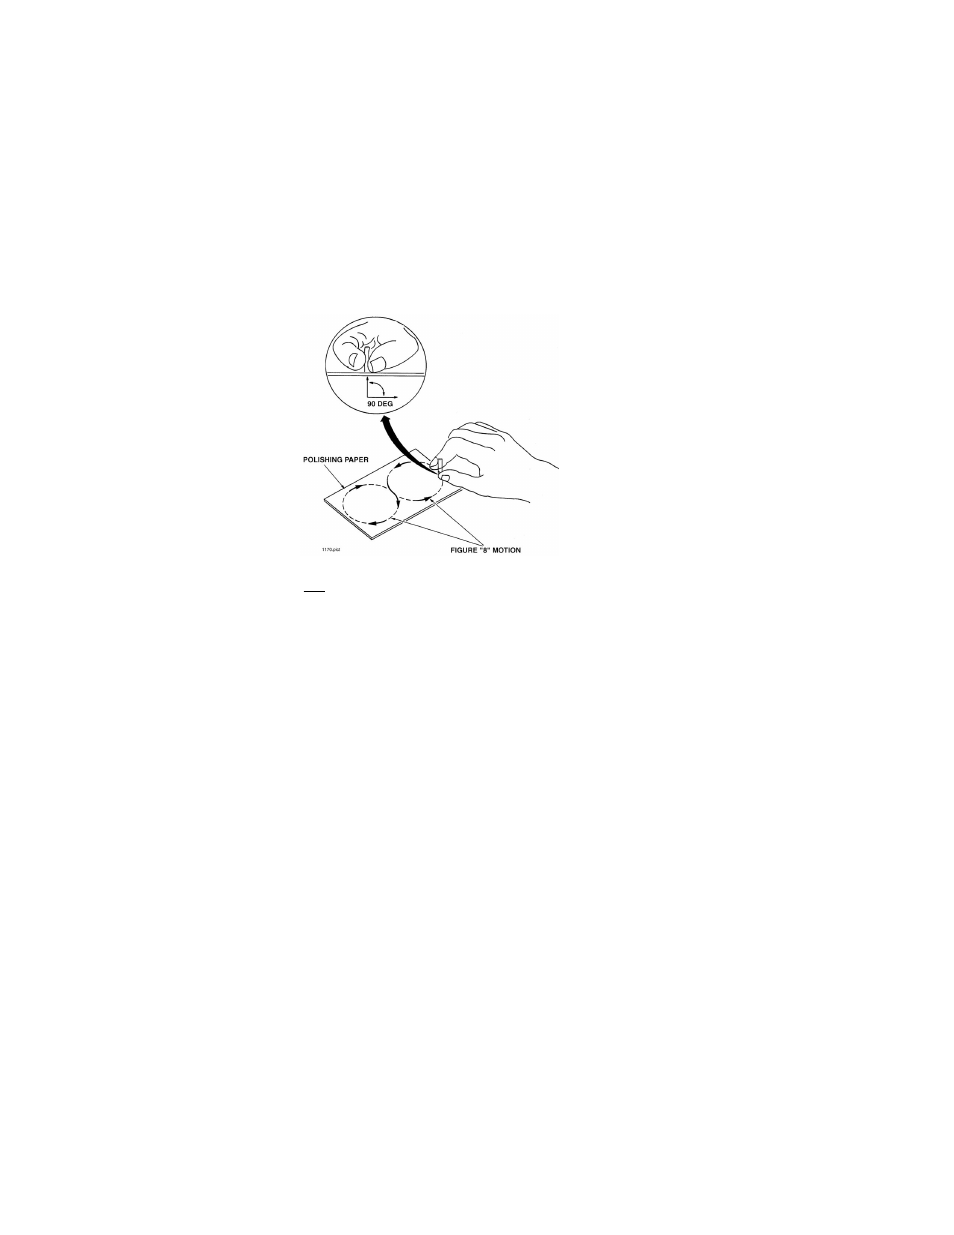
Place the 2000 grit polishing paper on a flat firm surface and wet it with water, light oil or
glycerin. Hold the fiber bundle upright, at right angles to the polishing paper, and polish it with a
gentle figure-8 pattern as shown above. Continue polishing until both fiber bundle ends are flat.
•
Wet the 3
µm polishing film with water or light oil and again polish both fiber bundle ends. Dry
the bundle ends with paper towels.
•
Place one end of your newly created fiber bundle over the text on this page, starting with the
larger print sizes and moving to smaller print.
R
R
R
R
EEEE SSSS UU
U
U LLLL TTTT SSSS
::::
The fiber bundle that you just made should exhibit the same "image-transferring" properties as
the Ulexite and the faceplate used in the previous experiments. Some fibers may appear dark.
W
W
W
W
HHHH Y
Y
Y
Y
::::
The fiber bundle just assembled will not have as high a resolution (detail) as the Ulexite or man-
made faceplate. The bundle transferred the image from one side to the other because most of the fibers
were all parallel to each other inside the heat shrink. The reason some of the fibers appear dark is that
they may be broken internally, or they were not even with the other fibers at one end or the other.