Venting installation instructions, Continued – Desa (V)T32EN-A Series User Manual
Page 9
9
9
www.desatech.com
116647-01A
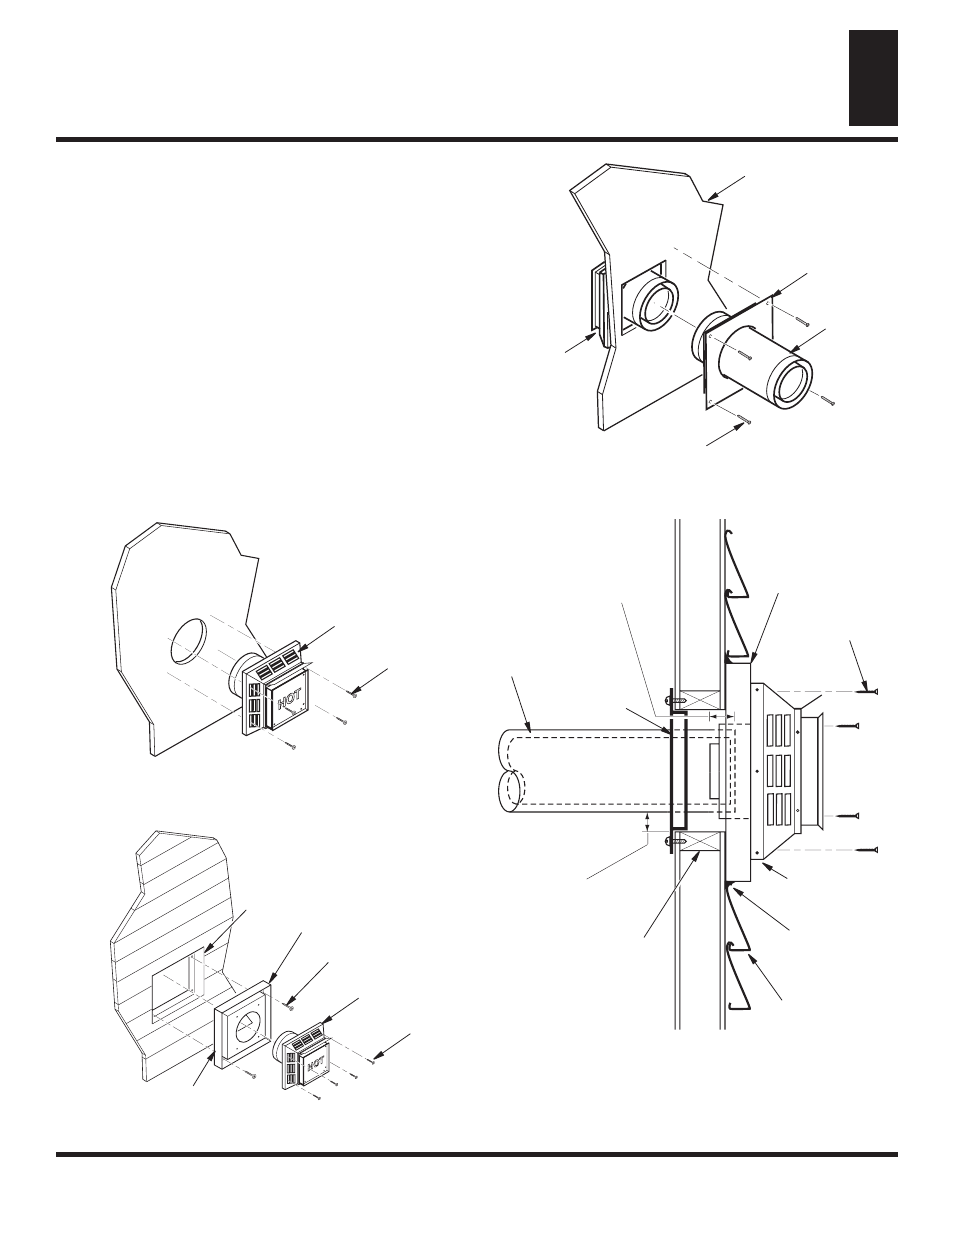
7.
Combustible Exterior Wall Only:
Slide the wall firestop over
the vent pipe before connecting horizontal run to vent cap (see
Figure 12).
8. Carefully move fireplace, with vent assembly attached, toward
wall and insert vent pipe into horizontal termination. The pipe
overlap should be a minimum of 1
1
/
4
" (see Figure 13).
9.
Combustible Exterior Wall Only:
Slide wall firestop against
interior wall surface and attach with screws provided (see
Figure 12). See Figure 13 for horizontal termination details.
10. Place fireplace into position and shim with noncombustible
material if needed. Nail or screw side flanges to framing to
secure unit in place. IMPORTANT: Make sure fireplace is
level before securing. If fireplace is not level it will not work
properly.
VENTING INSTALLATION
INSTRUCTIONS
Continued
VENTING INSTALLATION INSTRUCTIONS
Installation Planning (Cont.)
Figure 10 - Installing Horizontal Vent Cap (Noncombustible
Exterior)
Figure 11 - Installing Siding Standoff (Combustible Exterior)
Vent Cap
(Horizontal
Termination)
Interior Wall
Surface
Wall
Firestop
Horizontal
Vent Pipe
Figure 12 - Connecting Vent Cap with Horizontal Vent Pipe
Screw
Wood Screw
Vent Cap
Cut Siding Away
to Fit Standoff
Wood Screw
Screws
Standoff
Vent Cap
Apply Mastic
to All Four Sides
Figure 13 - Typical Horizontal Termination Cap Mounting with
Additional Siding Standoff Installed
Siding Standoff
Screws
High Wind
Termination
Apply Mastic to
Outside Edge of
Standoff
Exterior Wall
with Vinyl Siding
10
3
/
4
" x 10
3
/
4
" Framed
Opening
Maintain 1"
Minimum Air
Space Around
Outer Pipe When
Penetrating a Wall
Minimum Pipe
Overlap 1
1
/
4
"
Wall
Firestop
Direct Vent
Pipe