Dish Network DVR 942 User Manual
Select the right key confirm your receiver model
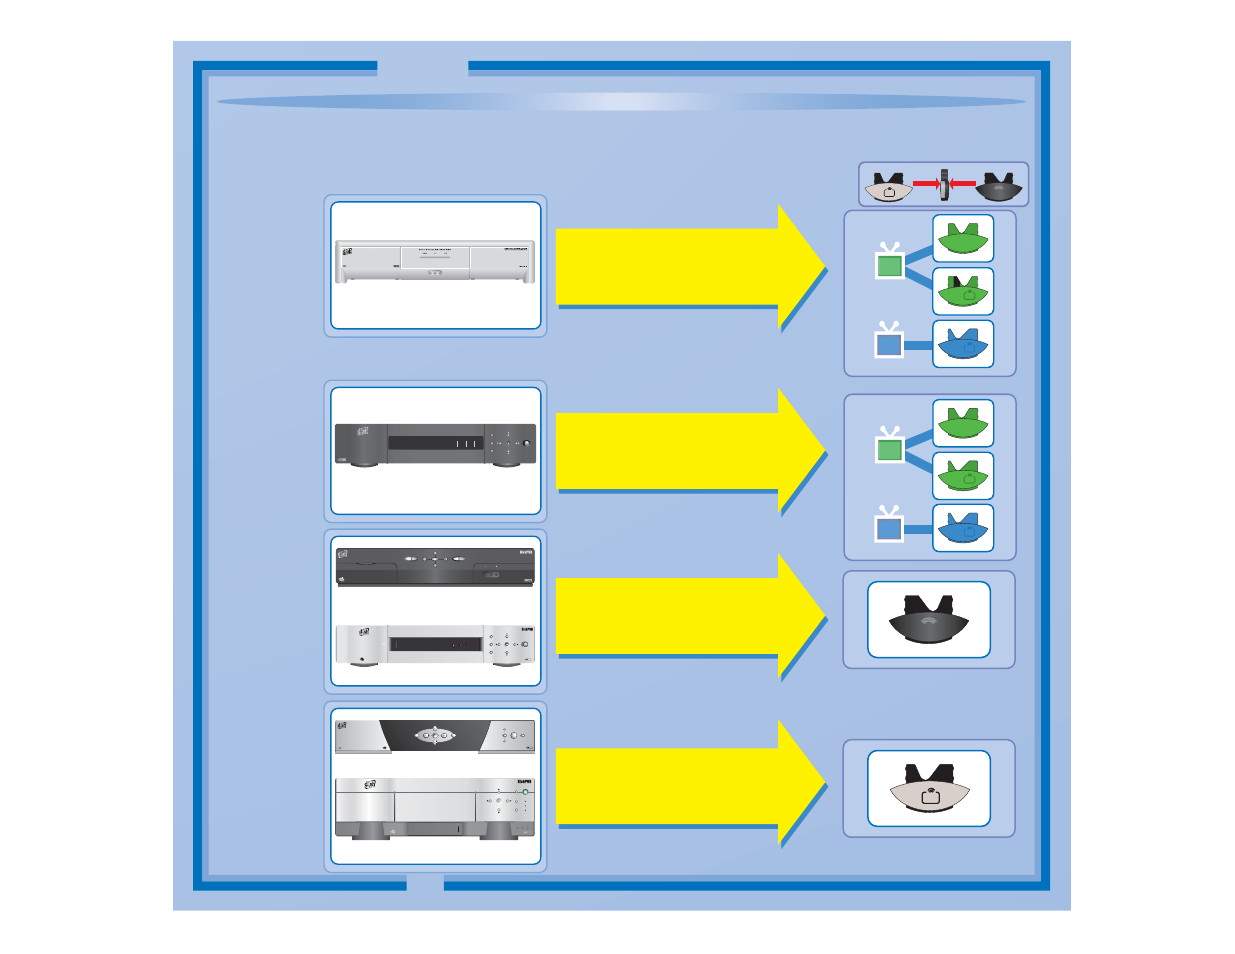
Select the Right Key
Confirm Your Receiver
Model
11
1
1
UHF
PRO
2
UHF
PRO
1
2
DISH Player-DVR 942
or
®
PERSONAL VIDEO RECORDER
D I G I T A L
DOLBY
D I G I T A L
DOLBY
SELECT
INFO
MENU
SYS INFO
POWER
POWER
RECORDING
MPEG 2
ONLINE
MESSAGE
RECORDING
®
721
PERSONAL VIDEO RECORDER
POWER
SELECT
MENU
INFO
SYSTEM
INFO
D I G I T A L
DOLBY
MPEG 2
PUSH
DISH 501 & DISH 508
DISH Player-DVR 510
DISH 721
UHF
®
8
INFO
SELECT
MENU
MPEG 2
CANCEL
SATELLITE
OFF-AIR
POWER
SYSTEM INFO
HDTV SATELLITE RECEIVER
D I G I T A L
DOLBY
MESSAGE
RECORD
ONLINE
INFO
MENU
SYSTEM INFO
SELECT
PERSONAL VIDEO RECORDER
D I G I T A L
DOLBY
921
921
MPEG 2
®
DISH 811
DISH Player-DVR 921
UHF
PRO
If your
receiver
looks like
this...
If your
receiver
looks like
one of
these...
If your
receiver
looks like
one of
these...
Use the key that
looks like this
1
1
UHF
PRO
2
UHF
PRO
1
2
DISH Player-DVR 522
&
DISH Player-DVR 625
or
If your
receiver
looks like
this...
Use the key that
looks like this
Use the key that
looks like this
Use the key that
looks like this
C-1
Remote keys are included in this replacement remote kit.
Quick Setup
625
POWER
TV1
TV2
MODE
POWER
DUAL
RECORDING
RECORDING
SINGLE
MENU
MODE
SYSTEM
INFO
SELECT
POWER
DIGITAL VIDEO RECORDER
DishDVR
MPEG 2
Keys have two sides. Look on both sides
to find right key for your remote.
UHF
UHF
PRO
Document Outline
- Remote Control Overview
- Using the Guide
- Remote Control Modes
- How the Remote Communicates
- Programming for Other Equipment
- 1 Turn the equipment on.
- 2 Find the brand name of the equipment in the tables starting on page 12.
- 3 Press and hold the mode button until all the other mode buttons light up, and then let go of the button. The mode button flashes.
- 4 For Aux mode only. Press 0 for a second TV, or 1 for a second VCR, or 2 for a tuner, or amplifier.
- 5 Enter one of the three-digit equipment codes from the table using the number buttons.
- 6 If you want to program Limited Mode, press 1. If not, skip to step 7.
- 7 Press Pound (#).
- 8 Press Power to turn off the equipment. If the equipment does not turn off, go to step 10.
- 9 Turn the equipment back on and try some other buttons to make sure they work. If the code works for other buttons, stop here.
- 1 Turn the equipment on.
- 2 Press and hold the mode button until all the other mode buttons light up, and then let go of the button. The mode button flashes.
- 3 For Aux mode only. Press 0 for a second TV, or 1 for a second VCR, or 2 for a tuner, or amplifier. Then press the Star (*) button.
- 4 Press PoweR.
- 5 Press the Up or Down arrow repeatedly until the equipment turns off.
- 6 Press Pound (#).
- 7 Turn the equipment back on and try some other buttons to make sure they work.
- 8 If necessary, repeat this procedure until you’ve tried all the codes.
- 1 Press and hold the Aux mode button for three seconds, and then let go of it. The aux mode button will blink.
- 1 Press and hold the TV mode button for three seconds, and then let go of it. The TV mode button will blink.
- 2 Press the Pound (#) button.
- 3 Press the plus (+) side of the Volume button.
- 4 Press the 0 number button.
- 5 Press the Pound (#) button.
- 6 Press the sat mode button.
- 7 Press the plus (+) and minus (-) sides of the volume button.
- 8 The equipment’s volume changes and the aux mode button lights instead of the TV mode button.
- 1. Turn on the other receiver and display the System Info screen (see the receiver user’s guide for information on how to display the screen).
- 2. Press and hold the Aux button until all the other mode buttons light up, and then let go of the button. The Aux button flashes.
- 3. Press the 3 button.
- 4. Use the Number Pad to enter the address you wrote in step 1.
- 5. Press Pound (#). The Aux button blinks three times.
- 6. Press Record to make sure the address and the remote matches the address on the receiver.
- Reading Out the Remote Control Codes
- 1 Press and hold the mode button for the equipment you want the remote to control. When all the other mode buttons light up, let go of the mode button - that mode button should now be flashing.
- 2 Press the Pound (#) button twice. The mode button flashes the number for each digit of the equipment code, with a pause between the groups of flashes. A quick flash is for zero.
- Avoiding Remote Conflicts
- 1. Press System Info on the receiver's front panel. The System Information screen displays and shows the Remote Address.
- 2. Press and hold SAT on your remote control for about three seconds, until all of the mode buttons light up, and then let go of SAT.
- 3. Use the Number Pad to enter any number between 1 and 16, but not the one you wrote in step 1.
- 4. Press Pound (#). If you entered the address correctly, SAT will flash three times.
- 5. Press Record. Make sure the Remote Address you see on the System Information screen is the same as the one you entered in step 3. If it isn't, the remote cannot control the receiver.
- 6. Press Select to close the System Information screen.
- 2. Use a small screw driver or a paper clip to carefully change the setting.
- 3. Put the battery cover back on the remote control.
- 4. Use the Sys Info button on the front panel to open the System Information screen.
- 5. Press Record on the remote control.
- 6. Make sure the System Information screen shows the correct band information:
- 2. Make sure the UHF Antenna is attached to the back of the receiver.
- 3. Using the receiver’s front panel buttons, press Menu. Select the following onscreen items in this sequence:
- 5. Select System Info to open the System Information screen.
- 6. Move the highlight to the address for the Remote Address as shown below. This is important - if you do not move the highlight...
- 7. Press the Record button on the green TV1 remote control you are setting up. If you get a warning that tells you to pick another address, continue on to the next step. If no warning pops up, go to the step 12 of this procedure.
- 8. On the remote control, press and hold the Sat mode button about three seconds, until all the mode buttons light up, and then let go of the Sat button. The Sat mode button will blink.
- 9. Use the number buttons to enter any number from 1 to 16, except for the address shown for .
- 10. Press the Pound (#) button. If you entered the address correctly, the Sat mode button will flash three times.
- 11. Make sure the System Information screen shows UHF and that this address matches the number you entered in step 9.
- 12. Select Done to close the System Information screen. If nothing happens, press Record, and then select Done.
- Equipment Codes
- Troubleshooting
- Limited Warranty
- If You Need Help
- Regulatory Factors