Electrical connection, Connection n” 1, Connection n" 2 – Ariston fm81r ix aus User Manual
Page 9: Warning: this appliance must be earthed
Attention! The text in this document has been recognized automatically. To view the original document, you can use the "Original mode".
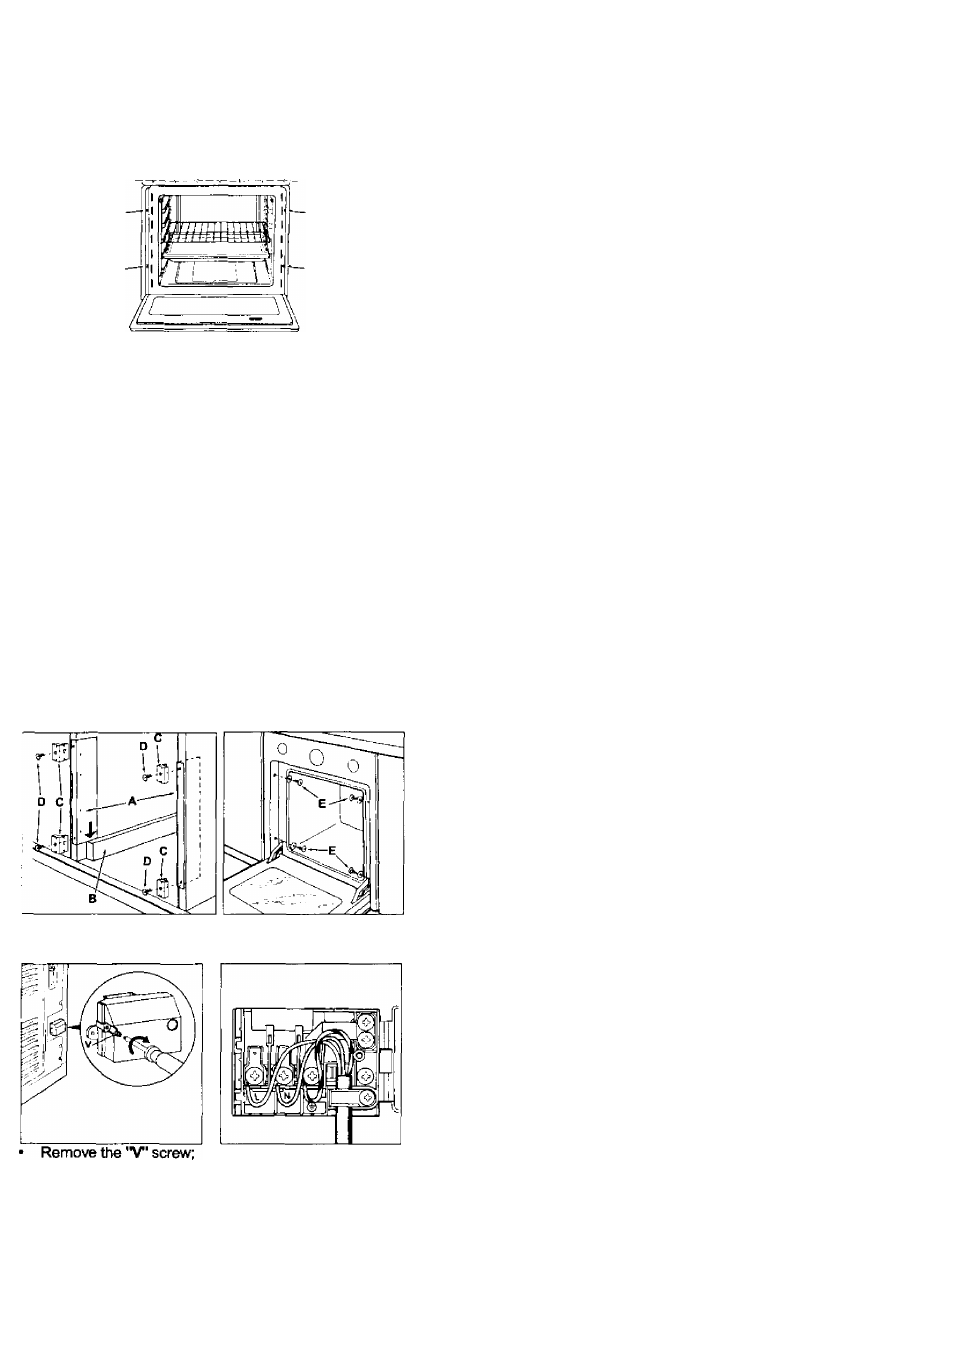
To fasten the oven to the cabinet, open the door of the
oven and fasten it by inserting the 4 wood screws into the
4 holes locate on the perimeter of the frame.
The panels of the adjacent cabinets must be made of
heat resistant material. In particular, cabinets with a veneer
exterior must be assembled with glues able to withstand
temperatures of up to 100°C.
In compliance with current safety standards, contact with
the electrical parts of the oven must not be possible once
it has been installed.
Ail parts which ensure safe operation of the appliance must
not be able to be removed without the use of a tool.
Fastening the Oven to the Cabinet
(only on a few
models)
1
. Position the
"A"
brackets so that they are flush against
the oven support strips
(B).
2.
Position the cleats
(C)
on the
”A"
brackets as shown in
the figure so that the thickness of the sides of the
cabinet, indicated on the cleat, is facing you.
3. Fasten the brackets and the cleats to the edge of the
side of the cabinet using the "D" screws.
4. Fasten the oven to the cabinet using the screws and
plastic washers (E).
Mounting a Power Suppiy Cabie
Opening the terminal board:
• Pull to open the cover of the terminal board.
To install the cable, proceed as follows:
•
Remove the wire clamp screw and the three contact
screws L-N—
• Fasten the wires beneath the heads of the screws using
the following color scheme :
Blue
(N)
Brown
(L)
Yellow-
Green ^
' Fasten the suppy cable in place with the clamp, close the
cover to the termi nal box and fasten it with the
"V"
screw.
Electrical connection
Ovens with a three-pole power supply cable are designed
to operate with alternated current at the supply frequency
and voltage indicated on the data plate {at the bottom of
the oven dashboard). The earthing conductor of the cable
is the yellow-green conductor.
Two types of connection are provided:
Connection n” 1
Connecting the power supply cable to the mains.
Fit a normalized plug to the cable, which corresponds to
the load indicated on the data plate; if the cooker is
connected directly to the mains, an omnipolar circuit-
breaker with a minimum opening of 3 mm between the
contacts, suitable for the load indicated and complying
with current directives, must be installed between the
appliance and the mains (the earthing wire must not be
intemupted by the circuit-breaker).The power supply cable
must be positioned so that it does not exceed room tem
perature by 50°C at any point of its length. Before making
the connection check that:
• the limiter valve and the home system can support
•
the power supply system has an efficient earthing
connection which complies with the provisions of
current regulations and the law;
•
there is easy access to the socket or the omnipolar
circuit-breaker once the cooker has been installed,
N.B.:
do not use reducers, adapters or shunts as these
could cause heating or burning.
Connection n" 2
Disposing of the plug.
WARNING: THIS APPLIANCE MUST BE EARTHED.
Ensure that before disposing of the plug itself, you make
the pins unusable so that it cannot be accidentally inserted
into a socket. Instructions for connecting cable to an alter
native plug:
Important:
the wires in the mains lead are coloured in
accordance with the following cade:
Green & Yellow
-Earth
Blue
-Neutral
Brown
-Live
If the colours of the wires in the mains lead do not
correspond with the coloured markings identifying the
terminals in your plug, proceed as follows.
Connect Green & Yellow wire to terminal marked
“E"
or ^
or coloured Green or Green & Yellow.
Connect Brown wire to terminal marked
“L"
or coloured
Red. Connect Blue wire to terminal marked
“N”
or coloured
Black. If a 13 amp plug (BS 1363) is used it must be fitted
with a 13 amp fuse.
in the plug or adaptor or at the distribution board.If you
are in any doubt about the electrical supply to your
machine, consult a qualified electrician before use.