Choke lever, Forward tine engagement handle, Reverse tine drive clutch lever (model 390 only) – Bolens 390 User Manual
Page 6: Depth stake, Gas and oil fill-up, To start engine, To stop engine, How to use your tiller, Wheel position, Dperation
Attention! The text in this document has been recognized automatically. To view the original document, you can use the "Original mode".
CHOKE LEVER
The choke lever is located above the throttle (ontrol. It
is used to enrich the fuel mixture when startir g a cold
engine.
FORWARD TINE ENGAGEMENT HANDLE
The forward tine engagement handle is located
beneath the tiller handle. (See Figure 5) Sc ueezing
the handle up against the tiller handle engages the
tines. Release the handle to stop the tines.
REVERSE TINE DRIVE CLUTCH LEVER
(Model 390 Only)
The reverse tine drive clutch lever is located on top of
the handle panel. (See Figure 5) Pull the lever to the
rear to move the tines in reverse. Release the lever to
stop the reverse tine drive.
NOTE:
Never engage both the forward and reverse
tine drives at the same time. Engaging both forward
and reverse tine drives at the same time could dam
age the belt drives and cause the engine to stall.
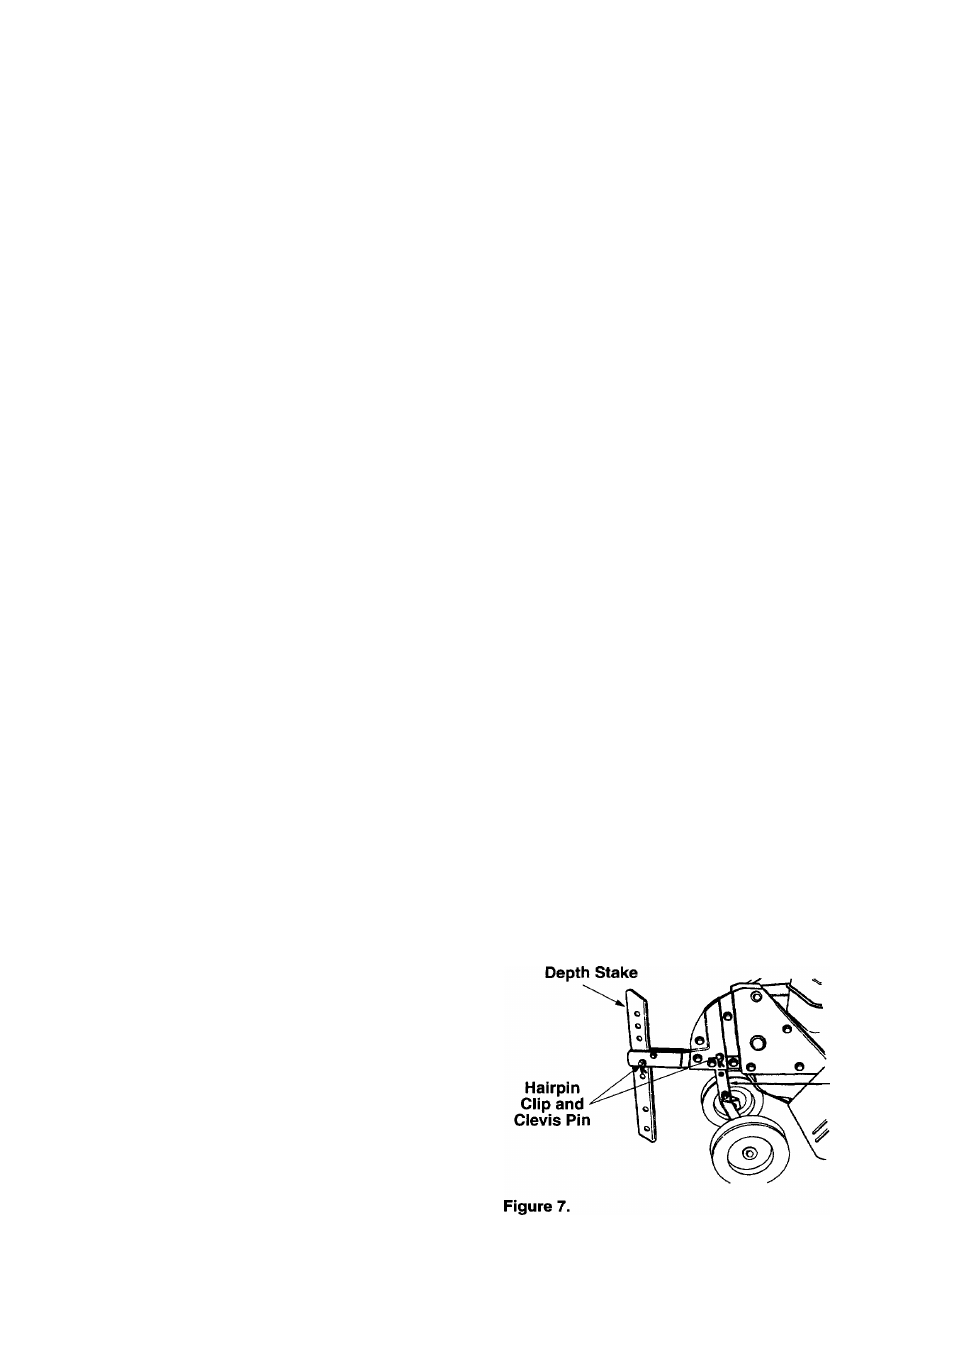
DEPTH STAKE
The depth stake controls the tilling depth. Refer to
"How to Use Your Tiller" section on page 6.
(DPERATION
GAS AND OIL FILL-UP
Service the engine with gasoline and oil as instructed
in the separate engine manual packed with your tiller.
Read instructions carefully.
NOTE:
Your tiller is shipped without oil; however, a
small amount of oil may be present from the fe ctory.
TO START ENGINE
A
WARNING: BE SURE NO ONE IS STAND
ING IN FRONT OFTHE TILLER WHILE THE
ENGINE IS RUNNING OR BEING
STARTED.
1. Attach spark plug wire to spark plug. Mako certain
the metal loop on the end of the spark p ug wire
(inside the boot) is fastened securely over the
metal tip on the spark plug.
2. Make certain all controls are in the neutral position
(released). (See Figure 5)
3. Place the throttle control lever in FAST position.
(See Figure 6)
4. Move choke lever to CHOKE position. (\ warm
engine requires little or no choke.)
5. Grasp starter handle (See Figure 6) and pull rope
out slowly until engine reaches start of compres
sion cycle (rope will pull slightly harder at this
point). Let the rope rewind slowly.
6. Pull rope with a rapid, continuous, full arn stroke.
Keep a firm grip on starter handle. Let rop(! rewind
slowly. Do not let starter handle snap back against
starter.
7. Repeat preceding instructions 5 and 6 unti engine
starts. When engine starts, move choke ever on
engine halfway between CHOKE and RUh .
8. Move throttle control to IDLE position fcr a few
minutes warm-up. Move choke lever to RL N posi
tion as engine warms up.
TO STOP ENGINE
1. Move throttle control lever to OFF position.
2. Disconnect spark plug wire from spark plug and
ground against the engine to prevent accidental
starting while equipment is unattended.
HOW TO USE YOUR TILLER
Your tiller is a precision built machine designed for
seed bed preparation, cultivating, furrowing and
mulching. It is engineered to minimize the hardest
work in the vegetable or flower garden, to till the soil
for planting and cultivating, and to perform many other
useful labor saving tasks in the garden. With the
proper amount of care and maintenance, this machine
will provide the owner with many years of service.
WHEEL POSITION
The tiller is shipped with the wheels adjusted such that
the unit sits level. While tilling, as the tines enter the
ground and the front of the tiller lowers, the wheels
must be raised to level the unit, which is essential for
proper engine operation. This adjustment is made by
removing the clevis pin and hairpin clip from wheel
yoke, raising the wheels to the desired height, and
replacing the clevis pin and hairpin clip. (See Figure 7)
Wheel
Yoke