Reverse drive belt removal and installation, Warning – Troy-Bilt REAR-TINE TILLER 675B User Manual
Page 22
Attention! The text in this document has been recognized automatically. To view the original document, you can use the "Original mode".
A
WARNING:
Before inspecting, cleaning or servicing the machine, shut off engine, wait for ail
moving parts to come to a complete stop, disconnect spark plug wire and move wire away from
spark plug. Failure to follow these instructions can result in serious personal injury or property
damage.
3. Slip the forward drive belt down and
over the front of the transmission pulley
(C, Figure 5-16). NOTE: For additional
working room, loosen the reverse belt
guide (V, Figure 5-12) and twist it out of
the way.
4. Put the lower half of the belt into the
High speed groove (middle groove) or the
Low speed groove (rearmost groove) of
the transmission pulley (C, Figure 5-16).
5. Put the upper half of the belt in the High
speed groove (groove closest to engine) or
the Low speed groove (rearmost groove)
of the engine forward drive pulley (D, Fig
ure 5-16).
IMPORTANT:
Make sure that the forward
drive belt is to the inside of the wire belt
guide (I, Figure 5-12) and the forward idler
pulley (J).
6. If you loosened the belt guide, wait until
the reverse drive belt Is Installed before se
curing the belt guide.
7. Install the reverse drive belt.
8. Install the belt cover and secure it with
the two nuts.
9. If you installed a new belt, check the ten
sion after two hours of operation
r).
Reverse Drive Belt Removal
and Installation
NOTE: The forward drive belt must be in
stalled before installing the reverse drive
belt.
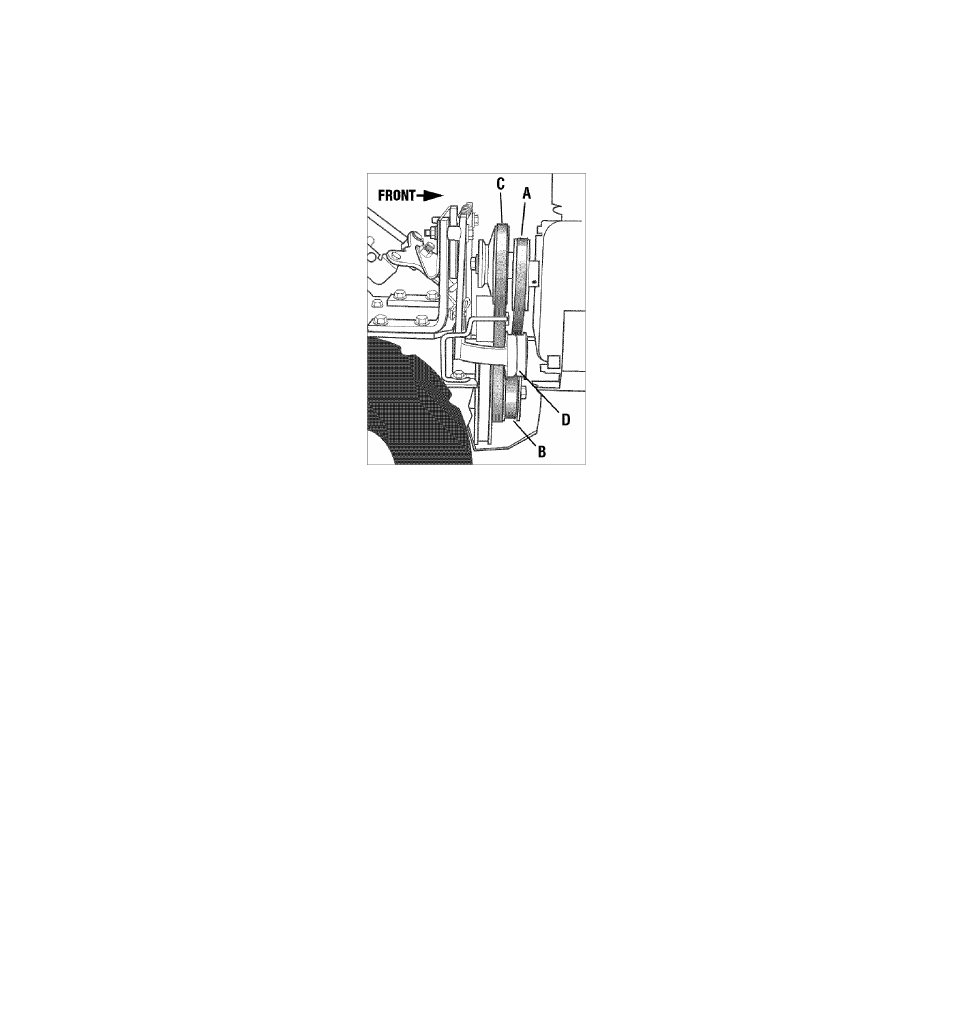
Figure 5-18: Removmg and installing reverse
belt.
A. Removing the Reverse Drive Belt:
1. Stop the engine and allow it to cool be
fore working near the belts. Be sure the
spark plug wire is disconnected and on
electric start models the ignition key is re
moved.
2. Remove the belt cover by removing the
two nuts. For easier access to the trans
mission (lower) pulley, remove the trans
mission cover located below the trans
mission pulley.
3. Slip the reverse belt off the engine re
verse pulley (A, Figure 5-18). If necessary,
work the belt off the pulley with your left
hand while pulling the engine recoil starter
rope with your right hand.
4. Push the upper half of the reverse belt
downward to create slack in the belt. Then
reach underneath the transmission and
slip the belt off the front of the transmis
sion pulley (B. Figure 5-18).
5. Pull the belt up and past the engine re
verse pulley (A. Figure 5-18).
B. Installing the Reverse Drive Belt:
1. Slip the reverse belt down between the
engine reverse pulley (A, Figure 5-18) and
the engine forward drive pulley (C).
2. Loop the bottom half of the belt over the
front of the transmission pulley (B, Figure
5-18) and seat the belt in the front groove
of the pulley.
3. Place the belt to the inside of the reverse
idler pulley (D, Figure 5-18) and the re
verse belt guide (V, Figure 5-12). Then slip
the upper end into the groove of the engine
reverse pulley (A, Figure 5-18).
4. If the reverse belt guide (V, Figure 5-12)
was loosened previously, center the belt
guide on the belt and tighten the mounting
screw securely.
5. Install the belt cover and secure it with
the two nuts. If the lower transmission
cover was removed, reinstall it with the
four self-tapping screws.
22