SINGER W117 User Manual
Page 19
Attention! The text in this document has been recognized automatically. To view the original document, you can use the "Original mode".
2. Wrong Needle being used:
,
Be sure you are using the correct needle for this machine.
3. Needle incorrectly set—too low:
- See instructions elsewhere in this book on how to prop,
erly set needle and follow instructions carefully.
Needle Rubs on Presser Foot:
Adjust foot as described “Needle rubs on Presser Foot"
under “Skips Stitches”.
Needle not firmly set:
After being certain needle is properly set be sure it is
held tight by needle clamp screw—use a screw driver.
4.
5.
' '-i
2.
---■i
1/
%
1.
-'
■
2.
3.
If Puckers On Ordinary Material
The trouble may be caused by—
1. Tensions NOT in balance:
Reduce the'tension on upper thread by- moving indicator
towards No. 1. Do some testing. If this fails, examine
lower tension on bobbin case for proper adjustment and
proceed to balance the tensions. See instructions else
where in this book on tension adjustment.
Blunt
Needle—Replace with a new straight needle—ex
amine needle point.
The trouble may be caused by—
Both tensions may be too tight:
^
Adjust upper and lower tensions—must be in balance.
For chiffon and other very light materials, best results
are obtained with upper tension set at % and the lower
tension in balance with that. However, sufficient tension
must be maintained to raise the small auxiliary spring
(No. 4 in Fig. 3) when machine is in operation.
Presser foot loose in holder:
Tighten knurled thumb screw.
Blunt Needle:
Replace with new straight needle—examine needle point.
Thirty-four
1
.
2
.
Needle Plate:
1, in
this plate might be slightly bent down. N.
hole might be rough from needle striking it
eifhir
«.se a new needle plate is required.
Loose
Stitching
The trouble may be caused by—
Tension too loose—either top, bottom
or
both:
gee
instruction.-» elsewhere on tension adjustment
balance.
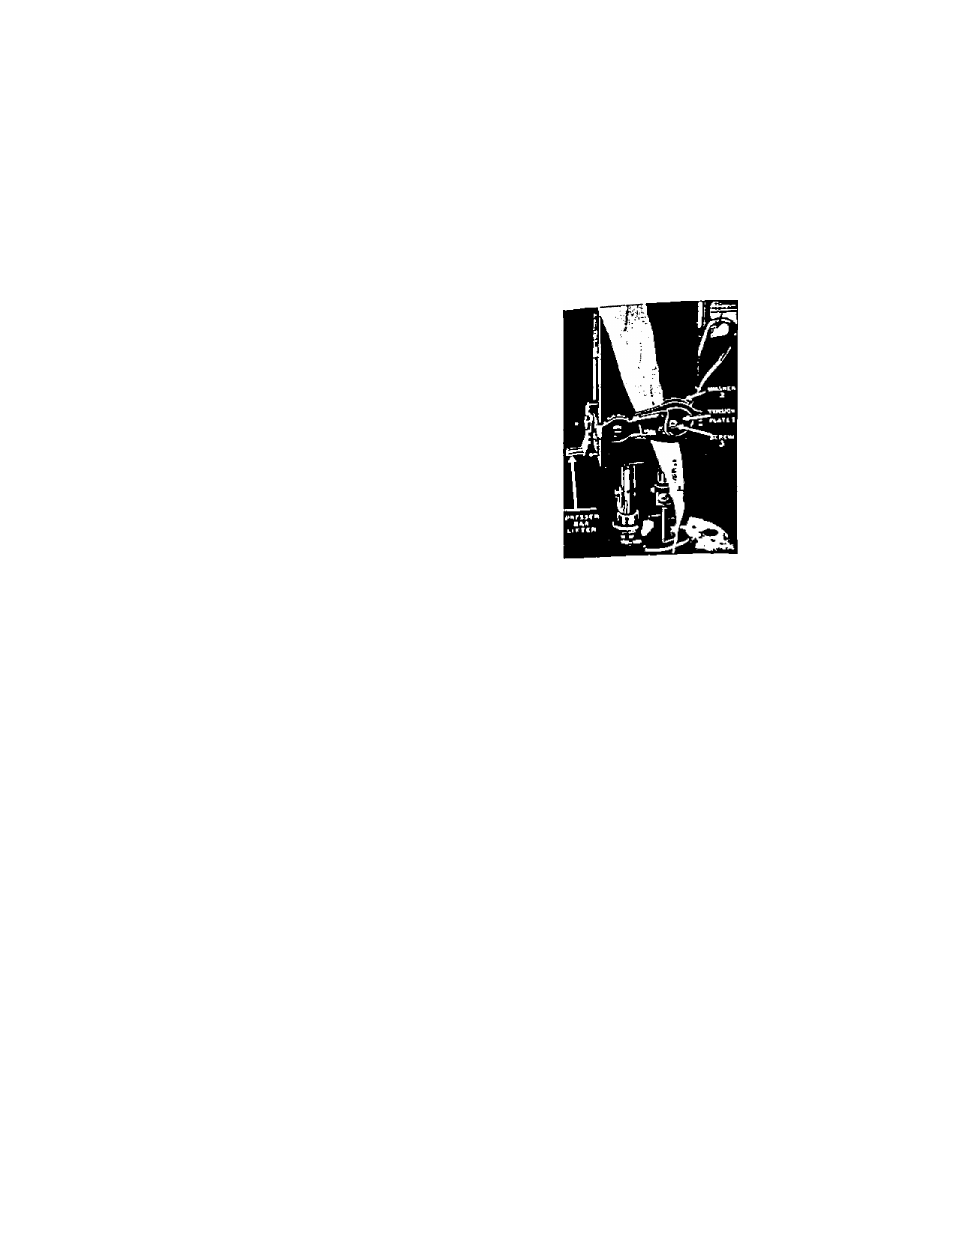
Upper Tension fails to Operate Satisfactorily:
T int or stray threads lodged between tension plate Nc
n ¡L the presser foot lifter (see illustration). Set
fension regulator at figure No. 1, next cut a piece of 1
_ cloth to a point and di
this strip of cloth thrm
and under tension pi
No. 1 and close to sci
No. 3 on the side from »
as shown in illustrati
This cloth should be dra
down through tension ph
No. 1 and washer No. 2 i
shown in illustration), t
can be accomplished
holding tension plate (T
1) and washer (No.
apart with a small sen
driver. Be careful to dri
the cloth between pis
No. 1 and washer No.
When you have this do
in place, drop the press
bar lifter, move the te
sion regulator toward N
8 and pull the cloth up ai
down a few times which will remove any bits of thread i
lint from between tension plate No. 1 and washer No.
Thirty-five