Zigzag stitch sewing, 1) zigzag width control, 2) needle position control – SINGER W1710 User Manual
Page 16: 3) thread tension for zigzag stitch
Attention! The text in this document has been recognized automatically. To view the original document, you can use the "Original mode".
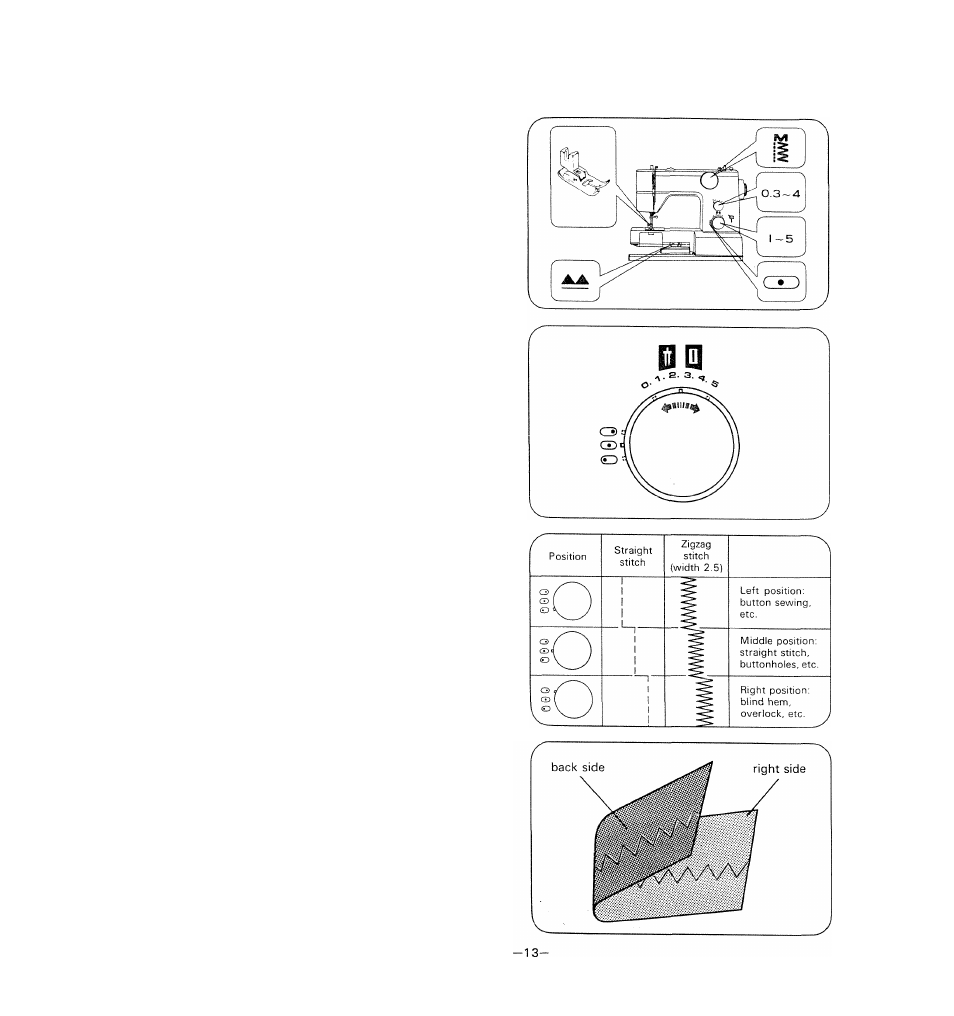
5. ZIGZAG STITCH SEWING
Set machine as shown.
To prevent seam ends unravelling, set machine
for straight stitch and sew in reverse at
beginning and ending of seam.
(1) Zigzag width control
Set control at required number.
Larger the number, wider the stitch.
Set it at 0 for straight sewing.
Make sure needle is in upper position when you
set control.
(2) Needle position control
Needle position can be changed by turning
needle position control.
When selecting position, make sure needle is
in upper position to avoid tearing material or
bending needle.
(3) Thread tension for zigzag stitch
Better-looking zigzag stitching requires less
upper tension than straight stitching.
Loosen upper tension slightly.
- 401A (116 pages)
- Simple 3116 (94 pages)
- 1507 (88 pages)
- 1507WC (88 pages)
- 112W140 (32 pages)
- 147-2 (30 pages)
- 114-33 (43 pages)
- 119-3 (23 pages)
- 14K1 (10 pages)
- 147-104 (34 pages)
- 116-1 (20 pages)
- 115-2 (38 pages)
- 14U286 (40 pages)
- 14U286B (21 pages)
- 114-4 (29 pages)
- 142W25 (10 pages)
- 147-81 (28 pages)
- 118 (16 pages)
- 136W105 (22 pages)
- 114-41 (20 pages)
- 147-4 (28 pages)
- 105-3 (30 pages)
- 1027 (36 pages)
- 147-26 (37 pages)
- 12W208 (25 pages)
- 128-4 (25 pages)
- 109-320 (14 pages)
- CP17 (47 pages)
- 147-6 (56 pages)
- 132B26 (9 pages)
- 114-2 (36 pages)
- 1371A3 (86 pages)
- 14CG754 (53 pages)
- 147-50 (39 pages)
- 14T967DC (3 pages)
- 109-520 (13 pages)
- 14SH654 ULTRALOCK (48 pages)
- 147-86 (30 pages)
- 105-20 (23 pages)
- W303 (13 pages)
- 147-38 (53 pages)
- 114-22 (45 pages)
- 1375A1 (33 pages)
- 107-2 (31 pages)
- 1200A (4 pages)