First-time operation, Unpack tv and accessories, Install batteries in remote control – Sears 274.4392839 User Manual
Page 3: Connect antenna or cable-tv system, Attach power cord, Autoprogram the tv’s channel memory, Getting started
Attention! The text in this document has been recognized automatically. To view the original document, you can use the "Original mode".
Getting Started
First-Time Operation
The steps below will help you get your TV connected and
working quickly. The page numbers on which you can
find detailed instructions for each of these steps are also
listed for your convenience.
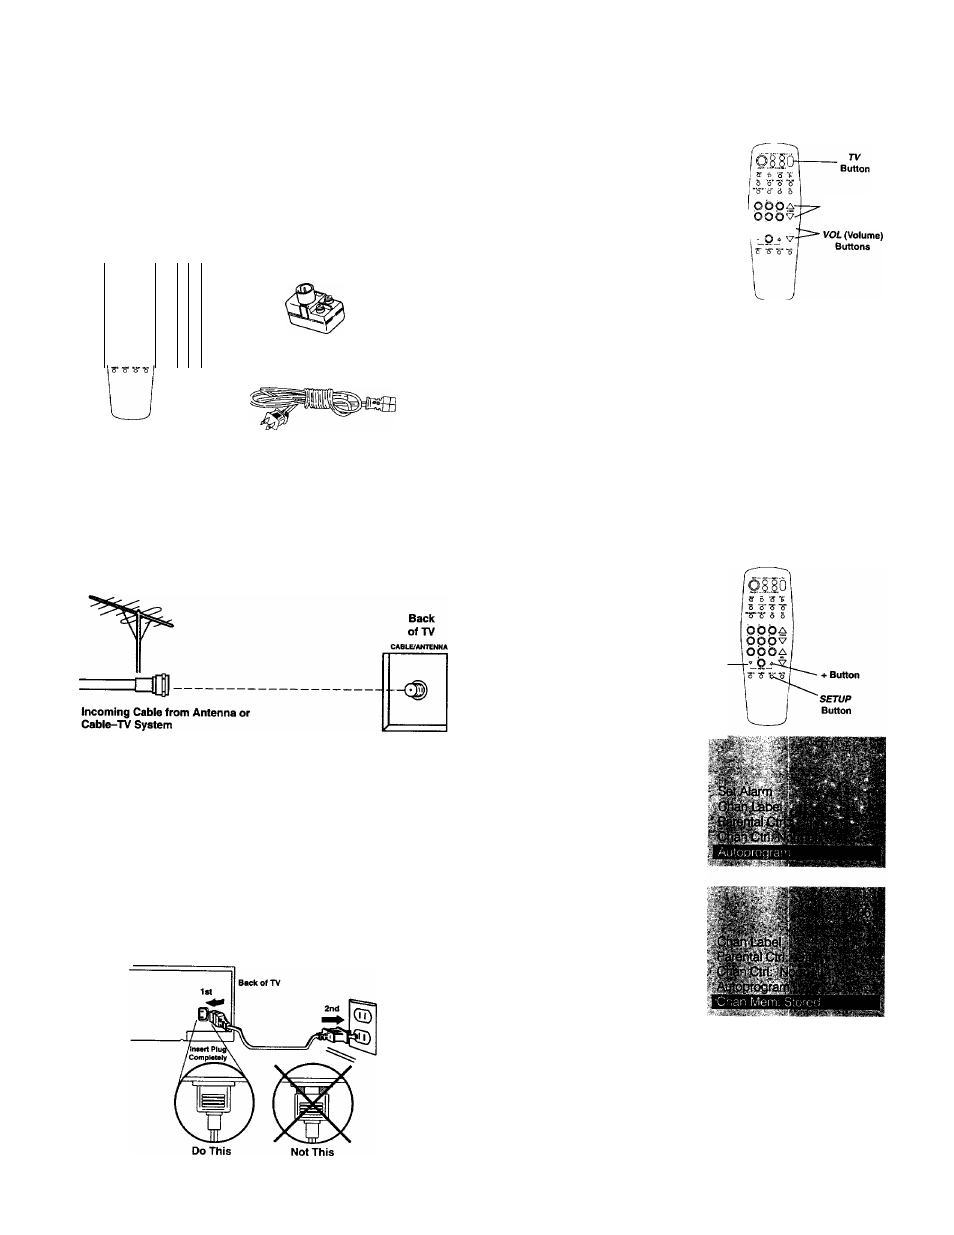
1. Unpack TV and accessories.
Shown here are the accessories that came packed with your TV.
fSMO
V è s
I
+
S o 'S“ “o
3 o
s
1
ci;
Ö 0 0 A
O O O v
T
+
O 0 0 A
V Ö i V
+
1
Antenna Adapter
Remote Control and
Four AAA Batteries
Power Cord
2. Install batteries in remote control.
Details are on page 6.
3. Connect antenna or cable-TV system.
Most antenna or cable-TV systems can be connected as
shown here.
• Details for connecting a home antenna to your TV
are on page 20.
• Details for connecting a cable-TV system to your TV
are on page 21.
• Details for connecting a VCR to your TV are on
pages 27-28.
4. Attach power cord.
First attach the flat end of the power cord completely into the
connector on the back of your TV, and then plug the other
end into a wall outlet.
5. T\irn on TV, adjust the volume, and select a channel.
• Press the TV button on the
remote to turn on the TV.
When using the remote,
remember to point it at the
front of the TV.
Buttons
jobòA-
CHAA/(Channel)
Buttons
• Press the VOLUME up or
down button to adjust the
volume to a desired level.
• Press the CHANNEL up or down button to select the next
channel in memory. You can also press two number buttons
to select a channel. To select a 3-digit cable channel (up to
channel 128), press and hold number button 1 until 1—
appears on the screen. Then press the other two numbers.
Channels 2-13 were programmed into the channel memory
for you at the factory, so pressing CHANNEL up or down
stops at these channels only. When you start the
autoprogramming feature (described in step 6), your set will
automatically scan through all channels and place only the
active channels for your area into its channel memory.
• Details about using the remote are on page 6.
6. AutoProgram the
TV’s channel memory.
To start the TV
autoprogramming itself,
press the SETUP button
repeatedly to select
(highlight) the
-Button
AUTOPROGRAM
function, and then press -i-.
Details are on page 16.
You can also add and erase
channels from memory as
desired by first pressing
SETUP
to select (highlight) the
CHAN MEM
function.
Select the desired channel
number by pressing the
CHANNEL
up or down button
or by pressing the twg
corresponding number buttons.
Then press -r to add a channel,
or press - to erase a channel.
Details are on page 16.
l
06-.
; ; ■
Chan Labe
Parental CM Off
Chan Ctrl Normal
Autoprogram -