Sears 486.244062 User Manual
Page 5
Attention! The text in this document has been recognized automatically. To view the original document, you can use the "Original mode".
2.
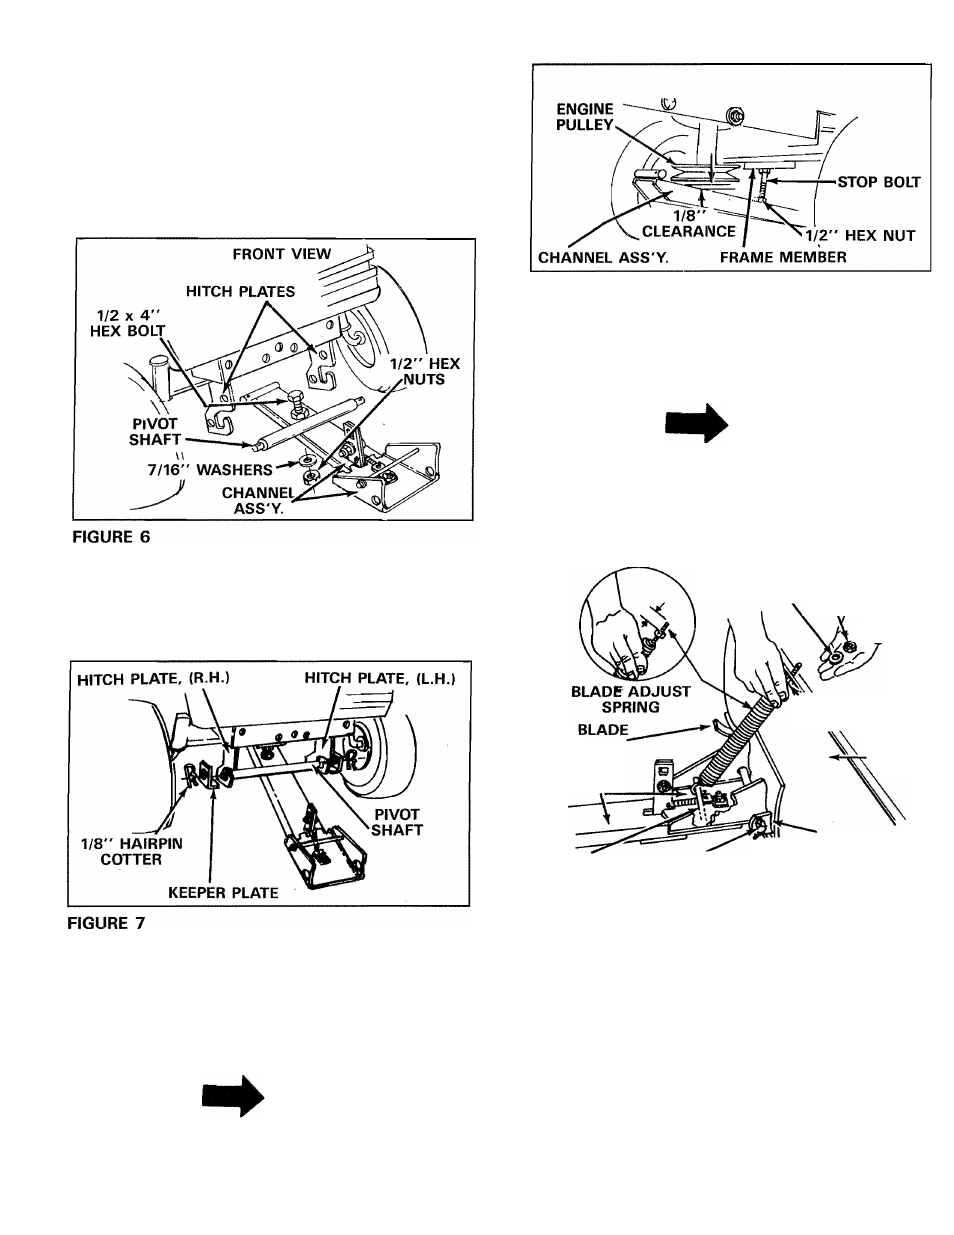
Assemble one 1/2" x 4" hex bolt, one 1/2"
hex nut and one 7/16" standard washer into
top of slotted hole in channel assembly. Assem
ble one 7/16" standard washer and one 7/16"
hex nut on bottom of 1/2" bolt under channel
assembly. See figure 6. DO NOT TIGHTEN AT
THIS TIME.
Assemble channel assembly to hitch plates at
front of tractor as shown in figures 6 and 7.
3. Assemble keeper plates over each end of pivot
shaft with lip under hitch plates (see figure 7)
and
secure
with
two
1/8"
(large)
hairpin
cotters through small holes near each end of
shaft.
4.
Adjust
1/2"
X
4"
stop
bolt,
previously
assembled into channel assembly (step 1). See
figure 8. Adjust hex nuts, above and below
channel
to
provide
approximately
1
/
8
"
clearance
between
channel
and
the
tractor
engine pulley with the stop bolt positioned
against frame member. See figure 8.
NOTE
The stop bolt must be tightened in
place
before
assembling
blade
assembly to channel.
FIGURE 8
5. Assemble blade assembly to channel assembly
by aligning holes in pivot plate with holes in
reinforcement plate and inserting pivot shaft.
See figure 9. Secure by assembling two 1/8"
X
1-1/4" cotter pins into small holes near ends of
pivot shaft. Spread ends to retain.
NOTE
Blade shoes are factory assembled to
blade assembly in lower setting. See
adjustments step "C" page 10 for
repositioning.
SHOE
CHANNEL
ASSY.
SPRING
MOUNT ROD
PIVOT
SHAFT
(TOP)
5/16" HEX NUT
V
PLASTIC
5/16" WASHER \ ^
Ju
5/16" HEX NUT
(BOTTOM)
BLADE
ASS'Y.
RIGHT HAND
\
BRACKET
1/8"
X
1-i/4"
COTTER PIN
FIGURE 9
6
.
To assemble blade adjust spring, remove plastic
cap, 5/16" flat washer and one 5/16" hex nut.
Adjust the remaining 5/16" hex nut on the long
bolt to approximately one inch down from end
of bolt threads. Assemble adjusting bolt through
hole in top edge of blade and hold in place with
5/16" flat washer and 5/16" hex nut removed
earlier. Do not tighten 5/16" hex nut at this time.
Push down on the spring and hook end of spring
over spring mount rod as shown in figure 9.
Tighten 5/16" hex nut on top edge of blade
down
against
the
bottom
5/16"
hex
nut.
Replace plastic cap over end of adjusting bolt
threads. See figure 9.