Important assembly update – Sears 831.28742 User Manual
Page 13
Attention! The text in this document has been recognized automatically. To view the original document, you can use the "Original mode".
IMPORTANT ASSEMBLY UPDATE
Pleaae rater
to
assembly «tops 3 and
7
on pages 4 and
5
Gf
the USER’S MANUAL.
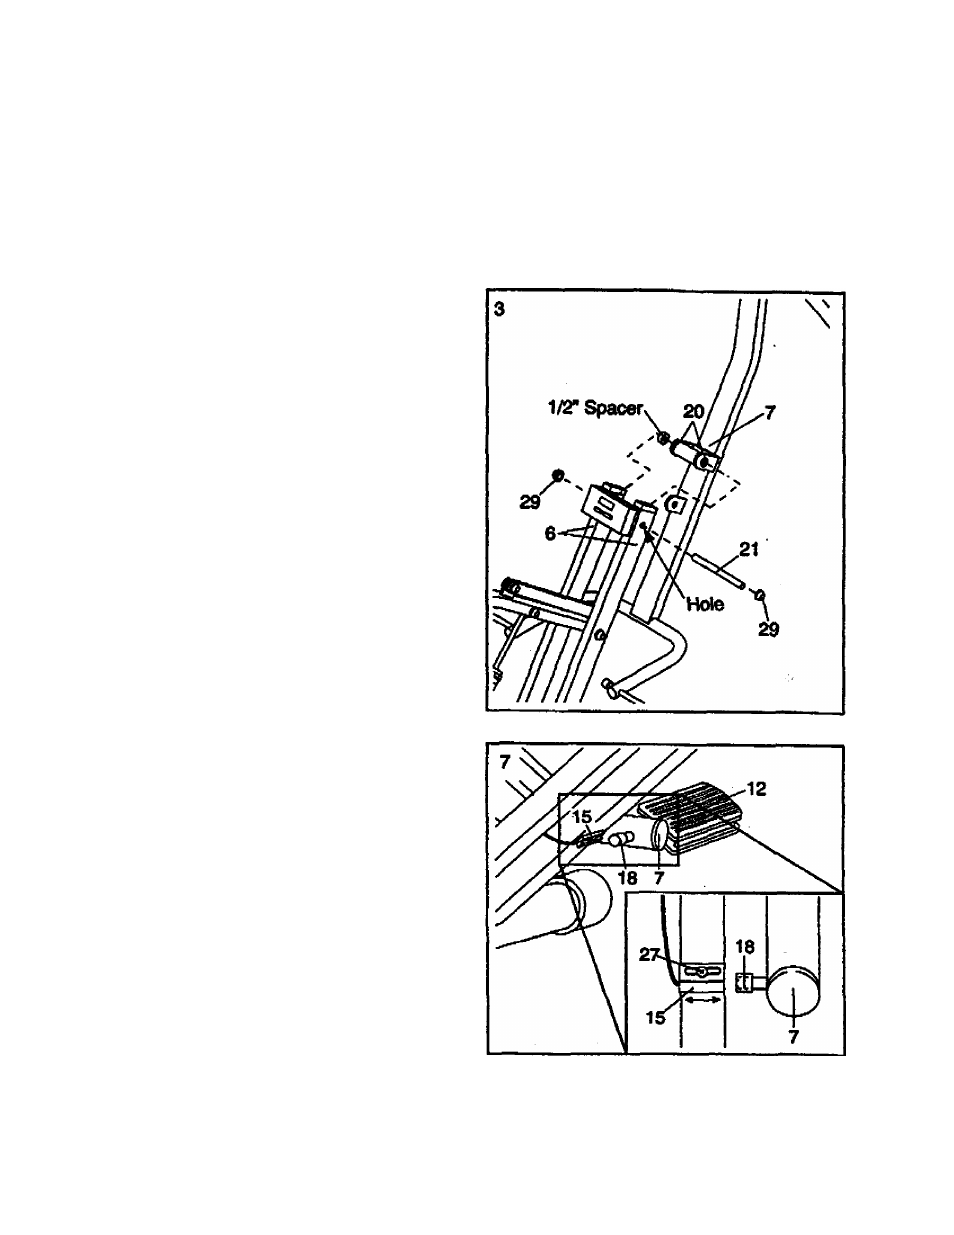
Replace assembly stops 3 and 7 with the steps shown below.
IMPORTANT^ Belbra assembling the 1/2” Dome Caps (29), be sura that all parts
are positioned as shown in the drawings. The Dome Caps can be used only
onee; if they must be removed, it will be necessary to order new Dome Caps.
3. Tap a 1/2* Dome Cap onto one
end of the 6* Pivot Rod (21). Insert
the end of the Pivot Rod into the
indicated hole in №e Frame (6).
Make sure there are two 1/2T Pivot
Bushings (20) in the indicated
bracket on the Pedal Frame (7). Hold
the Pedal Frame so the bracket is
between the holes in the Frame (6).
Insert the 6” Pivot Rod (21) through
the bracket Hold a 1/2* spacer
between the bracket and the Frame.
Insert the Pivot Rod through the
spacer and the Frame. Tap a
VT
Dome Cap (29) onto the end of ttie
Pivot Rod.
Note: The part number of the 1/2*
spacer is 109374.
7. Before using the CARDIO FORCE,
check the Reed Svdtch (15) and the
Magnet (18) near the right PedaJ
(12). Pivot the Pedal Frame (7) until
the Magnet is aligned with the Reed
Switch (see the inset drawing).
Loosen the indicated #8 x 3/4*
Screw (27). Adjust the position of toe
Reed Switch so that toere is a 1/8”
gap between toe Magnet and toe
Re^ Switcto. Reti^iten toe Screw.
Make sure that all parts of the CAR
DIO FORCE are property tightened.
Part No. 127795 R109^ 01995 Sears, Roebuck and Co.