Engine care, Maintenance – Winco WL18000VE/N User Manual
Page 11
11
3110-00
60706-39
ENGINE CARE
If major engine service or repair is required, contact
an authorized engine service center. The manufac-
turer of these engines has established an excellent
world-wide engine service organization. Engine ser-
vice is very likely available from a nearby authorized
dealer or distributor. Check the yellow pages of your
local telephone directory under “Engines-Gasoline”
for the closest engine repair center or ask the dealer
from whom you purchased the power plant.
1.
Change the oil after the first 5 hours of operation
and yearly or 100 hours thereafter under normal op-
erating conditions. Change engine oil every 50 hours
of operation if the engine is operated under heavy
load, or in high ambient temperatures.
a. Start the engine and warm it up, stop the engine
and remove the spark plug wire to prevent it
from accidently being started.
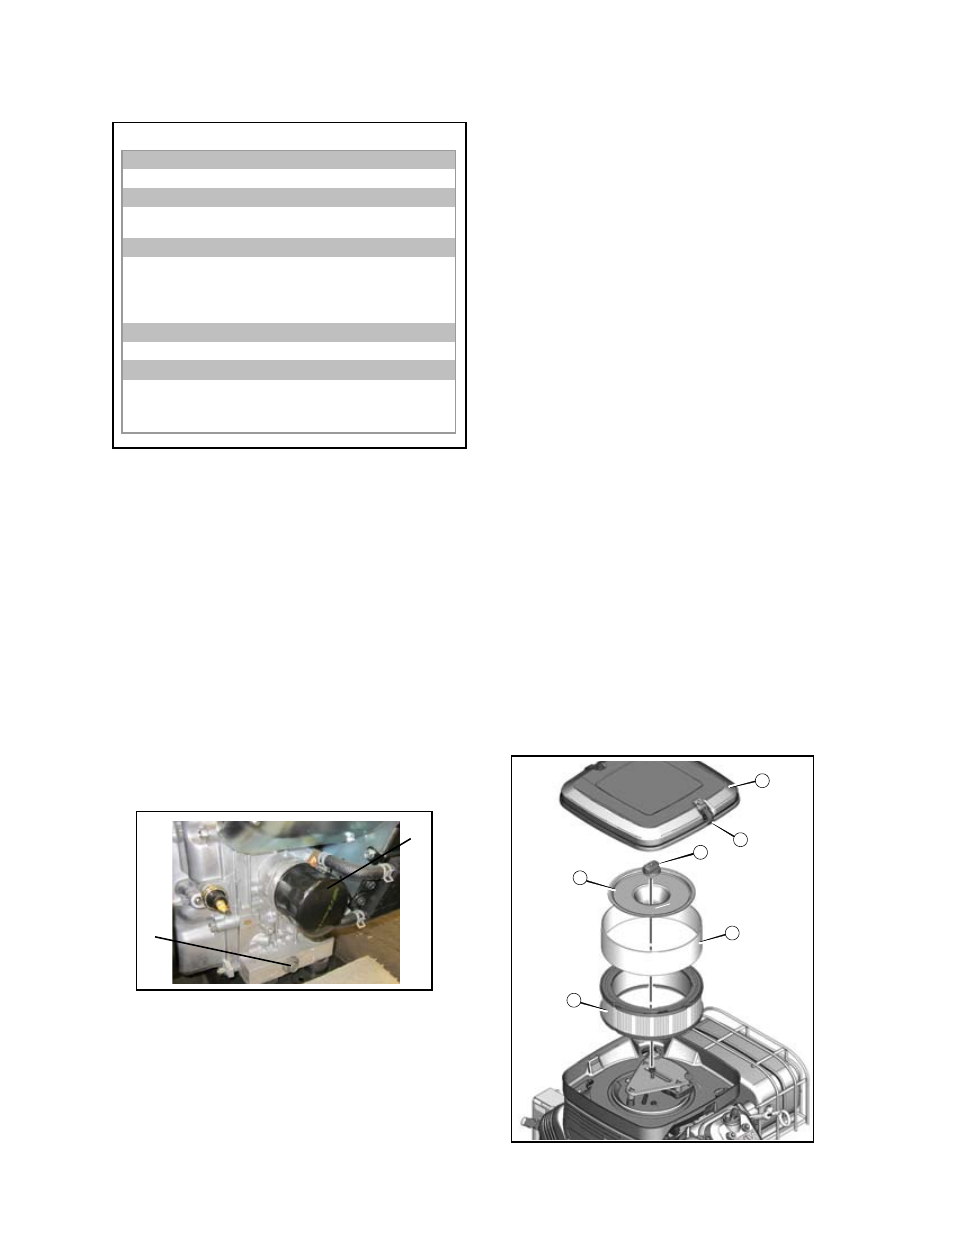
b. Remove oil drain plug at base of the engine
(Ref “B”) and drain the oil into an approved
container.
c. Remove the oil filter (Ref “C”) and dispose of it
properly.
d. Before you install the new oil filter, lightly lubri-
cate the oil filter gasket with fresh clean oil.
e. Install the oil filter by hand until the gasket
contacts the oil filter adapter, then tighten the oil
filter 1/2 to 3/4 turns.
f. Replace oil drain plug.
g. Remove oil filler plug and refill with new oil.
Refer to the table on page 5 for the proper
grade of oil based on your operating
temperature.
NOTE: This engine requires 78 to 80 ounces of oil
if it is completely drained. Use caution when refilling
the engine as some residual oil may have remained
in the engine. Always use the dipstick when filling
the engine with oil to prevent overfilling.
h. Replace filler plug.
I. Start the engine and warm it up.
J. After warming up the engine, recheck the oil
level and refill as necessary to bring it to the
proper level. See page 5 for proper oil level.
.
Checking the Oil Level: The oil level must al-
ways be checked before the engine is started. Take
care to remove any dirt or debris from around the
oil fill plug before removing. Be sure the oil level is
maintained. Fill to the “
FULL” mark on the dipstick.
3.
Dual Element Air Filter: Clean and/or replace
foam pre-cleaner and air filter annually or every 100
hours. Service more often under dusty conditions.
WARNING: EQUIPMENT DAMAGE
Never start or run the engine with the air filter re-
moved
a. Loosen snaps (Ref “A”) and remove cover.
Ref “B”
8
VanguardEngines.com
WARNING
Fuel and its vapors are extremely flammable and explosive.
Fire or explosion can cause severe burns or death.
When Starting Engine
x
Ensure that spark plug, muffler, fuel cap and air cleaner (if equipped) are in
place and secured.
x
Do not crank engine with spark plug removed.
x
If engine floods, set choke (if equipped) to OPEN/RUN position, move throttle
(if equipped) to FAST position and crank until engine starts.
Engines give off carbon monoxide, an odorless, colorless, poison gas.
Breathing carbon monoxide can cause nausea, fainting or death.
WARNING
x
Start and run engine outdoors.
x
Do not start or run engine in enclosed area, even if doors or windows are open.
NOTICE: This engine was shipped from Briggs & Stratton without oil. Before you start
the engine, make sure you add oil according to the instructions in this manual. If you
start the engine without oil, it will be damaged beyond repair and will not be covered
under warranty.
Note: Some engines and equipment have remote controls. See the equipment manual
for location and operation of remote controls.
1. Check the oil level. See the How To Check/Add Oil section.
2. Make sure equipment drive controls, if equipped, are disengaged.
3. Turn the fuel shut-off valve (A), if equipped, to the on position (Figure 4).
4. Push the stop switch (F), if equipped, to the on position.
5. Move the throttle control (B) to the fast
position. Operate the engine in the fast
position.
6. Move the choke control (C) to the choke
position.
Note: Choke is usually unnecessary when restarting a warm engine.
7. Rewind Start: Turn the key switch (D), if equipped, to the run position.
8. Rewind Start: Firmly hold the starter cord handle (E). Pull the starter cord handle
slowly until resistance is felt, then pull rapidly.
Note: If the engine does not start after repeated attempts, go to
VanguardEngines.com or call 1-800-999-9333 (in USA).
WARNING:
Rapid retraction of the starter cord (kickback) will pull your
hand and arm toward the engine faster than you can let go. Broken bones, fractures,
bruises or sprains could result. When starting engine, pull the starter cord slowly until
resistance is felt and then pull rapidly to avoid kickback.
9. Electric Start: Turn the electric start switch (D) to the on/start position.
Note: If the engine does not start after repeated attempts, go to
VanguardEngines.com or call 1-800-999-9333 (in USA).
NOTICE: To extend the life of the starter, use short starting cycles (five seconds
maximum). Wait one minute between starting cycles.
10. As the engine warms up, move the choke control (C) to the run
position.
How To Stop The Engine - Figure 4
WARNING
Fuel and its vapors are extremely flammable and explosive.
Fire or explosion can cause severe burns or death.
x
Do not choke the carburetor to stop engine.
1. With the throttle control (B) in the slow
position, turn the key switch (D) to the
off position (Figure 4). Remove the key and keep in a safe place out of the reach of
children.
2. Push the stop switch (F) to the off position.
3. After the engine stops, turn the fuel shut-off valve (A), if equipped, to the closed
position.
Maintenance
We recommend that you see any Briggs & Stratton Authorized Dealer for all
maintenance and service of the engine and engine parts.
NOTICE: All the components used to build this engine must remain in place for proper
operation.
WARNING:
When performing maintenance that requires the unit to be
tipped, the fuel tank must be empty or fuel can leak out and result in a fire or
explosion.
Emissions Control
Maintenance, replacement, or repair of the emissions control devices and systems
may be performed by any non-road engine repair establishment or individual.
However, to obtain “no charge” emissions control service, the work must be performed
by a factory authorized dealer. See the Emissions Warranty.
Unintentional sparking can result in fire or electric shock.
Unintentional start-up can result in entanglement, traumatic
amputation, or laceration.
Fire hazard
WARNING
Before performing adjustments or repairs:
x
Disconnect the spark plug wire and keep it away from the spark plug.
x
Disconnect battery at negative terminal (only engines with electric start.)
x
Use only correct tools.
x
Do not tamper with governor spring, links or other parts to increase engine
speed.
x
Replacement parts must be of the same design and installed in the same
position as the original parts. Other parts may not perform as well, may damage
the unit, and may result in injury.
x
Do not strike the flywheel with a hammer or hard object because the flywheel
may later shatter during operation.
When testing for spark:
x
Use approved spark plug tester.
x
Do not check for spark with spark plug removed.
Maintenance Chart
First 5 Hours
x
Change oil
Every 8 Hours or Daily
x
Check engine oil level
x
Clean area around muffler and controls
Every 100 Hours or Annually
x
Clean or change air filter *
x
Clean pre-cleaner (if equipped) *
x
Change engine oil and filter
x
Replace spark plug
x
Check muffler and spark arrester
Every 250 Hours or Annually
x
Check valve clearance. Adjust if necessary.
Every 400 Hours or Annually
x
Change air filter
x
Replace fuel filter
x
Clean air cooling system *
x
Clean oil cooler fins *
*
In dusty conditions or when airborne debris is present, clean more often.
Carburetor Adjustment
Never make adjustments to the carburetor. The carburetor was set at the factory to
operate efficiently under most conditions. However, if adjustments are required, see a
Briggs & Stratton Authorized Dealer for service.
NOTICE: The manufacturer of the equipment on which this engine is installed specifies
the top speed at which the engine will be operated. Do not exceed this speed.
4
VanguardEngines.com
E
D
A
8
F
D
C
9
C
B
10
A
B
B
C
D
11
A
B
F
E
D
G
12
C
B
C
D
E
G
F
C
B