Engine care – Winco WT3000H/C User Manual
Page 10
277-00
10
60706-24
ENGINE CARE
If major engine service or repair is required, contact
an authorized engine service center. The manufac-
turer of these engines has established an excellent
world-wide engine service organization. Engine ser-
vice is very likely available from a nearby authorized
dealer or distributor. Check the yellow pages of your
local telephone directory under “Engines-Gasoline”
for the closest engine repair center or ask the dealer
from whom you purchased the power plant.
1.
Change the oil after the first 20 hours of opera-
tion and yearly or 100 hours thereafter under normal
operating conditions. Change engine oil every 50
hours of operation if the engine is operated under
heavy load, or in high ambient temperatures.
a. Start the engine and warm it up, stop the engine
and remove the spark plug wire to prevent it
from accidently being started.
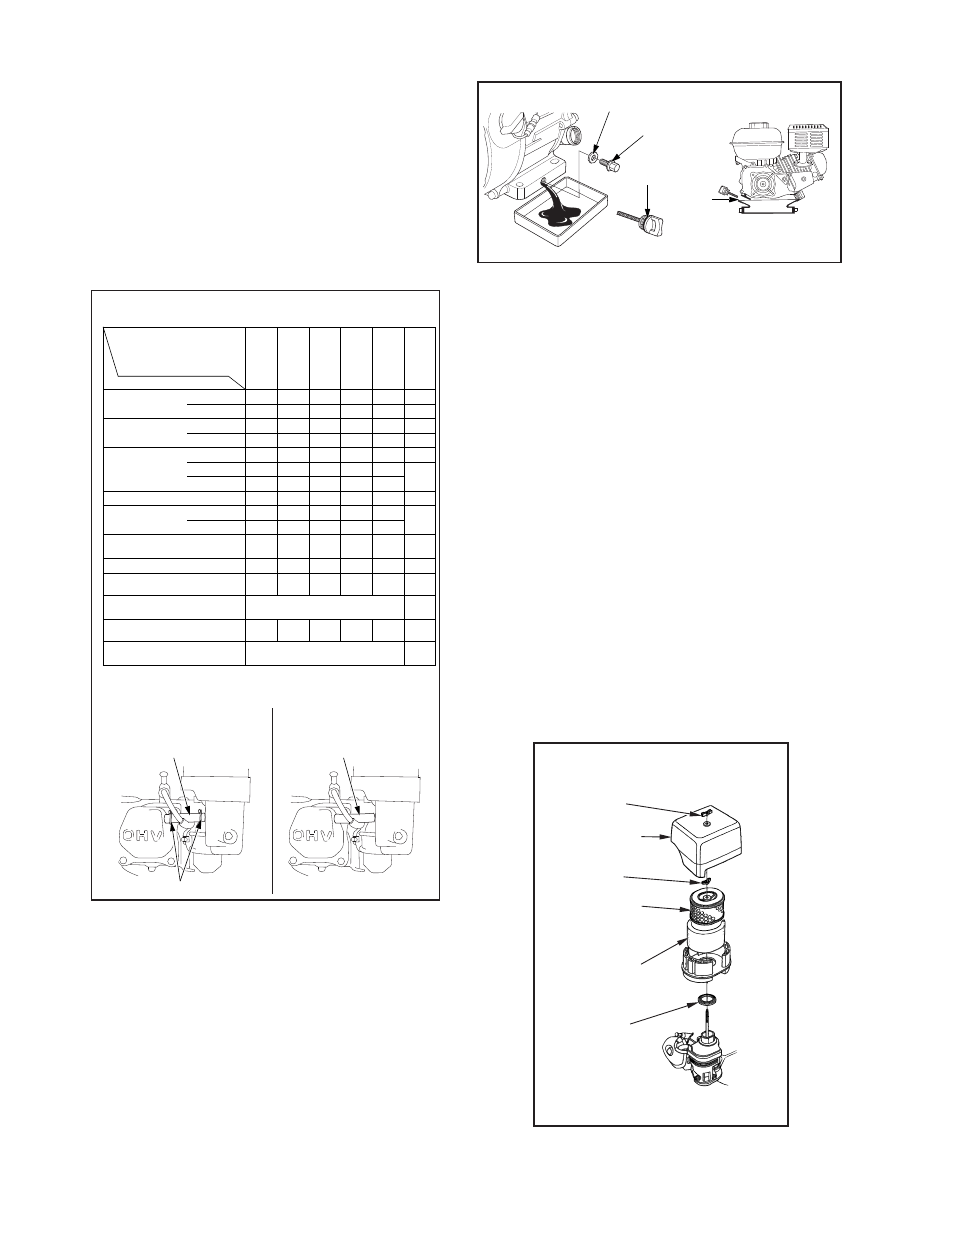
b. Remove oil drain bolt at base of the engine
and drain the oil into an approved container.
c. Replace oil drain bolt making sure the sealing
washer is in place..
d. With the engine in a level position, fill with new
oil. Refer to the table on page 5 for the proper
grade of oil.
NOTE: This engine requires .61 qts of oil if it is
completely drained. Use caution when refilling the
engine as some residual oil may have remained in
the engine. Always use the dipstick when filling the
engine with oil to prevent overfilling.
e. Replace filler plug.
f Start the engine and warm it up.
h. After warming up the engine, recheck the oil
level and refill as necessary to bring it to the
proper level.
2.
Checking the Oil Level: The oil level must al-
ways be checked before the engine is started. Take
care to remove any dirt or debris from around the
oil fill plug before removing. Be sure the oil level is
maintained. Fill to the “
FULL” mark on the dipstick.
.
Dual Element Air Filter: Clean and/or replace
foam pre-cleaner and air filter annually or every 100
hours. Service more often under dusty conditions.
ENGLISH
AIR CLEANER
Inspection
Cleaning
Dual-Filter-Element Types
Oil Change
LOWER LIMIT
GASKET
GASKET
TAB
GROOVE
PRECLEANER CAP
AIR CLEANER
COVER
PAPER FILTER
ELEMENT
FOAM FILTER
ELEMENT
WING NUT
STANDARD DUAL-FILTER-
ELEMENT TYPE
WING NUT
WING NUT
DRAIN PLUG
UPPER LIMIT
CYCLONE DUAL-FILTER-ELEMENT TYPE
AIR CLEANER COVER
WING NUT
PAPER FILTER ELEMENT
FOAM FILTER ELEMENT
AIR GUIDE
CYCLONE HOUSING
SPECIAL PAN SCREW (3)
OIL FILLER CAP/DIPSTICK
10
A dirty air cleaner will restrict air flow to the carburetor, reducing
engine performance. If you operate the engine in very dusty areas,
clean the air filter more often than specified in the MAINTENANCE
SCHEDULE.
Operating the engine without an air filter, or with a damaged air
filter, will allow dirt to enter the engine, causing rapid engine wear.
This type of damage is not covered by the
Distributor’s Limited
Warranty.
Refer to pages
for instructions that apply to the air cleaner
and filter for your engine type.
Remove the wing nut from
the air cleaner cover, and
remove the cover.
Remove the wing nut from
the air filter, and remove the
filter.
Remove the foam filter from
the paper filter.
Inspect both air filter
elements, and replace them if
they are damaged. Always
replace the paper air filter
element at the scheduled
interval (see page
).
Drain the used oil while the engine is warm. Warm oil drains
quickly and completely.
Place a suitable container below the reduction case to catch the
used oil, then remove the oil filler cap/dipstick, the drain plug
and washer.
Allow the used oil to drain completely, then reinstall the drain
plug and a new washer, and tighten it securely.
Please dispose of used motor oil in a manner that is compatible
with the environment. We suggest you take used oil in a sealed
container to your local recycling center or service station for
reclamation. Do not throw it in the trash or pour it on the ground
or down a drain.
Transmission oil capacity: 0.30 (0.32 US qt , 0.26 Imp qt)
Running the engine with a low transmission oil level can cause
transmission damage.
Screw in the oil filler cap/dipstick and tighten securely.
Remove the air cleaner cover and inspect the filter elements.
Clean or replace dirty filter elements. Always replace damaged
filter elements. If equipped with an oil-bath air cleaner, also check
the oil level.
With the engine in a level position, fill to the upper limit mark on
the dipstick with the recommended oil (see page
). To check
the oil level, insert and remove the dipstick without screwing it
into the filler hole.
1.
2.
4.
3.
3.
4.
9
1.
2.
10
11
7
ENGLISH
7
SERVICING YOUR ENGINE
THE IMPORTANCE OF MAINTENANCE
Good maintenance is essential for safe, economical, and
trouble-free operation. It will also help reduce pollution.
To help you properly care for your engine, the following pages
include a maintenance schedule, routine inspection procedures, and
simple maintenance procedures using basic hand tools. Other
service tasks that are more difficult, or require special tools, are
best handled by professionals and are normally performed by a
Honda technician or other qualified mechanic.
The maintenance schedule applies to normal operating conditions.
If you operate your engine under severe conditions, such as
sustained high-load or high-temperature operation, or use in
unusually wet or dusty conditions, consult your servicing dealer for
recommendations applicable to your individual needs and use.
Maintenance, replacement, or repair of the emission control
devices and systems may be performed by any engine repair
establishment or individual, using parts that are ‘‘certified’’ to EPA
standards.
MAINTENANCE SAFETY
Some of the most important safety precautions follow. However,
we cannot warn you of every conceivable hazard that can arise in
performing maintenance. Only you can decide whether or not you
should perform a given task.
SAFETY PRECAUTIONS
• Make sure the engine is off before you begin any maintenance or
repairs. To prevent accidental startup, disconnect the spark plug
cap. This will eliminate several potential hazards:
– Carbon monoxide poisoning from engine exhaust.
Operate outside, away from open windows or doors.
– Burns from hot parts.
Let the engine and exhaust system cool before touching.
– Injury from moving parts.
Do not run the engine unless instructed to do so.
• Read the instructions before you begin, and make sure you have
the tools and skills required.
• To reduce the possibility of fire or explosion, be careful when
working around gasoline. Use only a non-flammable solvent, not
gasoline, to clean parts. Keep cigarettes, sparks and flames away
from all fuel related parts.
Remember that an authorized Honda servicing dealer knows your
engine best and is fully equipped to maintain and repair it.
To ensure the best quality and reliability, use only new Honda
Genuine parts or their equivalents for repair and replacement.
Improper maintenance, or failure to correct a problem
before operation, can cause a malfunction in which
you can be seriously hurt or killed.
Always follow the inspection and maintenance
recommendations and schedules in this owner’s
manual.
Failure to properly follow maintenance instructions
and precautions can cause you to be seriously hurt or
killed.
Always follow the procedures and precautions in this
owner’s manual.
MAINTENANCE SCHEDULE
*
• Internal vent carburetor with dual element type only.
• Cyclone type every 6 months or 150 hours.
**
• Replace paper element type only.
• Cyclone type every 2 years or 600 hours.
(1) Service more frequently when used in dusty areas.
(2) These items should be serviced by your servicing dealer,
unless you have the proper tools and are mechanically
proficient. Refer to the Honda shop manual for service
procedures.
(3) For commercial use, log hours of operation to determine proper
maintenance intervals.
(4) In Europe and other countries where the machinery directive
2006/42/EC is enforced, this cleaning should be done by your
servicing dealer.
Failure to follow this maintenance schedule could result in
non-warrantable failures.
REGULAR SERVICE PERIOD (3)
Perform at every
indicated month or
operating hour interval,
whichever comes first.
ITEM
Each
Use
First
Month
or
20 Hrs
Every 3
Months
or
50 Hrs
Every 6
Months
or
100 Hrs
Every
Year
or
300 Hrs
Refer
to
Page
Engine oil
Check level
o
9
Change
o
o
9
Reduction case oil
(applicable types)
Check level
o
9–10
Change
o
o
10
Air cleaner
Check
o
10
Clean
o (1)
o *(1)
11–12
Replace
o **
Sediment cup
Clean
o
12
Spark plug
Check-adjust
o
12
Replace
o
Spark arrester
(applicable types)
Clean
o (4)
13
Idle speed
Check-adjust
o (2)
13
Valve clearance
Check-adjust
o (2)
Shop
manual
Combustion
chamber
Clean
After every 500 Hrs. (2)
Shop
manual
Fuel tank & filter
Clean
o (2)
Shop
manual
Fuel tube
Check
Every 2 years
(Replace if necessary) (2)
Shop
manual
BREATHER TUBE
INTERNAL VENT
CARBURETOR TYPE
BREATHER TUBE
STANDARD TYPE
TUBE CLIP
ENGLISH
9
Oil Level Check
Check the engine oil level with the engine stopped and in a level
position.
1. Remove the oil filler cap/dipstick and wipe it clean.
2. Insert the oil filler cap/dipstick into the oil filler neck as shown,
but do not screw it in, then remove it to check the oil level.
3. If the oil level is near or below the lower limit mark on the
dipstick, fill with the recommended oil (see page 8) to the upper
limit mark (bottom edge of the oil fill hole). Do not overfill.
4. Reinstall the oil filler cap/dipstick.
Running the engine with a low oil level can cause engine damage.
This type of damage is not covered by the Distributor’s Limited
Warranty.
The Oil Alert system (applicable types) will automatically stop the
engine before the oil level falls below the safe limit. However, to
avoid the inconvenience of an unexpected shutdown, always check
the engine oil level before startup.
Oil Change
Drain the used oil when the engine is warm. Warm oil drains quickly
and completely.
1. Place a suitable container below the engine to catch the used oil,
then remove the oil filler cap/dipstick, oil drain plug and washer.
2. Allow the used oil to drain completely, then reinstall the oil drain
plug and a new washer, and tighten the oil drain plug securely.
Please dispose of used motor oil in a manner that is compatible
with the environment. We suggest you take used oil in a sealed
container to your local recycling center or service station for
reclamation. Do not throw it in the trash, pour it on the ground,
or pour it down a drain.
3. With the engine in a level position, fill with the recommended oil
(see page 8) to the upper limit mark (bottom edge of the oil fill
hole) on the dipstick.
Running the engine with a low oil level can cause engine
damage. This type of damage is not covered by the Distributor’s
Limited Warranty.
The Oil Alert system (applicable types) will automatically stop
the engine before the oil level falls below the safe limit.
However, to avoid the inconvenience of an unexpected
shutdown, fill to the upper limit, and check the oil level regularly.
OIL FILLER CAP/DIPSTICK
UPPER LIMIT
OIL FILL HOLE
(bottom edge)
LOWER LIMIT
4. Install the oil filler cap/dipstick and tighten securely.
Wash your hands with soap and water after handling used oil.
REDUCTION CASE OIL (applicable types)
Recommended Oil
Use the same oil that is recommended for the engine (see page 8).
Oil Level Check
Check the reduction case oil level with the engine stopped and in a
level position.
2 : 1 Reduction Case With Centrifugal Clutch
1. Remove the oil filler cap/dipstick and wipe it clean.
2. Insert and remove the oil filler cap/dipstick without screwing it
into the filler hole. Check the oil level shown on the oil filler cap/
dipstick.
3. If the oil level is low, add the recommended oil to reach the
upper limit mark on the dipstick.
4. Screw in the oil filler cap/dipstick and tighten securely.
WASHER
DRAIN PLUG
OIL FILLER CAP/
DIPSTICK
OIL LEVEL
FILLER CAP/DIPSTICK
LOWER LIMIT
UPPER
LIMIT