Installation guide, Function and led indicators, Figure 1 – Viconics SED-WDS-P (ZigBee Pro) Door and Window Sensor Installation guide User Manual
Page 4: Door/window sensor, Install magnet, Device function
Door/Window Sensor
Installation Guide
4
© 2
01
4 V
ic
on
ic
s. A
ll r
ig
ht
s r
es
er
ve
d.
Viconics Technologies Inc. | 9245 Langelier Blvd. | St.-Leonard | Quebec | Canada | H1P 3K9 | Tel: (514) 321-5660 | Fax: (514) 321-4150
028-6076-00 www.viconics.com | [email protected] October 2014
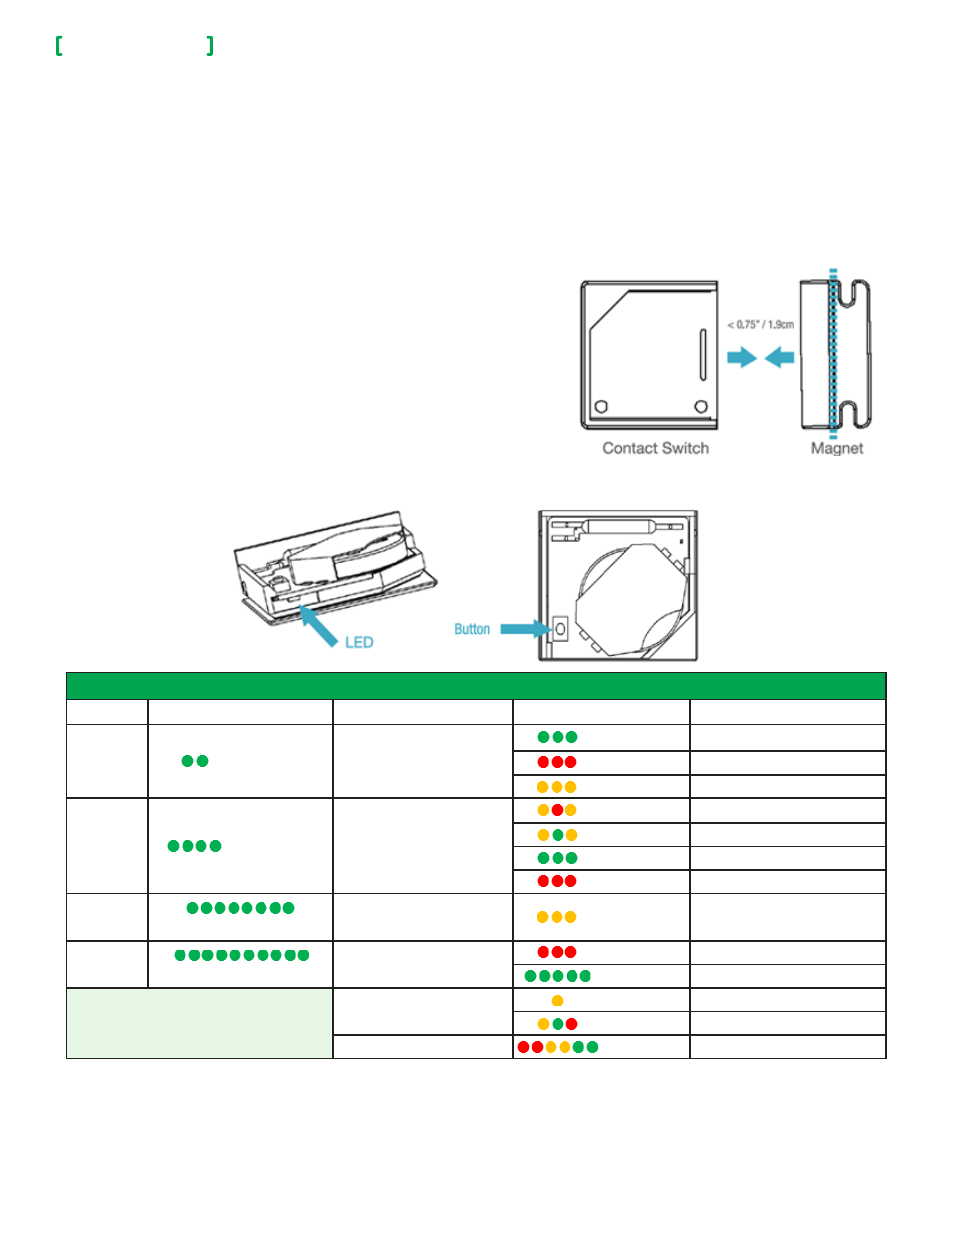
INSTALL MAGNET
This procedure shows you how to install the Magnet to the desired location. You
can use one of the following two options to install the Magnet:
• 2-sided tape
• Screws
Install Magnet in the proper orientation using 2-sided tape or screws. The Magnet
must be within 0.75in (1.9cm) of the Sensor. If using 2-sided tape, the Magnet’s
tab can be removed by snapping the screw tab along the scored line (Figure 1).
Option 1
1. Affix 2-sided tape to desired location.
NOTE: ensure tape is flush with surface and securely affixed to surface.
2. Set Magnet on 2-sided tape and press firmly to secure Magnet in place.
Option 2
1. Using screwdriver, secure Magnet to desired location with two screws.
NOTE: Ensure screws are tight and Sensor does not move easily. Do not
torque screws.
DEVICE FUNCTION
Function and LED Indicators
BUTTON
LED
ACTION
LED
DESCRIPTION
2 times
GG
Network Status
GGG
Joined
RRR
Not Joined
YYY
Re-Join in Process
4 Times
GGGG
Network Join
YRY
Searching for Network
YGY
Device Being Configured
GGG
Device Joined
RRR
Device Failed to Join
8 Times
GGGGGGGG
Forced Re-Join
YYY
Re-Join, Searching for Parent
10 Times
GGGGGGGGGG
Network leave and join a
new Network
RRR
Leave if Joined
GGGGG
Defaults Restored
G = Green
Y = Yellow
R = Red
No Action
Y
Wrong Button Press
YGR
Device Busy
Power Up
RRYYGG
Figure 1