TC-Helicon VoiceCraft Installation Guide User Manual
Page 4
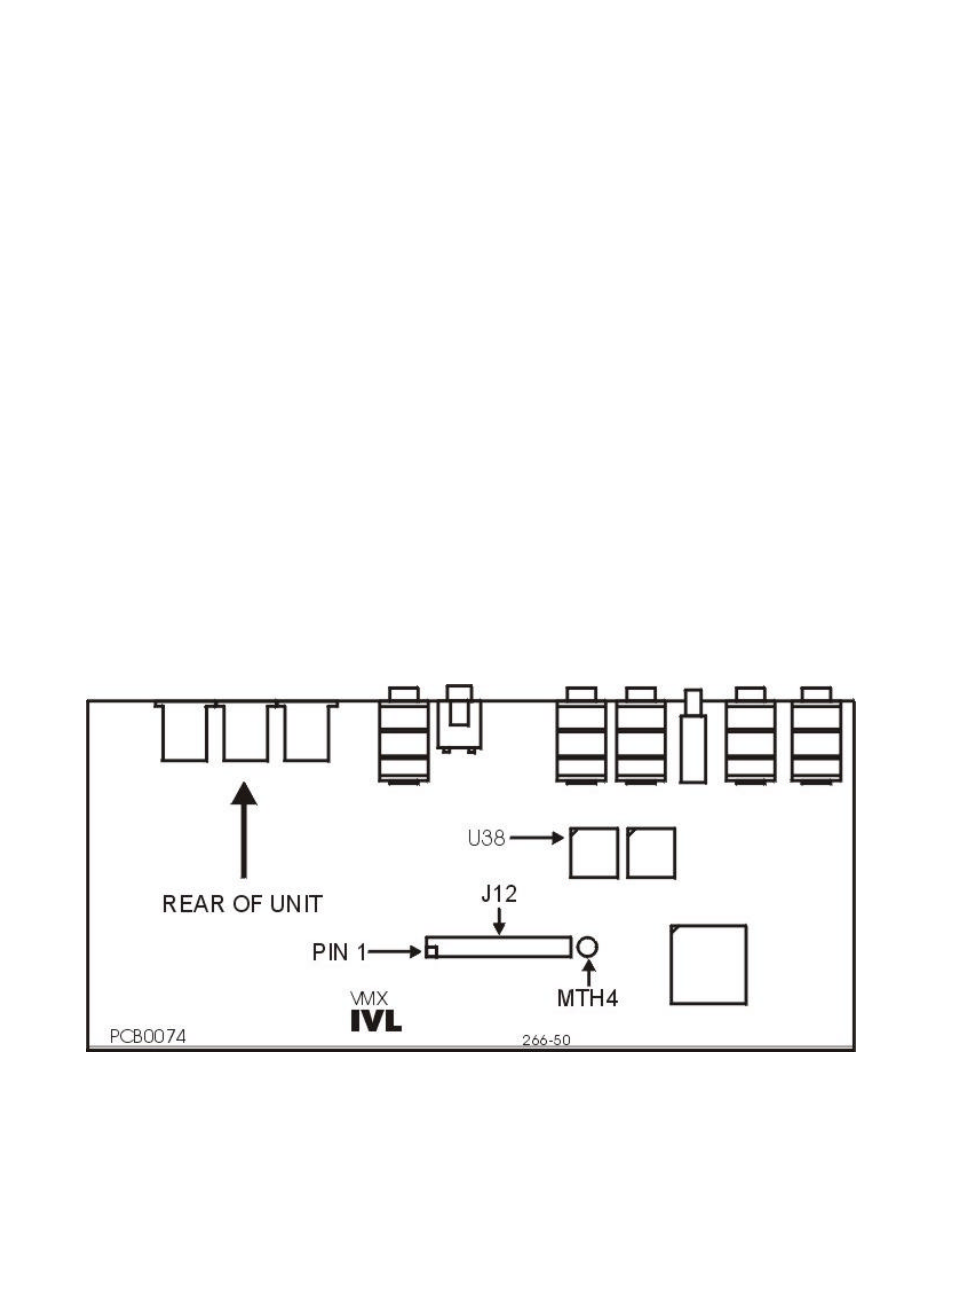
5. Now press the ROM into the socket.
6. Remove the back plate on the VoicePrism reserved for the
VoicePrismPlus expansion card by removing 4 screws.
7. Press the plastic standoff into the hole labeled MTH4 on the main
circuit board in the VoicePrism.
8. The red stripe on the ribbon cable connected to the VoiceCraft card
indicates pin 1. Align the connector on the ribbon cable with J12
header on the VoicePrism main board making sure that pin 1 on the
cable is oriented correctly with pin 1 of J12.
9. CAREFULLY press the ribbon cable connector onto J12.
10. Position the VoiceCraft card so that the standoff is aligned with the
corresponding hole on the VoiceCraft Card.
11. Press the VoiceCraft card down so that the standoff presses into the
card.
12. Attach the plate of the VoiceCraft card to the back panel of the
VoicePrism using 4 screws removed earlier.
13. Put the top cover back on to the VoicePrism using 7 screws removed
earlier.
Figure 1 - VoicePrism Main Board
- VoiceLive 3 - QuickStart Guide (20 pages)
- VoiceLive 3 - Reference Manual (127 pages)
- VoiceLive 3 - Firmware 1.2 Manual Addendum (MIDI Sync) (12 pages)
- VoiceTone T1 Manual (2 pages)
- VoiceTone T1 Manual (12 pages)
- VoiceTone C1 Manual (2 pages)
- VoiceTone C1 Manual (11 pages)
- VoiceTone D1 Manual (12 pages)
- VoiceTone D1 Manual (2 pages)
- VoiceTone R1 Manual (2 pages)
- VoiceTone R1 Manual (12 pages)
- Play Electric - Quick Start Guide (2 pages)
- Play Electric - Reference Manual (77 pages)
- VoiceLive Touch Quick Start (17 pages)
- VoiceLive Touch User Manual (42 pages)
- VoiceLive 2 User manual (105 pages)
- Voicesolo FX150 - Reference Manual (40 pages)
- VoiceLive Play - Quickstart Guide (2 pages)
- VoiceLive Play Details Manual (32 pages)
- Play Acoustic - Quick Start Guide (2 pages)
- Play Acoustic - Reference Manual (75 pages)
- Mic Mechanic Manual (2 pages)
- Harmony Singer Manual (2 pages)
- Ditto Mic Looper - Reference Manual (15 pages)
- VoiceLive Touch 2 Reference Manual (98 pages)
- VoiceLive Touch 2 Quick Guide (17 pages)
- VoiceTone Harmony-M Manual (28 pages)
- VoiceTone Harmony-G XT Manual (30 pages)
- VoiceTone Synth Manual (31 pages)
- VoiceTone Synth Manual Addendum (5 pages)
- VoiceTone Correct XT Manual (2 pages)
- VoiceTone Create XT Manual (34 pages)
- VoiceLive Play GTX Getting Started Manual (2 pages)
- VoiceLivePlay GTX Details manual (39 pages)
- MP70 manual (2 pages)
- MP-76 - Reference Manual (13 pages)
- VoiceWorks Manual (33 pages)
- VoiceWorks Sysex Manual (8 pages)
- VoiceWorks Plus Manual (44 pages)
- VoiceWorks Plus 1.2 Addendum (6 pages)
- VoiceWorks Plus Preset Guide (2 pages)
- Reveal 402 (12 pages)
- VoiceLive Rack - Basics Manual (18 pages)
- VoiceLive Rack - Basics Manual (19 pages)
- VoiceLive Rack Full User's Manual (89 pages)