Slant/Fin F Series User Manual
Page 2
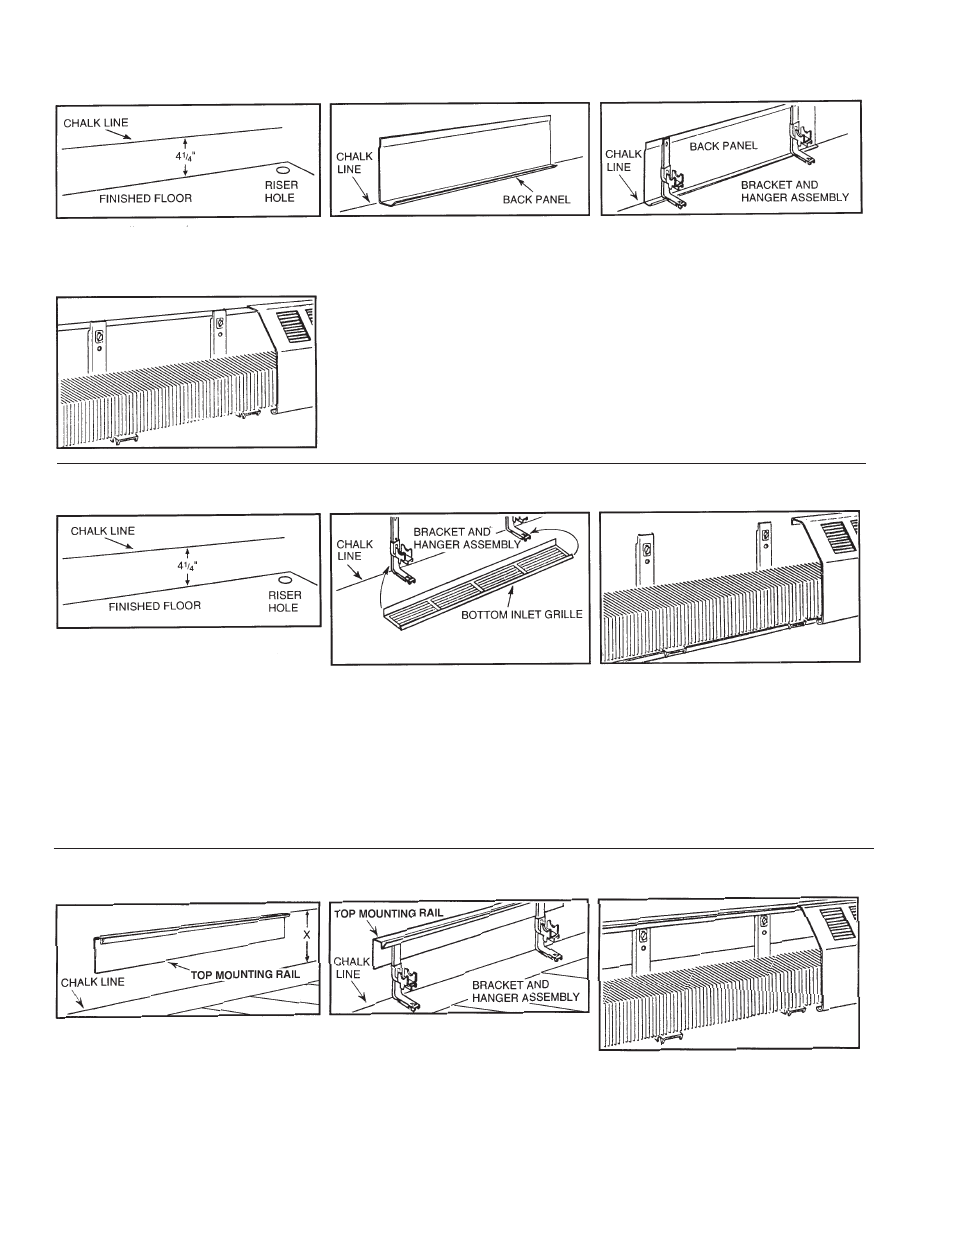
SERIES J & R ENCLOSURES WITH BACK PANEL
STEP 1:
STEP 2:
STEP 3:
Mark chalk line, as above.
Install back panel at chalk line.
a) Attach hanger to bracket with Sems
screws furnished (1/4" x 20 x 1/4").
b) Mount assembly to back panel.
c) Align hanger for necessary pitch.
a) Install elements, connect and test
system.
b) Insert top lip between wall and back
panel. Pull down and back until
bottom lip snaps into slot on bracket.
c) Follow through with accessories.
STEP 4:
SERIES J & R ENCLOSURES WITH BOTTOM INLET GRILLE
STEP 1:
STEP 2:
STEP 3:
Mark chalk line.
a) Attach hanger to bracket with Sems
screws furnished (1/4" x 20 x 1/4").
b) Mount to wall at chalk line. Leave
bottom screws loose for friction fit of
back edge of bottom inlet grille.
c) Install bottom inlet grille to bracket.
Complete mounting of bracket
to wall.
d) Align hanger for necessary pitch.
a) Install elements, connect and test
system.
b) Snap on cover, insert top lip between
wall and bracket. Pull down and back
until bottom lip snaps into slot on
bracket.
c) Follow through with accessories.
2
a) Mark chalk line.
b) Install top mounting rail above chalk
line using the following dimensions:
for enclosures with 1-tier of element
10", 1-tier of element 14", 2-tier 21"
and 3-tier 28".
SERIES JR & RR ENCLOSURES WITH 4" TOP MOUNTING RAIL (BPT)
STEP 1:
STEP 2:
STEP 3:
a) Attach hanger to bracket with Sems
screws furnished (1/4" x 20 x 1/4").
b) Mount assembly to back panel.
c) Align hanger for necessary pitch.
a) Install elements, connect and
test system
b) Insert cover in the “V” channel in top
mounting rail. Pull down and back until
bottom lip snaps into slot on bracket.
c) Follow through with accessories.