B. a – Sigtronics S-A-F-E Installation Instructions User Manual
Page 10
Transmit long enough so that the receiving station can
get “calibrated” to your transmission (voice) level.
3. Put on the Officer 2’s headset and verify FM radio reception.
If OK, use Officer 2’s PTT to transmit to your receiving
party. If the receiving station reports weak transmissions,
use the screwdriver to turn the FM MIC GAIN ADJ clockwise
a small amount. If they report garbled, broken or noisy
transmissions, turn the FM MIC GAIN ADJ counterclockwise
a small amount. Repeat as necessary until the receiving
party reports that transmissions through the SAFE unit
sound as good or better than when using the FM radio’s
hand mic.
If the FM radio does not operate as it should, use the “Radio
Troubleshooting Guide” to find and fix the problem.
Auxiliary Radio
If you are using an auxiliary radio, only two connections
(orange wires) are required to hook it to the SAFE unit. See
Figure 4. No adjustments are required for the auxiliary radio.
Turn the AUX switch to “ON” to hear the auxiliary radio in
the headsets.
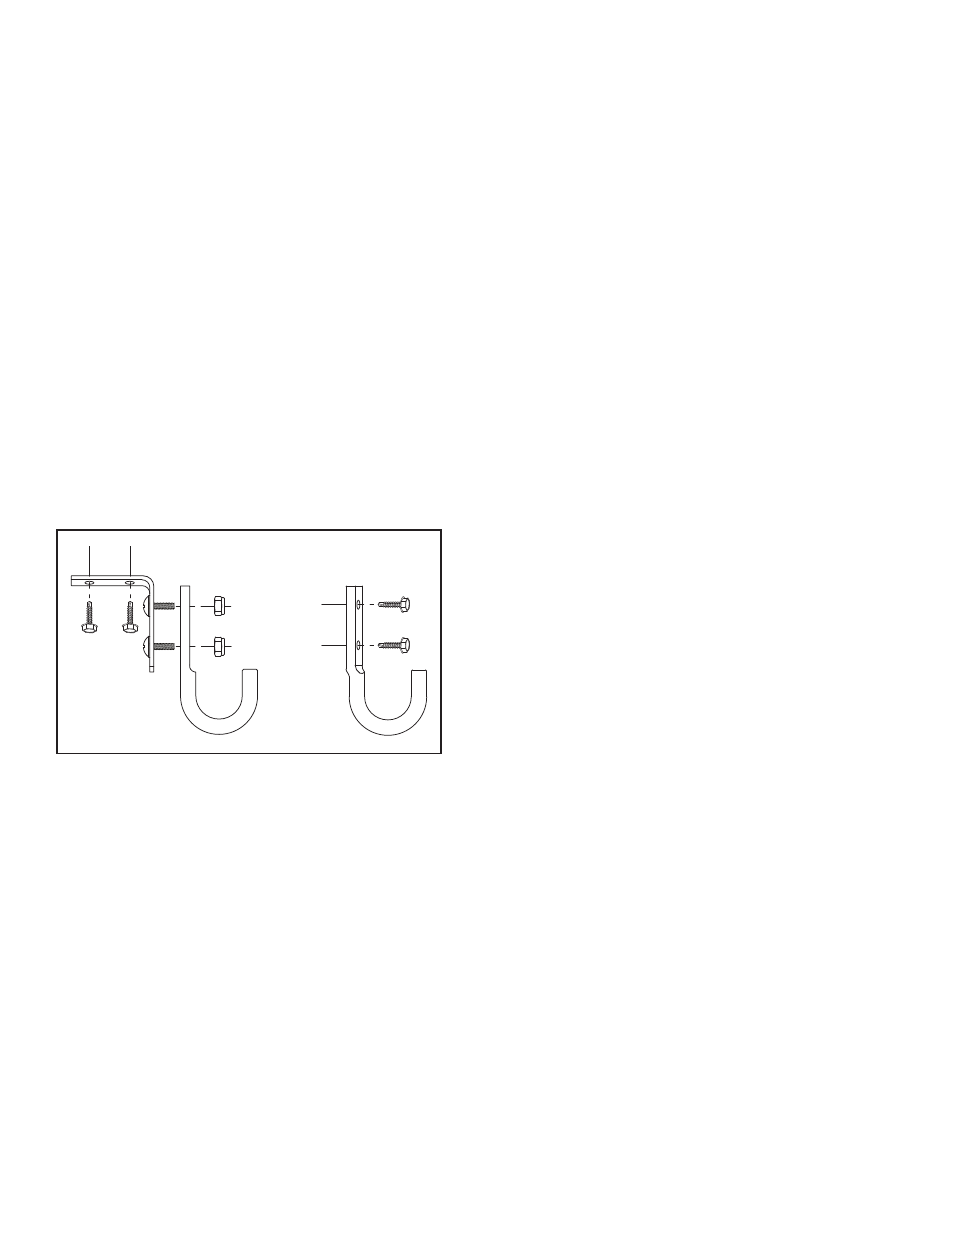
HEADSET HOOK INSTRUCTIONS
The enclosed headset hooks are provided at no additional
charge to allow for a convenient way to store the headset.
These strong and durable hooks may be mounted in any
location. Two mounting methods seem to be preferred:
1. Top Mounting ( Figure 7-a ). The hooks may be mounted
from the existing headliner screws and hardware, or you
may use the enclosed attaching screws. When used with
an electric driver these screws are self drilling. For most
metals such as aluminum or common steel, they will not
require a pilot hole. For some stainless steels however,
1⁄8” pilot holes will need to be drilled. Attach the right
angle mounting bracket to the hooks with the machine
screws and lock nuts.
2. Side Mounting ( Figure 7-b ). The hooks may be mounted
on the side of the cab with the enclosed attaching
screws.
Note: The right angle mounting bracket may be shortened
(one hole removed) by cutting with any standard hack saw.
SYSTEM OPERATION
The following describes how to use and adjust the SAFE
controls. It also explains exactly how the SAFE unit operates.
This will allow you to easily set all unit functions to your
specific needs. If you are not familiar with the SAFE operation,
perform the next few steps while the vehicle is not in motion.
Intercom operation and adjustment can be performed by the
following procedure:
1. Set the ON/OFF switch to the “ON” position and turn both
RECeive VOLume controls all the way down (counter-
clockwise).
2. Turn both intercom VOLume controls to the 10 o’clock
position and both SQuelch controls all the way up
(clockwise). Notice the intercom is now continually
activated and you should be able to talk between
headsets.
3. To adjust the intercom SQuelch controls for voice activated
operation (VOX), it is helpful to have some background
noise present. It may also be necessary to turn up the
intercom VOLume controls. Turn both intercom SQuelch
controls all the way counter-clockwise. Now, without
speaking, rotate one of the SQuelch controls clockwise
until you hear the background noise in your headset. Next,
using that same SQuelch control, rotate counter-clockwise
small, incremental amounts until the background noise
disappears. (This procedure is necessary because the
squelch is a “fast on, slow off” system). That SQuelch
control is now set.
4. Adjust the other intercom SQuelch control similarly by
turning it clockwise until you hear background noise.
Rotate counter-clockwise incremental amounts until the
background noise disappears.
Small adjustments may be necessary if background noise
changes significantly - such as from idle to full power.
Radio Selection of both the A/C (Radio 1) and FM (Radio 2)
radios are provided by two switches.
1. XMIT SELECT determines the radio you wish to transmit
on.
2. BOTH/OFF/AUTO selects which radio(s) you receive or hear
in your headset.
a) “BOTH” position permits you to hear both the radios at
the same time.
b) “OFF” position disables the hearing of either radio.
c) “AUTO” position allows you to hear the radio that the
XMIT SELECT switch is set to.
The AUXiliary audio source is selected by the AUX/OFF
switch. In the “AUX” position, you can hear it, and in the “OFF”
position you cannot.
page 10
b.
a.