Sigtronics SAS-640 User Manual
Page 5
If everything checks out, refer to the OPERATING
INSTRUCTIONS on page 5 for proper use and other
operating modes of the Sigtronics SAS intercom system.
If something does not work as above, carefully go over the
intercom wiring again. If OK, refer to the following sections for
solutions to two of the most common intercom problems:
SAS-440 / SAS-640 SIDETONE MODIFICATION
Most aircraft radios, when transmitting, provide what
is called “sidetone”. Without sidetone, you will not hear
yourself or your co-pilot transmit to ATC. This can be
distracting, especially during instruction, because no one
on the intercom will hear the outgoing transmission of the
radio conversation. Some aircraft radios, however, do not
provide this function. Also, some radios are designed to drive
only one headset. Therefore, if you have such a radio, the
sidetone may be extremely weak or nonexistent.
If this is the case and the sidetone cannot be turned up in
the radio(s), a simple modification can be performed within
the SAS unit to simulate sidetone. The SAS requires partial
disassembly to accomplish this modification. First unplug
and remove the SAS unit from the aircraft. To disassemble
unit, carefully remove the four screws securing the bottom
cover. Remove the cover to expose the solder side of the
circuit board.
Solder in an insulated jumper wire as illustrated in Figure
5 on page 4. Replace the cover and the four screws to
complete the modification.
With the unit modified in this way, the intercom volume
control adjusts the level of the sidetone. Additionally, when
in “ISO” mode, the SAS unit will not provide sidetone even
with this modification.
Install the SAS unit into the aircraft panel and plug in the
cable.
SAS-440 / SAS-640 ICS LOAD MODIFICATION
This modification is used when a SAS intercom is connected
to a radio or audio panel which has a low impedance
headphone output (less than 100 ohms). This is most
common with some Narco equipment (CP-135,CP-136,
and Mark 12D, for example) and “home made” audio select
panels.
Symptoms are:
1. Intercom audio volume is weak or non-existent when the
SAS unit is in “ALL” mode but fine in “ISO” mode and ...
2. Transmit function is normal on aircraft radio and ...
3. Receive function is normal on aircraft radio.
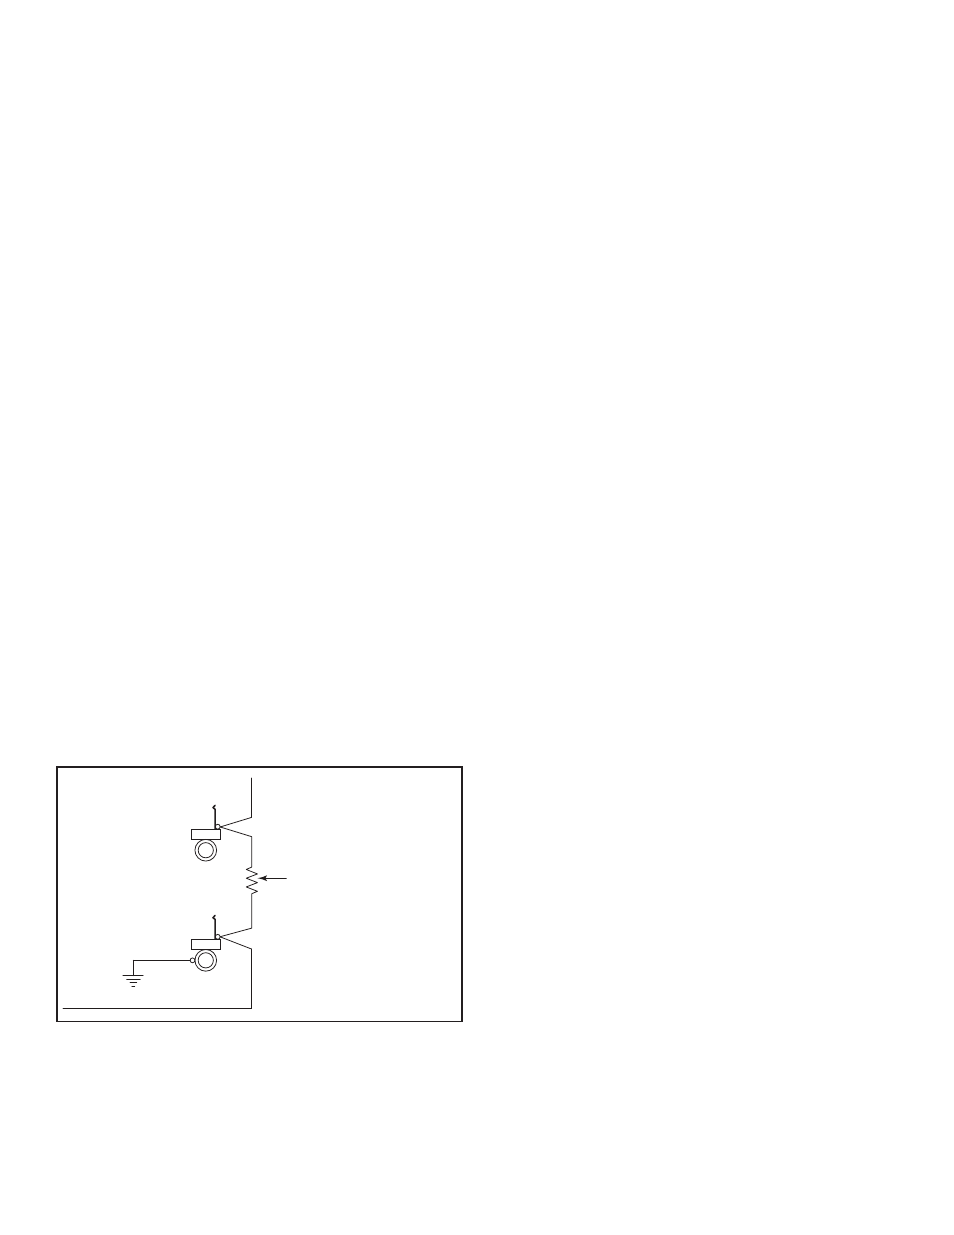
Solution: Add a 1/4 or 1/2 watt resistor per Figure 6 above.
The value of the resistor most commonly used is 220
ohms, however, optimum performance can be achieved by
selecting the value right for your particular installation. The
resistor can be any value between 100 and 330 ohms and is
selected for the best balance between radio receive volume
and intercom volume.
If something is still not right or you have any questions
regarding the installation and operation of the Sigtronics
SAS intercom or any other Sigtronics product feel free to
contact us directly. Technicians are available Monday though
Friday 8 am to 4:30 p.m. Pacific time.
This concludes the installation check-out.
OPERATING INSTRUCTIONS
The Sigtronics Transcom SAS-440 / SAS-640 is a voice
actuated intercom for aircraft with “transmit through the
aircraft radio capability” using your push-to-talk switches.
Three controls are provided on the SAS units:
OFF/ALL/ISO Switch - Sets the intercom mode of
operation.
VOL - Volume Control - Controls the intercom volume. (Does
not affect aircraft radio volume. Set radio volume on radio
as normal.)
SQ - Squelch Button - Automatically sets the intercom turn-
on threshold for voice activated intercom (VOX) mode.
CAUTION - As is standard practice with all aircraft avionics
equipment, be sure that the aircraft radio master switch is
turned off when you start up the aircraft engine.
INTERCOM OPERATION
Intercom operation and adjustment can be performed by the
following procedure:
1. With aircraft power on, set the SAS OFF/ALL/ISO switch
to the “ALL” position - the preferred mode for setting the
squelch. The SAS squelch level can also be set with the
SAS in the “ISO” mode, but the pilot headset audio will
not be utilized for squelch level setting.
2. Turn the SAS unit volume control to the 9 o’clock position.
Notice the intercom is now continually activated (hot
mic mode) and you should be able to talk between
headsets.
3. To adjust the intercom squelch control for voice activated
operation (VOX), press and hold the “SQ” button down.
Now announce to the other persons in the aircraft not
to talk because you need a moment to set the intercom.
PILOT
HEADPHONE JACK
AIRCRAFT
HEADPHONE
JACK
BREAK CONNECTION AND
ADD RESISTER HERE.
BARREL
TIP
TIP
(3) BLUE
FIGURE 6
LOAD MOD.
5