Vermont Casting 1920 User Manual
Page 16
16
Aspen Woodburning Stove
30000369
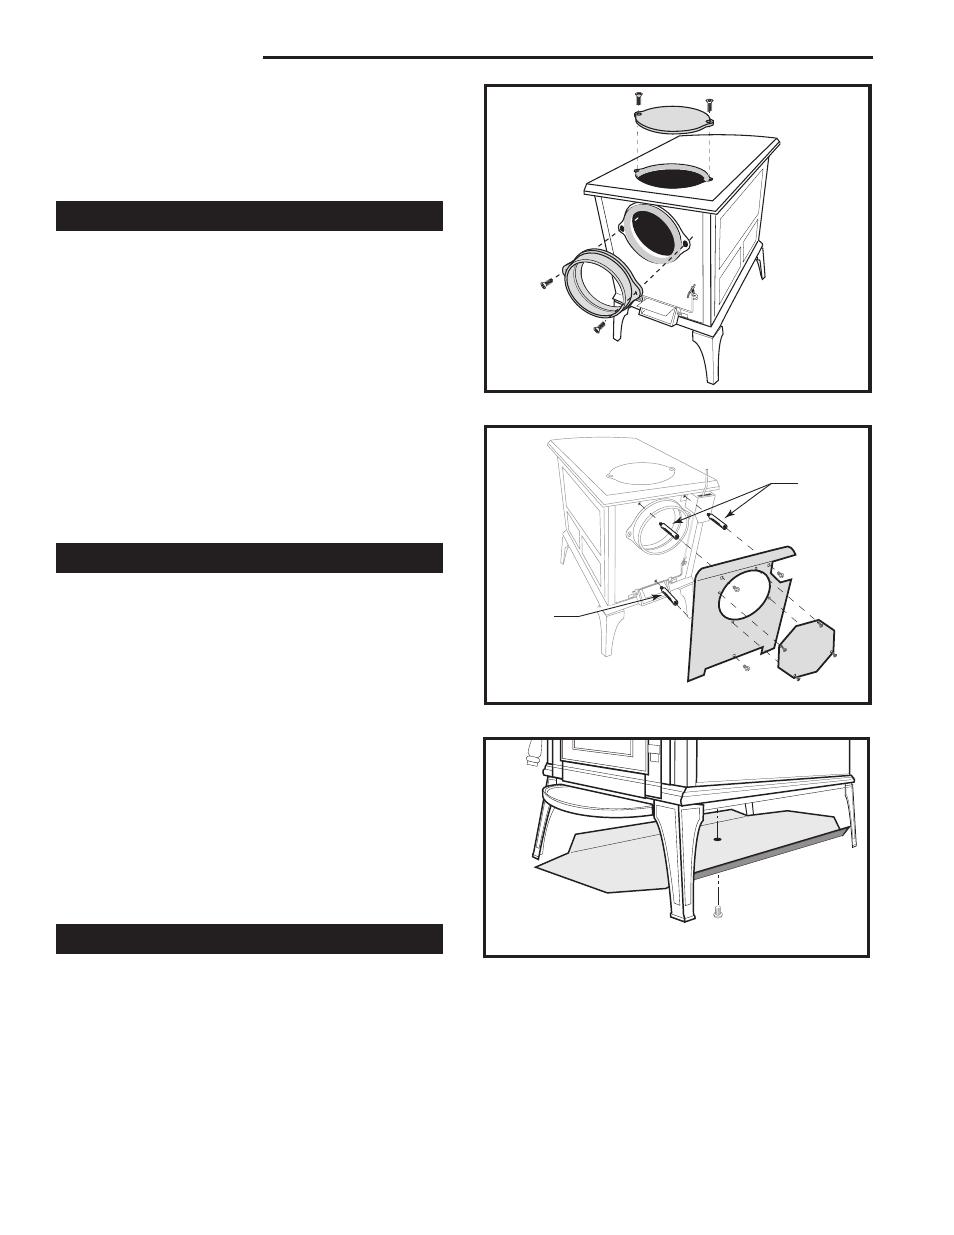
Install the Rear Heat Shield
The #1896 Rear Heat Shield reflects radiant heat away
from combustible materials located behind the stove. Its
use enables you to install the stove at a reduced clear-
ance to combustible materials in accordance with the
specifications in this manual.
1. Remove the three phillips head screws from the back
of the stove. The upper right screw also serves to
secure the thermostat cover to the stove. (Fig. 26)
2. Thread the three 1¹⁄₄" spacers provided with the heat
shield kit into the holes. Be sure to resecure the ther-
mostat cover using a spacer at that location. If the
Outside Air Adapter is used, secure its upper flange
to the hole above the primary air inlet using a spacer
instead of the screw. Hand tighten the spacers.
3. Align the holes in the heat shield with the spacers
and secure the shield to the spacers using the three
philips head screws previously removed. Tighten
firmly with a screwdriver.
Install the Bottom Heat Shield
The #1985 Bottom Heat Shield must be used in the
U.S. and Canada in any installation on a floor that is
not composed of unpainted cement on earth.
1. Remove the 1/4-20x 3/8” phillips screw from the cen-
tral mounting boss in the stove bottom. (Fig. 27)
2. Mount the bottom heat shield to the stove bottom
using the same phillips head screw previously re-
moved. The shield will butt against the cast bosses
in the bottom of the ashlip at the front of the stove.
Flue Collar Reversal
If a rear exit chimney connection is required, you will
need to remove the flue collar from the stove top and
move it to the back of the stove. (Fig. 25)
1. Use a phillips screwdriver to remove the two screws
and rear cover plate from the back of the stove.
2. Remove the flue collar by removal of the two phillips
screws from the top of the stove.
3. Attach the cover plate to the stove top. Be sure to
keep the gasket in place.
4. Secure the flue collar to the back of the stove.
5. Insert the crimped end of the first section of chimney
connector into the flue collar. Using the holes in the
collar as guides, drill 1/8” (3mm) holes through the
connector pipe. Use the three #10 x 1/2” sheet metal
screws provided to secure the chimney connection to
the flue collar.
3. If you are not installing a Rear Heat Shield, use the
phillips head screw to secure the upper flange of
the Adapter to the stove at the hole from which the
screw was removed in Step 1. (Fig. 24) Otherwise, a
heat shield spacer will be used here. (See “Install the
Rear Heat Shield”, below.)
ST261
install bottom heat shield
12/99
Fig. 27 Install the bottom heat shield.
ST261
ST260
install rear
heat shield
12/99
Fig. 26 Install the rear heat shield.
Spacers
Spacer
ST260
Fig. 25 Reversing the flue collar.
ST258
flue collar reversal
12/99
ST259