Warning – HONDA 2015 Odyssey - Owner's Guide (Revised 09/24/2014) User Manual
Page 60
112 |
| 113
HANDLING THE UNEXPECTED
HANDLING THE UNEXPECTED
The following instructions must be followed to use the jack safely:
• Do not use the jack with people or luggage in the vehicle.
• Use the jack provided in your vehicle. Other jacks may not support the weight
(“load”) or fi t the jacking point.
• Do not use while the engine is running.
• Use only where the ground is fi rm and level.
• Use only at the jacking points.
• Do not get in the vehicle while using the jack.
• Do not put anything on top of or underneath the jack.
Replacing the Flat Tire
1. Remove the wheel nuts, wheel cover (if
necessary), and fl at tire.
2. Mount the compact spare tire. Replace the
wheel nuts, and lightly tighten them.
3. Lower the vehicle and remove the jack. Tighten
the wheel nuts in the order indicated in the
image. Go around, tightening the nuts, two to
three times in this order. Do not overtighten the
wheel nuts.
If you drive with the spare tire installed, the
low tire pressure/TPMS indicator appears. The
indicator stays on until a regular tire is installed.
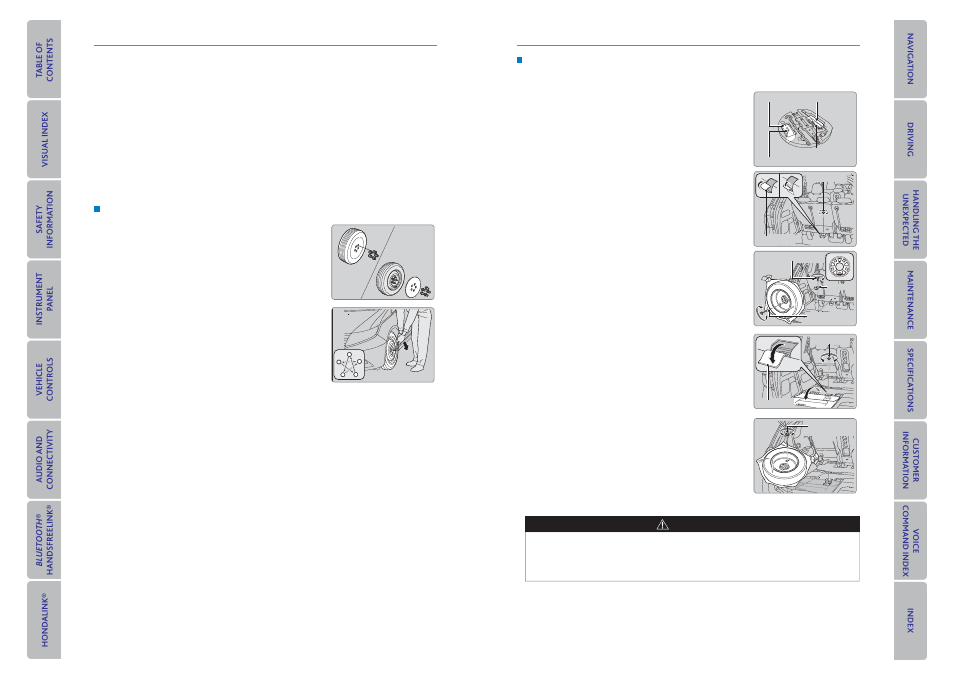
Storing the Flat Tire
The storage bag, bracket, and mounting wing bolts (A and B) are in the tool case.
1. Put the fl at tire in the storage bag provided with
your vehicle.
2. Pull down the U-shaped carpet piece, fold it, and
tuck the end under the carpet.
3. Remove the plastic screw with a coin.
4. Install the bracket and the mounting wing bolt (A)
on the attachment point, and tighten the bolt.
5. Install the fl at tire on the bracket with the inside
of the wheel facing toward you.
6. Install the mounting wing bolt (B) to the bracket
through one of the fi ve wheel nut holes, and
tighten the bolt. Poke a hole in the storage bag as
needed.
Storing a flat tire on the folded third–row seat
1. Turn over the fl ap on the left side of the cargo
area fl oor.
2. Pull down the U-shaped carpet piece and remove
the plastic screw with a coin.
3. Place the fl at tire face down on the attachment
point.
4. Put the tire mounting wing bolt (B) in the
attachment point through one of the fi ve wheel
nut holes, and tighten the bolt. Poke a hole in the
storage bag as needed.
Loose items can fl y around the interior in a crash and can seriously injure the
occupants.
Store the wheel, jack, and tools securely before driving.
WARNING
Bracket
Bracket
Plastic screw
Carpet piece
Storage bag
Mounting wing bolt (B)
Mounting wing
bolt (B)
Mounting wing
bolt (B)
Mounting wing bolt (A)
Mounting wing bolt (A)
Plastic screw