Balance the model (c.g.), Set the control throws – Great Planes Gee Bee ARF - GPMA1326 User Manual
Page 29
❏
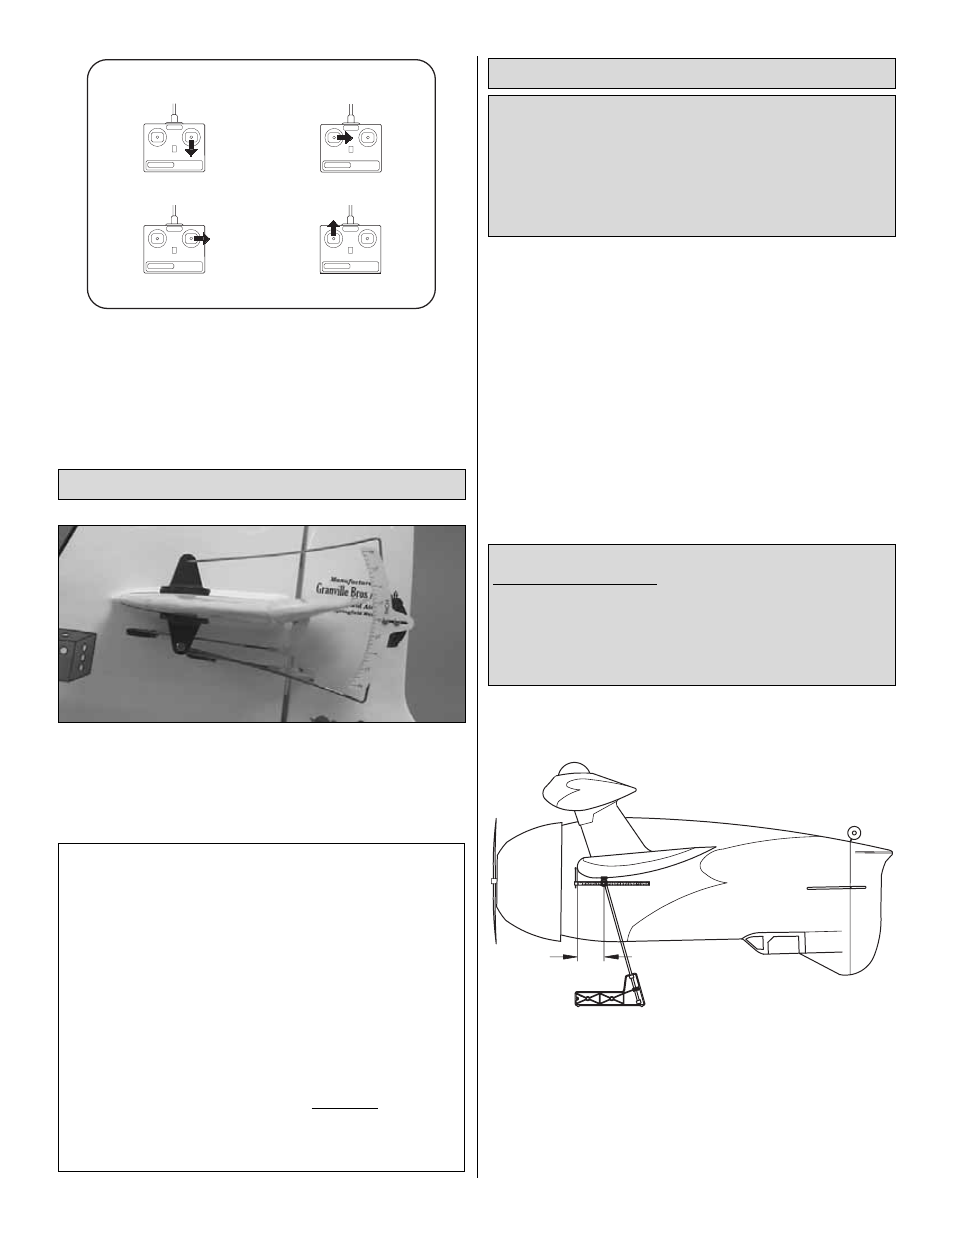
3. Make certain that the control surfaces and the
carburetor respond in the correct direction as shown in the
diagram. If any of the controls respond in the wrong direction,
use the servo reversing in the transmitter to reverse the
servos connected to those controls. Be certain the control
surfaces have remained centered. Adjust if necessary.
Use a Great Planes AccuThrow (or a ruler) to accurately
measure and set the control throw of each control surface
as indicated in the chart that follows. NOTE: The throws
are measured at the widest part of the elevators, rudder
and ailerons.
At this stage the model should be in ready-to-fly condition
with all of the systems in place including the engine, landing
gear, covering and paint and the radio system.
❏
1. Use a felt-tip pen or 1/8"-wide tape to accurately mark
the C.G. on the top of the wing on both sides of the fuselage.
The C.G. is located 2-3/4" [70mm] back from the leading
edge of the wing.
❏
2. With the wing attached to the fuselage, all parts of the
model installed (ready to fly) and an empty fuel tank, place
the model upside-down on a Great Planes CG Machine. If
you are using the C.G Machine you will have to use longer
rods for the base of the machine due to the width of the
fuselage. If you do not wish to do this you can remove the
balancing rods, place the pads on the C.G. location and lift
the model while holding onto the rods.
2-3/4"
[70mm]
This is where your model should balance. For the Gee Bee
we do not recommend that you move the C.G. forward or
back from this point. In our testing we found that moving
the C.G. too far aft causes the plane to snap with the
recommended elevator control throw. Moving the C.G
forward did not add to the overall stability of the plane and
only caused the plane difficulties while flaring for landing.
More than any other factor, the C.G. (balance point) can
have the greatest effect on how a model flies and may
determine whether or not your first flight will be successful.
If you value this model and wish to enjoy it for many flights,
DO NOT OVERLOOK THIS IMPORTANT PROCEDURE.
A model that is not properly balanced will be unstable and
possibly unflyable.
Balance the Model (C.G.)
These are the recommended control surface throws:
ELEVATOR:
5/8" [15.9mm] up
5/8" [15.9mm] down
RUDDER:
1" [25mm] right
1" [25mm] left
AILERONS:
7/8" [22.2mm] up
7/8" [22.2mm] down
IMPORTANT: The Gee Bee has been extensively flown
and tested to arrive at these throws. We have tested a range
of control throws and have found that
you must set them as
listed above. With these throws the model performs very well
and will not snap or roll violently. Coupled with these throws,
your properly balanced model will perform very well.
Set the Control Throws
CARBURETOR WIDE OPEN
RUDDER MOVES RIGHT
LEFT AILERON MOVES DOWN
RIGHT AILERON MOVES UP
ELEVATOR MOVES UP
4-CHANNEL
TRANSMITTER
(STANDARD MODE 2)
4-CHANNEL RADIO SETUP
TRANSMITTER
4-CHANNEL
TRANSMITTER
4-CHANNEL
TRANSMITTER
4-CHANNEL
29