Radio installation – Great Planes AT-6 Texan ARF 40 MonoKote - GPMA1245 User Manual
Page 8
❏
2. Connect the marks on the firewall to locate the center
of the firewall.
❏
3. Cut the Engine Mount Template from page 19 of this
manual and tape it to the firewall as shown above. At the
locations on the template, drill four 3/16” (4.7mm) holes in
the firewall for the engine mount blind nuts.
❏
4. Install four 6-32 Blind Nuts to the inside of the
firewall. Pull the blind nuts into the back side of the firewall
using a 6-32 machine screw (with a flat washer under the
head of the bolt). Fit the two halves of the Engine Mount
together. Use four #6 Flat Washers and four 6-32 x 3/4”
Machine Screws to secure the engine mount to the
firewall. Do not tighten the screws at this time, as the mount
must be adjusted for the engine.
❏
5. Test fit your engine into the mount. Adjust the width of
the rails to fit the engine snugly. Tighten the mount screws
to allow marking the engine mounting holes without moving
the rails.
❏
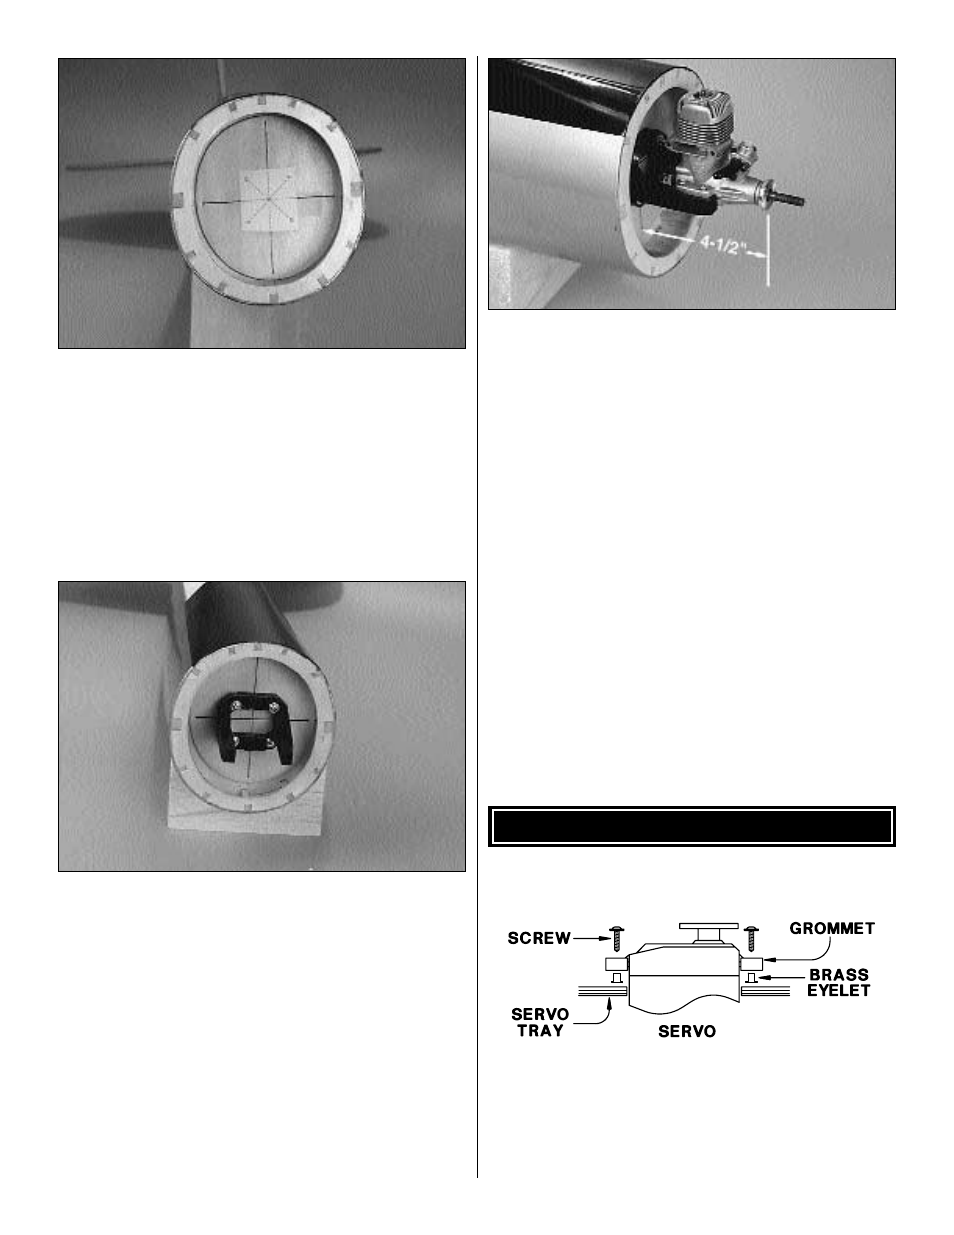
6. Position the engine on the engine mount rails so the
propeller thrust washer (or spinner backplate) is 4-1/2”
(114mm) ahead of the firewall. Use a Great Planes Dead
Center
™
Hole Locator (GPMR8130 not included) to scribe
the four engine mount holes onto the rails. You may use a
sharpened piece of wire to scribe the mount holes and
then, use a center punch at the marks to prevent the drill bit
from wandering. Drill 3/32” (2.4mm) pilot holes through the
rails. Be sure to hold the drill perpendicular to the rails. If
you have access to a drill press, this is a good tool for this
purpose. Put a drop of oil into each hole. Use four #4 x 5/8”
Sheet Metal Screws to secure the engine to the mount.
❏
7. Drill a 3/16” (4.7mm) hole in the firewall for the throttle
pushrod. The hole location will depend on whether you are
installing a 2-stroke or 4-stroke engine.
❏
8. Roughen the outside surface of the 11-3/4” (298mm)
Throttle Pushrod Tube with coarse grit sandpaper. Insert
the pushrod tube through the hole in the firewall. Push it in
until about 1/4” (6mm) of the tube is left exposed forward of
the firewall. Use medium CA to glue the tube to the firewall,
but leave it free inside the fuselage until the servos are
installed.
❏
1. Use the following sequence for mounting the servos
into the servo tray.
A. Install rubber grommets and brass eyelets in the servos
using the provided sketch.
RADIO INSTALLATION
8