Philips MIC4013SB User Manual
Page 3
Attention! The text in this document has been recognized automatically. To view the original document, you can use the "Original mode".
4.60 Imdge Quality
High Quality and Standard Quality
1 .'’The camera is defaulted with the setting in
.Н9»
High Quality.
2, To set to Standard Quality ^ ^, press the Mode button until ^ ^ appears in the
LCD. Press the "Shutter” Button once and the LCD will display 1- 5 .
3. Press the Mode button once to confirm the mode change. The ^ ^ standard
Quality is being selected.
Below is a table to show the maximum number of images can be taken at different
resolutions with different Image Quality:
Resolutions
High Quality
Standard Quality
HI (VGA 640
X
480)
70 images
110 images
Lo (QVGA 320 x 240)
170 images
270 images
PU (1.3M bv interpolation)
22 images
35 images
4.70 Frequency Selection- when using as a Web camera (Video mode) or
Indoor Image Capturing
50Hz/60Hz Frequency mode
1.
Select 50Hz or 60Hz according to the power frequency set in your living country to
avoid flickering under video mode or indoor image capturing.
2.
The 60Hz frequency is set as a default. To select 50Hz frequency, press the Mode
button until “60“ is displayed on the LCD, then press the Shutter button to confirm
selecting 50Hz.
Remark: It Is recommended to choose 60Hz In North America.
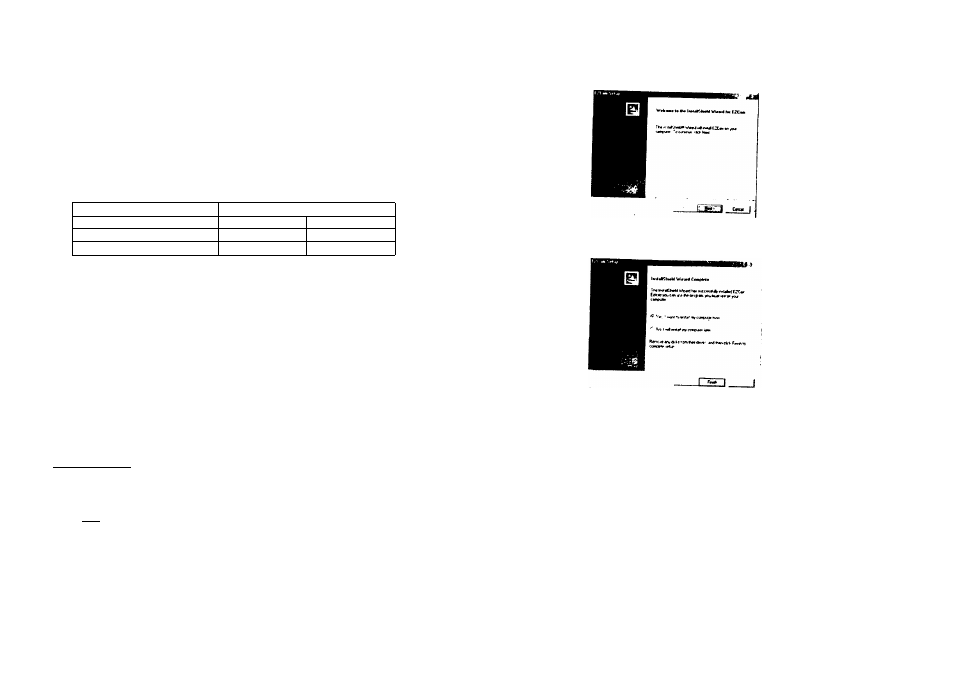
5.0 INSTALLING THE SOFTWARE AND UPLOADING IMAGES TO PC
Windows 98 Users
To upload the images to PC, install the camera driver first. After this has been done, the
stored images in the camera can be moved to the PC.
Note: Do NOT connect camera to USB port prior to installing software and drivers.
1. Insert the CD into the CD-Rom drive. The installation window automatically appears.
Ensure the camera is not connected to your computer.
2. Close out of all programs and disable any background applications such as Anti-Virus
software.
3. If the installation window does not appear, click the Start button on the desktop and
choose Run.
4. When the Run dialog box appears, click the Browse button and navigate to your CD-
ROM drive directory. Double-click the Setup.exe icon to begin the installation process.
5. An Install shield Wizard will be appeared. Click the “Next” button.
6. After the installation is completed, click the “Finish” button and restart the
computer.
USB cable. “Building Driver Information” &
camera
dialogue box will open and the computer will recognize the
Wndo>w i* IK*
yow k*,^**,»
8. If you can see “Removable Disk” under “My Computer”, the camera driver
succossTui.
instailation is