Crosman 72601 User Manual
Owner’s manual
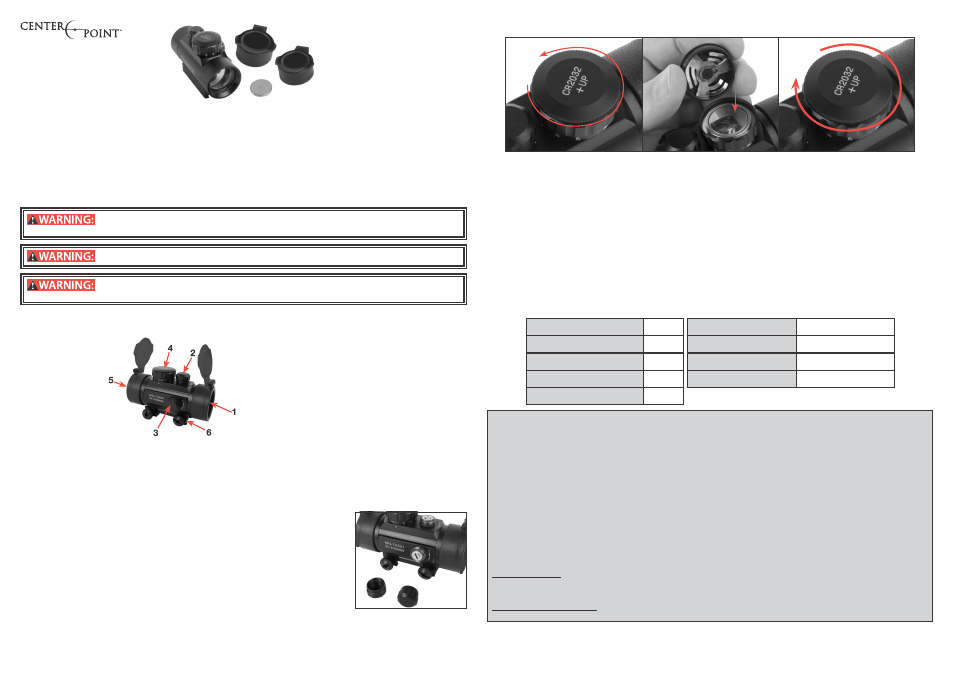
Red or Green Dot
1.
Remove the battery cover from the red/green illumination dial by turning the cover counter clockwise while holding the sides of
the illumination dial
2.
Install one CR2032 3V lithium battery into the compartment with the “+” side up
3.
Replace the cover and tighten in by turning it clockwise, while holding the sides of the illumination dial
4.
Turn the red/green illumination dial to illuminate the red or green dot. The brightness will change as you turn the dial. The mark-
ings on the dial show the color and intensity of the light. Lining the “R” or “G” up with the dot will turn the illumination off
Maintenance
• Take care not to drop or knock the sight once it is zeroed.
• Keep the protective lens covers in place when the sight is not being used.
• Store the sight in a cool dry place when not in use.
• Be careful to avoid contact with acid, alkaline or corrosive chemicals.
• Do not attempt to lubricate any part of the sight.
• Do not disassemble the sight. Do not loosen or remove any screws or parts. Any such or similar actions will void the warranty.
• Wipe the lens with a clean flannel cloth to keep it clean and dry. Do not use finger or finger nail to touch or clean lenses.
• Use only a clean flannel cloth for cleaning.
• To maintain battery life, turn illumination off when not in use.
• For extended storage, remove the battery
Specifications
Model
72601
Length (inches)
3.9
Magnification
1x
Weight (ounces)
7.4
Outside Diameter (mm)
40
W/E Adjust Click Value
1 MOA
Eye Relief (inches)
Infinite
Batteries
1: CR2032 3V Lithium
Tube Diameter (mm)
30
LIMITED LIFETIME WARRANTY ON CENTERPOINT SIGHTS
Your CenterPoint™ sight is warranted to be free of defects in materials and workmanship for the lifetime of the original owner.
This warranty does not cover damages due to fair wear and tear, failure to provide routine maintenance, and does not include
batteries or accessories. This warranty lasts as long as the original purchaser owns the product, and is not transferable. In the
event of a defect under this warranty, we will, at our option, repair or replace the product provided our inspection indicates that
an original defect exists. CenterPoint reserves the right to replace any product which is no longer available with a product of
comparable value and function. If CenterPoint determines the repair is not covered under the warranty guidelines, there could
be a charge to you for the repair. This is a limited warranty and does not cover damages caused by misuse, improper handling
or installation or maintenance provided by someone other than CenterPoint..
This limited warranty does not include consequential damages, incidental damages, or incidental expenses, including damage
to property or any other expense. CenterPoint disclaims any implied warranties. Some states do not allow the exclusion or
limitation of incidental or consequential damages, or allow limitations on implied warranties so the above limitations or exclusions
may not apply to you. This warranty gives you specific legal rights, and you may also have other rights which vary from state to
state and country to country.
WARRANTY CLAIMS/ REPAIR SERVICE
If your sight needs repair, call CenterPoint Customer Service at 1-800-726-1122 or visit our web site at www.centerpointoptics.
com DO NOT ATTEMPT TO DISASSEMBLE IT! Any disassembly or modification not performed by CenterPoint Precision Optics
will void the warranty.
USA Customers:
Please contact CenterPoint before shipping your product. Include with product your name, address, de-
scription of problem, phone number and copies of sales receipt and warranty. A check or money order in the amount of $10.00
to cover the cost of postage and handling is also required. Package and return to CenterPoint, Crosman Corporation, 7629 Rts.
5 & 20, Bloomfield, NY 14469. CenterPoint will not assume any responsibility for any loss or damage incurred in shipping
International Customers:
Please return product to your nearest distributor. If you do not know your distributor, please call
585-657-6161 and ask for our International Department for assistance. Shipping and handling costs may apply.
72601
OWNER’S MANUAL
READ ALL INSTRUCTIONS AND WARNINGS IN THIS MANUAL BEFORE USING THIS SIGHT
CenterPoint Precision Optics • 7629 Routes 5 & 20 • Bloomfield, NY 14469 • United States of America
www.centerpointoptics.com • 1-866-726-1122 • Made in China • P/N 72601A515
BUYER AND USER HAVE THE DUTY TO OBEY ALL LAWS ABOUT THE USE AND OWNERSHIP OF THIS SIGHT.
All CenterPoint™ sights are constructed with high quality precision machined parts. The rugged one piece tube con-
struction works for all terrains and weather. The sight is precision machined to exact tolerances from aircraft-grade
aluminum alloy.
Direct viewing of the sun can cause permanent eye damage. Do not attempt to view the
sun through this riflesight or any other optical instrument.
Always follow all rules of firearm and gun safety.
This product contains a chemical known to the state of California to cause cancer and
birth defects (and other reproductive harm).
Learning the parts of your sight
Learning the names of the parts of your new sight will help you to understand your owner’s manual.
1.
Ocular lens
2.
Elevation (vertical) adjustment
3.
Windage (horizontal) adjustment
4.
Red /Green illumination dial
5.
Objective lens
6.
Weaver-style mounting rings
Mounting Procedure
CAUTION:
Always ensure your rifle is UNLOADED, UNCOCKED and the safety is applied before fitting the sight. Practice safe
handling procedures at all times.
1.
Locate the proper mounting position on your rifle
2.
Loosen the mounting screws.
3.
Install and adjust the sight at a proper position to suit your shooting preferences, then tighten the mounting screws
NOTE:
Do not over tighten the screws as you could break the mounting studs.
The sight is now ready to be zeroed.
Sight Adjustment
The purpose of zeroing the sight is to ensure that the sight is aligned with the impact point of the
bullet. Before zeroing the sight, read the following adjustment instructions carefully.
1.
Place a target 100 yards away
2.
Ideally use a steadying device such as a bipod or shooting stand, aim at the center of the
target and fire a test shot, if safe to do so
3.
If the impact point of the bullet is exactly in the center of the target then the sight is zeroed. If
it is not, you will need to adjust the reticle using the elevation and/or windage adjustments
4.
Remove the caps from the windage and elevation dials
5.
Vertical Adjustment (Elevation) - Use tools to turn the adjusting knob as required. One click in
either direction equals 1 MOA
6.
Horizontal Adjustment (Windage) - Use your TOOLS to rotate the adjusting knob as required.
One click in either direction equals 1 MOA
7.
Having adjusted the windage and elevation as required, fire, if safe to do so, another test shot. Keep adjusting and test firing
until the test shot impacts on the center of the target when the reticle is on the center of the target. This is vital for accurate
shooting
8.
Once the sight is zeroed, be sure to put the windage and elevation caps back on