Calculator mode, Alarm mode, Operation guide 1174 – Casio 1174 User Manual
Page 3
Operation Guide 1174
3
To use Learning Mode data
1. In the Timekeeping Mode, press B to select the Learning Mode (
LEARN
).
2. Point the signal emitter at the device you want to control and press the button to
which the function is assigned.
To clear Learning Mode data
1. In the Timekeeping Mode, press B to select the Learning Mode (
LEARN
).
2. Hold down A for one or two seconds, until the data memory display appears.
3. Press the button that corresponds to the Learning Mode data you want to delete.
When you do, that button’s marking flashes on the display.
4. Hold down B until the button marking stops flashing.
5. Press A to return to the Learning Mode.
Troubleshooting Guide
Problem: Remote control functions do not work at all.
• Possible Cause: Use of the wrong mode (TV/Video/Learning)
Action: Make sure the watch is in the TV Mode when you are trying to control a
TV, in the Video Mode when you are trying to control a video tape deck,
or in the Learning Mode when you are trying to control a unit whose
data you have stored using the Learning Mode. See “About the
Timekeeping sub-modes” for details on changing modes.
• Possible Cause: Wrong manufacturer code
Action: You must set the correct manufacturer code for the type of TV or video
tape deck you are trying to control. See “To set the manufacturer code”.
• Possible Cause: The path between the signal emitter and device you are trying
to control is blocked or too long (more than five meters).
Action: Make sure that the path between the watchs signal emitter and the
signal receiver of the device being controlled is not blocked b clothing,
your hand, furniture, etc. Reduce the distance between the signal
emitter and device if necessary.
• Possible Cause: Your TV or video tape deck is not equipped with an infrared
remote control system.
Action: Use this watch only with TVs or video tape decks equipped with an
infrared remote control system.
• Possible Cause: The main power switch of the TV, video tape deck, or other
device is switched off.
Action: Use the main power switch to switch power on.
• Possible Cause: Manufacturer codes and Learning Mode data were altered
by battery replacement.
Action: Replacing the battery will cause the remote control data setting (TV
and video tape deck manufacturer codes, and Learning Mode data) to
be altered. Re-input the codes.
Problem: Some remote control functions do not work.
• Possible Cause: Improper pointing of the watch’s signal emitter.
Action: Make sure that the signal emitter is pointing directly at the device you
are controlling.
• Possible Cause: Use of button on the watch for which the TV/video tape deck
does not have a corresponding function.
Action: Some TV or tape deck models may not have functions that correspond
to the functions provided on the watch.
• Possible Cause: Direct sunlight shining on the infrared signal receiver port on
the TV or video deck.
Action: Take action so that direct sunlight does not shine on the infrared signal
receiver port on the TV or video deck.
Problem: Video deck functions do not work at all.
• Possible Cause: Your video tape deck might have a dual code (A Code/B
Code or Video 1/Video 2) remote control receiver.
Action: Try switching the setting (between A Code/B Code or Video 1/Video 2)
on your video tape deck until you find the correct setting for use with
the watch.
Problem: Cannot store Learning Mode data.
• Possible Cause: The remote control unit whose signals you are trying to store
is not an infrared type remote control unit.
Action: Use this watch only with devices equipped with infrared remote control
system.
• Possible Cause: The watch is not set up correctly to store data.
Action: This watch can store data in the Learning Mode only as long as one of
the key markings is flashing on the display. Perform the Learning Mode
operation correctly so that a key marking is flashing on the display.
• Possible Cause: The watch and remote control unit are not facing correctly or
they are too far from each other.
Action: Position the signal emitter of the remote control unit so that it faces
directly at the signal emitter of the watch. Make sure that the remote
control unit and watch are about three centimeters apart.
••••• Possible Cause: Error during storage of Learning Mode data (indicated by
“Er” message).
Action: Take care that you do not move the watch or the remote control unit
you are using while storing Learning Mode data. Otherwise, you may
be using a remote control unit whose infrared signals are incompatible
with this watch’s memory.
••••• Possible Cause: Memory full (indicated by “FL” message).
Action: Delete data that you no longer need to make room for new data.
Problem: Learning Mode operation does not work.
••••• Possible Cause: Improper storage of Learning Mode data.
Action: Check the display of key markings on the screen that appears when
storing Learning Mode data. If the marking of the button you are trying
to use appears on the display, it means that Learning Mode data is not
assigned to that button. Perform the correct procedure to assign data
to that button.
••••• Possible Cause: Operation of a button to which no Learning Mode data was
stored.
Action: Correctly store Learning Mode data.
Seconds
Hour
Minutes
Day of Week
Date
Month
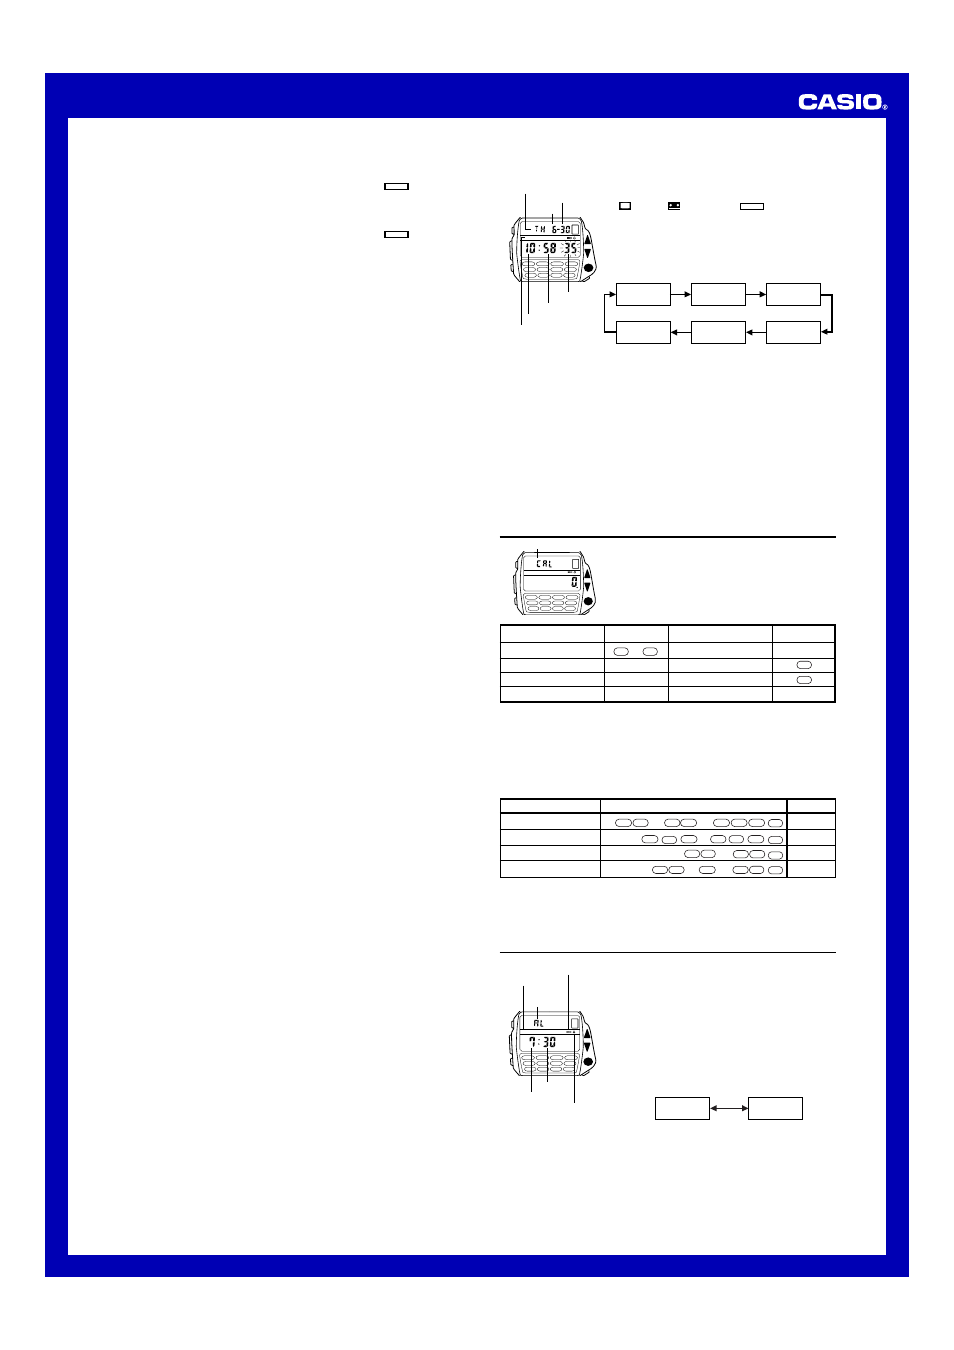
To set the time and date
1. Use C to enter the Timekeeping Mode.
• You cannot set the time and date starting from the TV
(
TV
), Video (
), or Learning (
LEARN
) Modes. If the
watch is in any of these modes, press C four times to
return to the Normal Timekeeping Mode.
2. Hold down A while in the Normal Timekeeping Mode
until the seconds digits start to flash on the display. The
seconds digits flash because they are
selected
.
3. Press C to change the selection in the following
sequence.
P
Day of week
Date
Month
PM indicator
Hour
Seconds
Minutes
B
A
C
D
• While the selection is flashing, press B to switch between 12-hour and 24-hour
formats.
4. While the seconds digits are selected (flashing), press
K to reset the seconds to
“00”. If you press
K while the seconds count is in the range of 30 to 59, the
seconds are reset to “00” and 1 is added to the minutes. If the seconds count is in
the range of 00 to 29, the minutes count is unchanged.
5. While any other digits (besides seconds) are selected (flashing), press
K to
increase the number. While the day of the week is selected, pressing
K advances
to the next day. Holding down
K changes the current selection at high speed.
6. After you set the time and date, press A to return to the Timekeeping Mode.
• The watch does not make any allowance for leap years. Be sure to manually set
February 29 (when one occurs) for the appropriate date.
• If you do not press any buttons for a few minutes while a selection is flashing, the
flashing stops and the watch goes back to the Timekeeping Mode automatically.
Calculator Mode
The Calculator Mode lets you perform addition,
subtraction, multiplication, and division using 8-digit
values (7 digits for negative values, because one digit is
used by the minus sign).
To use the calculator
• The following table shows the buttons you should use to
perform calculations in the Calculator Mode.
Mode Indicator
B
C
A
D
Button
0
to
9
K
L
●
Calculator Mode Function
Numeric input
Addition (
+)
Subtraction (
−)
Multiplication (
×)
Calculator Mode Function
Division (
÷)
Decimal point (•)
Equals (
=)
Calculator clear
Button
D
B
•
=
• Input calculations just as you do with any standard calculator, as shown in the
examples below. Be sure to press B to clear the calculator before beginning each
calculation.
• If you press the wrong arithmetic operation key, simply press the correct key before
inputting anything else.
• If the result of a calculation exceeds 8 digits, an “E” (error) indicator appears on the
display. Press B to clear the error indicator.
Calculation Examples
Example
35
+ 64 −123 = −24
2.3
Ч 5.2 = 11.96
89
ч 56 = 1.5892857
56
Ч 3 − 89 = 79
Operation
B
3
5
K
6
4
L
1
2
3
=
B
2
•
3
●
5
•
2
=
B
8
9
D
5
6
=
B
5
6
●
3
L
8
9
=
Display
−−−−−24.
11.96
1.5892857
79.
To switch the input tone on and off
While in the Calculator Mode, press A to switch the input tone on and off.
• A beep sounds when you press A to switch the input tone on. Nothing sounds
when you press A to switch the input tone off.
Alarm Mode
When the Daily Alarm is switched on, the alarm sounds
for 20 seconds at the preset time each day. Press any
button to stop the alarm after it starts to sound.
When the Hourly Time Signal is switched on, the watch
beeps every hour on the hour.
To set the alarm time
1. Hold down A while in the Alarm Mode until the hour
digits start to flash on the display. The hour digits flash
because they are
selected
.
• This operation will switch the Daily Alarm on
automatically.
2. Press C to change the selection in the following
sequence.
A
Hour
Minutes
B
A
C
Minutes
Hour
AM indicator
D
Mode
indicator
Alarm on indicator
Hourly time signal on
indicator
3. Press
K to increase the selected digits. Holding down K increases the selection
at high speed.
• The format (12-hour and 24-hour) of the alarm time matches the format you select
for normal timekeeping.
• When setting the alarm time using the 12-hour format, take care to set the time
correctly as morning (A) or afternoon (P).
4. After you set the alarm time, press A to return to the Alarm Mode.