Char-Broil 463620809 User Manual
Page 17
ASSEMBLY
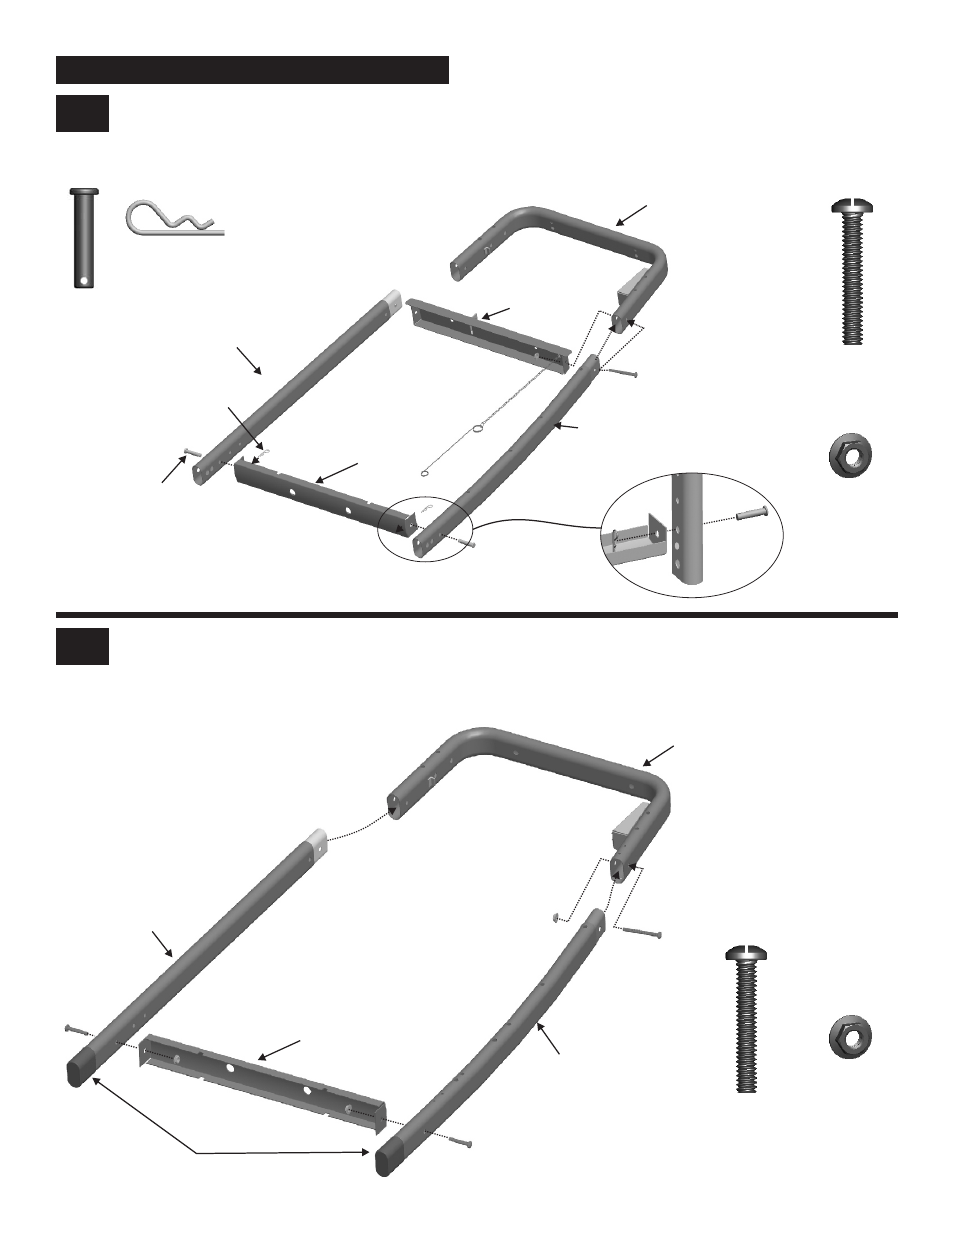
1
Hitch Pin
Qty. 2
Hinge Pin
Qty. 2
#10-24x1-1/4’’
Machine Screw
Qty. 1
#10-24
Flange Nut
Qty. 1
Left Front Leg
(Curve)
Suppo
rt Brack
et
Left Back Leg
(Straight)
Side Brac
e
Upper Leg
Hinge Pin
Hitch Pin
Left Leg
‘
Place one upper leg as shown
. NOTE: Left front and left back legs do not have leg extenders. In front, attach upper leg, side
brace and left front leg (curve) with
#10-24x1-1/4" screw and #10-24 flange nut.
‘
Attach support bracket in second hole from bottom of leg with hinge pins and hitch pins
(A).
2
#10-24x1-1/4’’
Machine Screw
Qty. 3
#10-24
Flange Nut
Qty. 3
Upper L
eg
Right Front Leg
(Curve)
Right Back Leg
(Straight)
Support Bra
cket
Leg Extender
17
Right Leg
‘
Place other upper leg as shown
. Attach upper leg and right front leg (curve) with #10-24x1-1/4" screw and #10-24 flange nut.
Tighten screws.
‘
Attach support bracket with
#10-24x1-1/4" screws and #10-24 flange nuts.
- BIG EASY 4638213 (1 page)
- 463666512 (28 pages)
- INFRARED 8401504 (8 pages)
- 463741209 (32 pages)
- 463420509 (32 pages)
- Patio Caddie 06601295 (20 pages)
- 4984722 (1 page)
- 463257010 (32 pages)
- NATURAL GAS CONVERSION KIT 7116572 (24 pages)
- PATIO BISTRO 10601578-16 (8 pages)
- 4654870 (16 pages)
- 463232011 (32 pages)
- THE BIG EASY 4638263 (1 page)
- SILVER SMOKER 3201560 (16 pages)
- 463210510 (32 pages)
- RED 463250211 (28 pages)
- 463250511 (36 pages)
- AMERICAN GOURMET 10301580 (16 pages)
- 80015625 (28 pages)
- 466247310 (32 pages)
- 461111811 (12 pages)
- 463460708 (28 pages)
- PATIO BISTRO 11601579 (8 pages)
- 463230511 (32 pages)
- 4651330 (16 pages)
- 11301696 (20 pages)
- QUICKSET 463742704 (1 page)
- 463263111 (32 pages)
- COMMERICAL 463248708 (32 pages)
- BISTRO 10601578 (8 pages)
- 463272509 (28 pages)
- 463741008 (27 pages)
- 11601578 (8 pages)
- 463262911 (24 pages)
- GRILL2GO 11401587 (8 pages)
- 463247512 (28 pages)
- T-47D 463251012 (40 pages)
- 463270911 (28 pages)
- HEATWAVE 461262409 (28 pages)
- 463460711 (32 pages)
- 463621611 (28 pages)
- PATIO BISTRO 11601578 (8 pages)
- 463244012 (32 pages)
- 415.161209 (28 pages)
- 463222209 (36 pages)