Kenmore 141.168600 User Manual
Page 11
Attention! The text in this document has been recognized automatically. To view the original document, you can use the "Original mode".
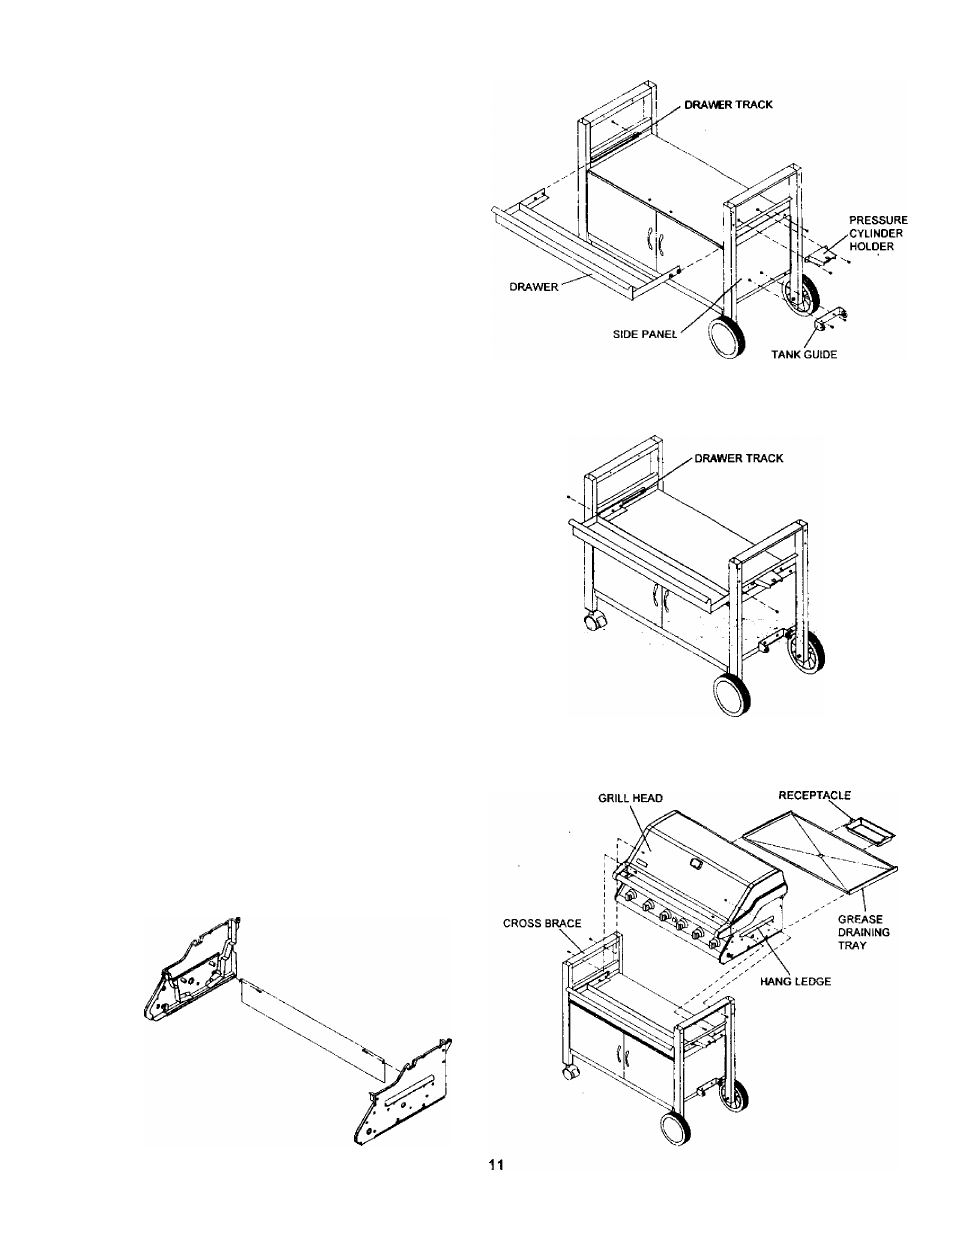
Attach the Pressure Cylinder Holder and Tank
Guide to the Cart Legs-Wheel Side of grill as
shown in Fig. 6. Align the tapped holes of both
parts wih the holes on Side Panel. Secure firmly
using 4 of the 1/4"x1/2" Phillips head screws and
nuts provided.
AssemUing The Grill Drawer
1. Instal 2 of the 1/4"x1/2" Phillips head screws
to the rear of the Drawer Track. Without these
screws the drawer will not stop properly.
2. Slide the Drawer into the Drawer Tracks until
it stops. See Fig. 7.
3. Instafi 2 of the 1/4"x1/2" Phillips head screws
to the front of the Drawer Track. This impor
tant step prevents the drawer from being
Figure 7
pulled outside the tracks. See Fig, 7.
Assembing The LP Gas Tank Hook
Figure 6
Installing The Grill Head
1. Now that you’ve assembled the grill cart you
can install the pre-assembled Grill Head. See
Fig. 8, To reduce the weight of the Grill
Head, we suggest you open the Grill Lid and
remove the packed components. Even with
the components removed, this step requires 2
people to lift and position the Grill Head onto
the grill cart. Be sure to align the 2 holes
beneath the hang ledge on each side of the
Grill Head with the 2 holes on each cross
brace of cart. Raise Grill Lid and insert 4 of
the 1/4"x1-3/8‘' Phillips head screws and lock
nuts and tighten securely.
2. From the back side of grill head, install the
Grease Draining Tray. See Fig. 8.
3. Center the Grease Receptacle under Grease
Draining Tray. See Fig. 8.
4. Install Rear Wind Shield between both Bowl
Side Panels by using 2 of the 1/4"x1/2"
Phillips head screws provided. See drawing
below.
Figure 8
GREASE