A. dishware preparation, B. loading the dishwasher, I. using your dishwasher – Kenmore 630.1730 User Manual
Page 6: Dishware preparation loading the dishwasher
Attention! The text in this document has been recognized automatically. To view the original document, you can use the "Original mode".
I. Using your Dishwasher
A. Dishware Preparation
1. General Guidelines
a)
Do not pre-wash items having loosely-attached soiling.
b)
Remove large food particles, bones, seeds, toothpicks, and
excessive grease.
c)
Items having burned-on or hard, stuck-on soiling may
require soaking and hand-scouring before being placed in
the dishwasher.
B. Loading the Dishwasher
1. General Guidelines
C A U T I O N
DISHWASHER DAMAGE:
Loading the dishwasher
with objects such as paper products, plastic bags,
packing materials, or anything other than normal
dishware and kitchenware could damage the
dishwasher. Do not load the dishwasher with anything
other than dishwasher-safe dishware and kitchenware.
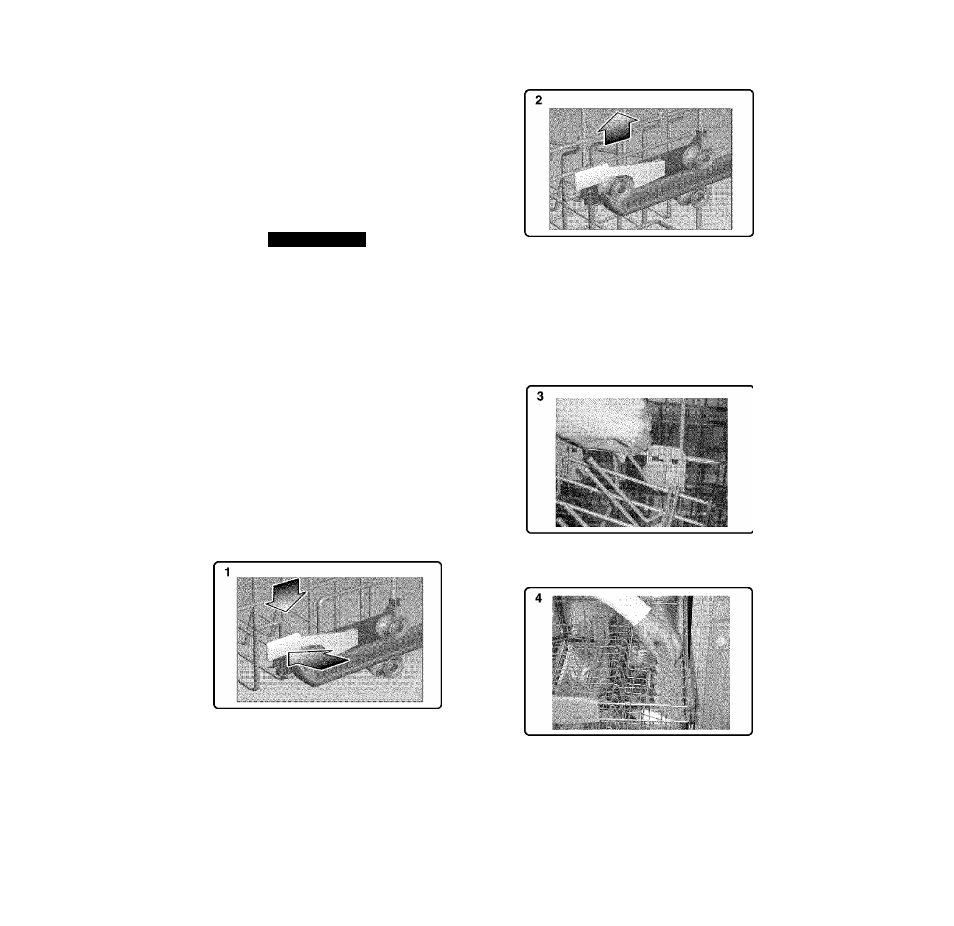
To raise the top rack:
c)
Pul! the top rack out of the dishwasher until it stops rolling.
Grasp the top of the rack above the Automatic Adjustability
handles and pull it upward as shown in Figure 2 until the
Automatic Adjustability handles lock the rack into position
(you do not need to press the Automatic Adjustability
handies in order raise the rack).
a) Check the Materials section of this manual if you are unsure
about an item’s dishwasher suitability.
b)
Load only dishwasher-safe items into the dishwasher.
c)
Load
items
so
that
water
can
reach
every
part
of
every
item.
d} Place pots, pans, cups, bowls, and glasses upsidedown in
the racks.
e)
Separate items of different metals.
2. Top Rack Accessories
Automatic Adjustability Top Rack Height Adjustment
The
top
rack
can
be
raised
to
accommodate
items
up
to
8”
(20cm)
in
the
top
rack
and
14”
(36cm)
in
the
bottom
rack,
or
lowered
to
accommodate
items
up
to
10”
(25cm)
in
the
top
rack and 12" (30cm) in the bottom rack.
To lower the top rack:
a)
Pull the top rack out of the dishwasher until it stops rolling.
b)
Press the blue Automatic Adjustability handles inward as
shown in Figure 1. The rack will drop to its lowered position.
NOTE: Before you push the top rack back into the dish-washer,
ensure that the rack height is the same on both sides.
Otherwise, the dishwasher door will not shut and the top rack
spray arm will not connect to the water circuit.
e) Push the top rack back into the dishwasher.
Flip Tines
Flip Tines fold down to make loading the racks easier in some
instances.
fi Grasp the tine stem as shown in Figure 3 and fold the tines
downward.
Cup Shelves
g) Grasp the Cup Shelves as shown in Figure 4 and fold them
down.
h) Place cups upside-down on the Cup Shelves. The Cup
Shelves can also hold large cooking utensils.
3. Loading the Top Rack
NOTE: Check the Wash Cycle Options section of this manual
for information on the Top Tier Only'^'^ cycle.
a)
Figure 5 shows a typical mixed load in the top rack.
Dishware Preparation Loading the Dishwasher