Electric dryer models, Installation procedure, Instructions for recessed or closet installations – Whirlpool Clothes Dryer User Manual
Page 6
Attention! The text in this document has been recognized automatically. To view the original document, you can use the "Original mode".
ELECTRIC DRYER MODELS
3" H-
-H’"K
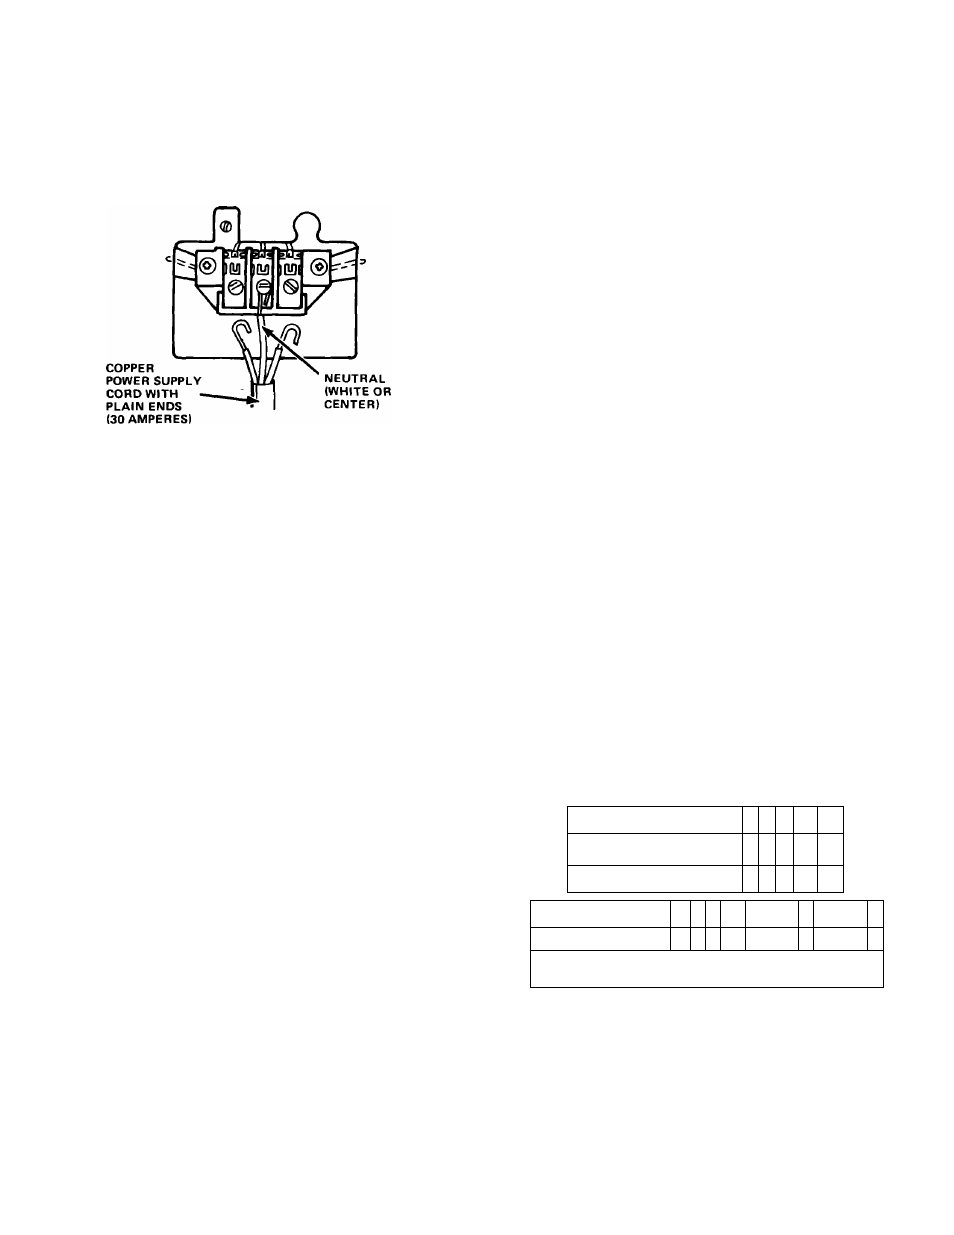
PLAIN-END FIELD WIRING
FIGURE 14
NOTE; The terminal connections at the dryer ter
minal block are suitable for connection of #10
copper wire only. To install plain-end field wire:
1. Strip outer covering back 3 inches from the end
exposing the 3 wires.
2. Strip the insulation back 1 inch from the end of
each wire. Form the bare wire into a "U" shaped
hook.
3. Loosen, do not remove, the center silver colored
screw of the terminal block.
4. Slide the end of the neutral (white or center)
wire under the screw head with the open side of
the hook on the right. Squeeze the wire together
to form a loop.
5. Tighten the screw firmly.
6. Connect the remaining 2 wires to the outer
screws the same way. Tighten screws firmly.
7. Tighten strain relief.
INSTALLATION PROCEDURE
1. Open the dryer door and remove the shipping
tape holding the dryer drum to the cabinet.
.2. Remove all literature and installation parts from
the dryer drum.
3. Block up the front of the appliance about four
inches and install leveling feet in the front corners.
These feet should extend approximately one inch.
Remove the block and repeat the procedure at the
rear of appliance.
For mobile home installations all floor mounted
dryers must be fastened to the floor during transit
using Kit No. 346765. The dryer does not need to be
fastened to the floor while the mobile home is not
in transit.
4.
Refer to the Exhaust System Requirements in
these instructions.
NOTE: For mobile home installations the dryer must
be exhausted to the outside. If the dryer is exhausted
through the floor and the area under the mobile
home is enclosed, it is recommended that the
exhaust system terminate outside the enclosure.
Extension beyond the enclosure will prevent the
accumulation of lint and moisture under the mobile
home.
5. Move the appliance into its permanent position.
Level appliance from front to back and from side to
side by adjusting the leveling feet.
INSTRUCTIONS FOR RECESSED
OR CLOSET INSTALLATIONS
The following installation spacings and door air
openings for the dryer are possible when installed
and exhausted as noted. (Spacing as indicated is in
inches and is minimum allowable. For ease of in
stallation and service, additional spacing should be
considered.)
CLOSET
DOOR
X______♦
B —
J_
I
I
L.
?
—I
H
—D
FRONT VIEW
(DOOR NOT
SHOWN)
—G
SIDE VIEW
FIGURE 15
FRONT VIEW
TO PREVENT LARGE AMOUNTS OF LINT AND
MOISTURE FROM ACCUMULATING AND TO
MAINTAIN DRYING EFFICIENCY, THIS MA
CHINE MUST BE EXHAUSTED OUTDOORS.
MINIMUM INSTALLATION SPACING
RECESS INSTALLATION
A
B
c
• ••
D
E
NON-EXHAUSTED (DEFLECTOR
LCK4000 REQUIRED)
0
0
4
•
EXHAUSTED
15
0
0
0
14
Max
CLOSET INSTALLATION
A
B C
• • •
D
**F
G
**H
J
EXHAUSTED ONLY
15
0
0
4
24 sq. in.
1
48 $q. in.
3
Unobstructed air openings required for laundry
equipment when door is installed.
*Shelf or cabinet is not permitted above dryer when
non-exhausted.
**Louvered door with equivalent air openings is
acceptable.
***"D" Dimension must be measured from dryer
cabinet rear panel.
Companion appliance spacings should be considered.
NOTE: No other fuel burning appliance may be
installed in the same closet.