Whirlpool 3397612 User Manual
Page 6
Attention! The text in this document has been recognized automatically. To view the original document, you can use the "Original mode".
Do Not
Remove
; Remove
the two rear corner
posts located at the
back of the
washer/dryer.
Remove the two
corner pieces
attached to the lower
front of the
washer/dryer, Do
Not
remove the foam
shipping pieces
between the washer
and dryer until the
washer/dryer is in place
rear
comer
posts
1 0
_
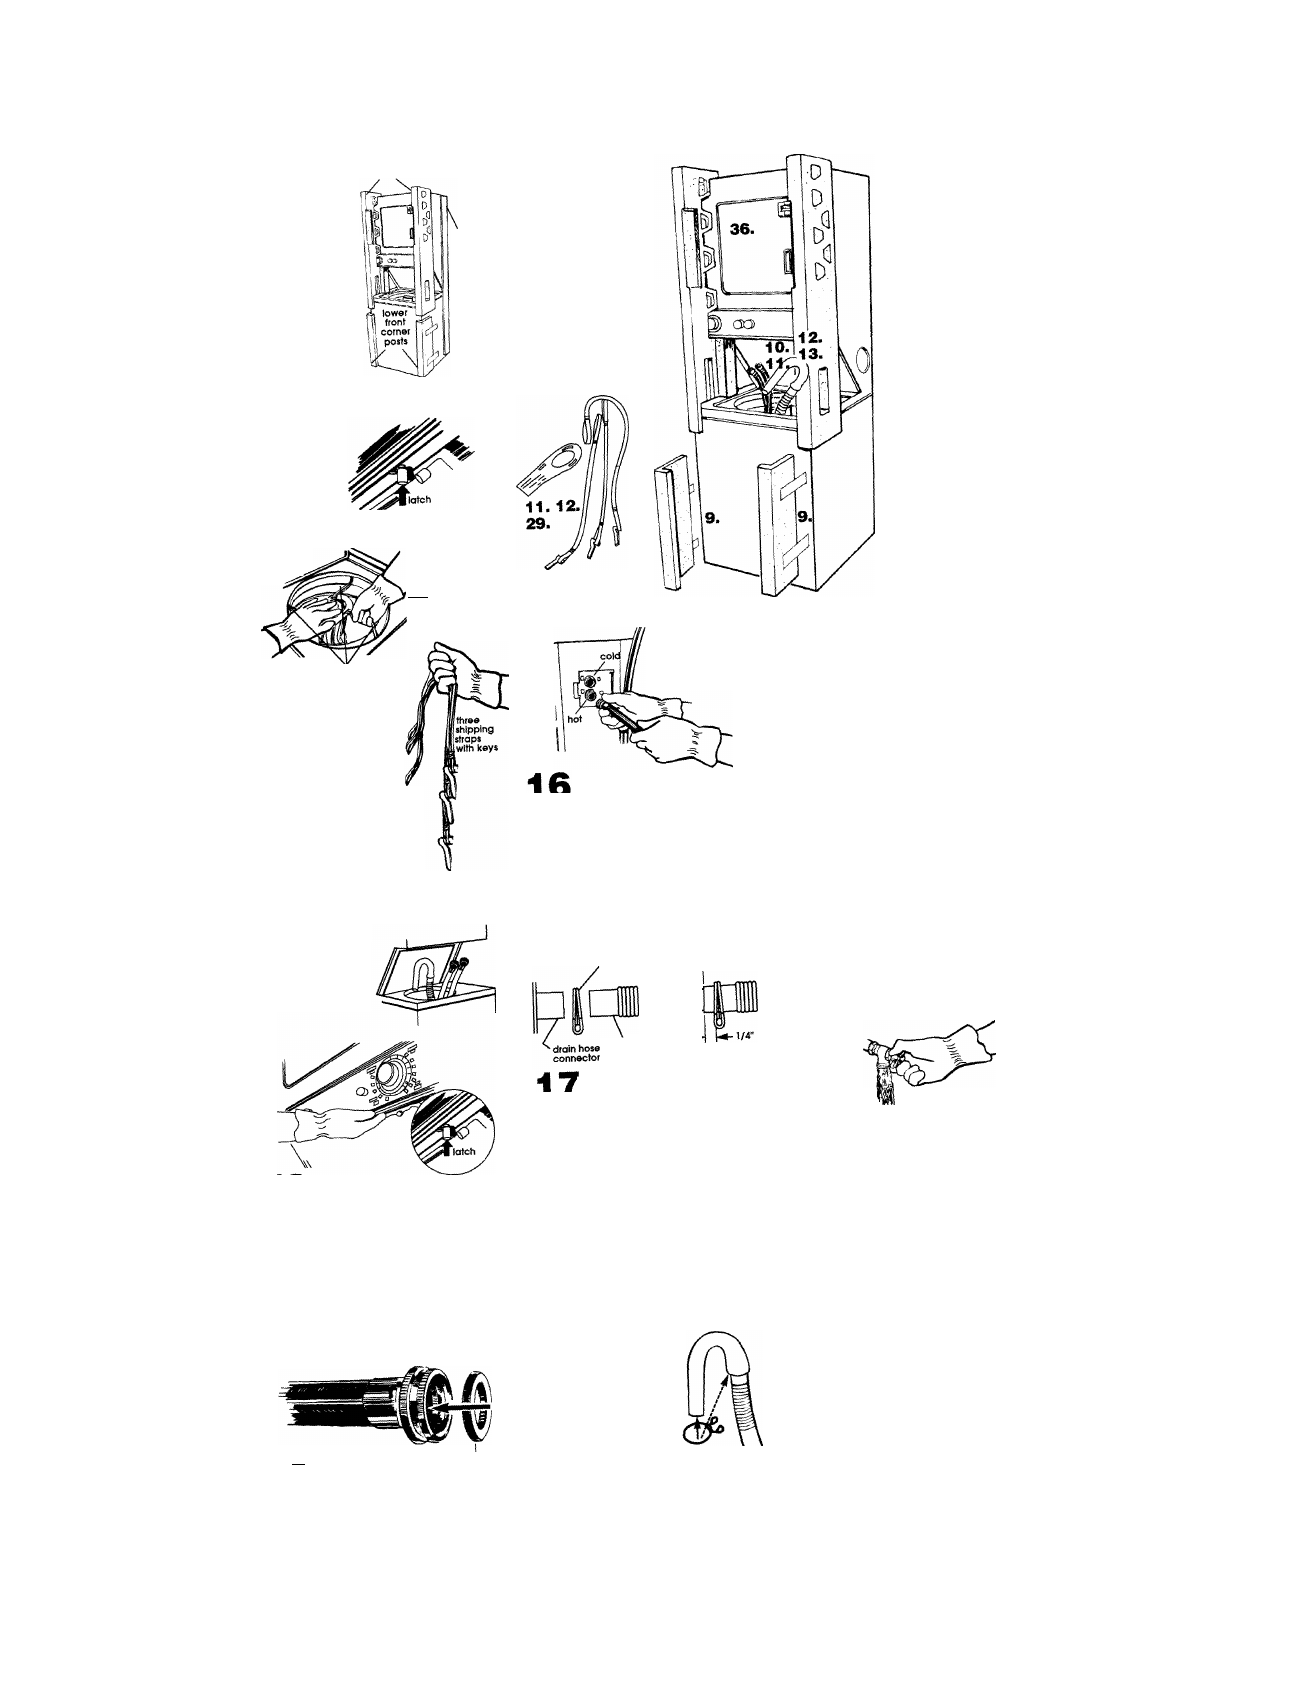
' ■ Move
foam shipping
pieces outward
just enough to
clear the washer
!id. Open the
washer lid. The
latch under the ^
dryer will hold lid open.
Read yellow
card. ■
Pull
giiihrge
Si!iEE!D£L^
straps with.
keys
completely
out of washer.
Do Not cut
shipping straps.
11
3 shipping straps
_ _ j Read the yellow
card. Place hand on top of
agitator when removing
the shipping straps. Firmly
jerk, then pull the
three
shipping strops
up until
each strap with key is
completely removed from
washer. Put straps in the same
area as other shipping pieces.
12
____ [Remove
yellow card. Take
hoses out of basket.
Place hoses with
other parts.
„
j
Release washer lid
by pushing up on latch. Close lid.
14
.
B
^Disconnect
the
power
supply.
Connect power supply cord or cable to
dryer. See "Electrical connection.
Panels B and C. Do Not plug power
supply cord into outlet or reconnect
power at this time.
Use new hoses and washers that came
with your washer/dryer.
m
jp||
coupling washer
I ■ Insert a flat washer into
each
end of the inlet hoses. Check that
wQshsrs or© firrnly SGOted in couplings.
Numbers
correspond
to steps.
n
9.
Inlet valves are
plastic. Do not strip
or crossthread.
^
■! Attach hose to bottom (hot
water) inlet valve opening first, then
second hose to top (cold water) irilet
valve. Tighten couplings by hand. Use
pliers to make an additional two-thirds
turn.
IMPORTANT: THIS PROCEDURE
MUST BE FOLLOWED TO ASSURE
proper
INSTALLATION.
clamp
I
1/4"
H*-max.
drain hose
. . ■To prevent the drain hose
from coming off or leaking, it mu^ be
installed per the following instructions:
1. Wet the inside end of the
with tap water.
DO NOT USE ANY
OTHER LUBRICANT.
2. Squeeze ears of drain hose clamp
with pliers to open and place clamp
over the end of the drain hose,
3. While holding clamp open, work end
of drain hose onto drain connector.
4 Position clamp over the drain hose
area marked "clamp." Release
clamp. Clamp should be 1 /4 inch
from end of drain hose.
18
.
_ ^ j standpipe or
laundry tub drain system;
Open yellow clamp and
slide over "hook" end of
drain hose to secure the
rigid and corrugated
sections together.
Floor drain system;
Do
Not install "hook" end of dram hose to
corrugated section. Consult your
plumber for proper installation.
ly
L
Slide washer/dryer onto cardboard or
hardboard before moving across floor to
avoid damaging floor covering.
19
—
^ If you hove room to work from
either side of the washer/dryer,
move
washer/dryer
close to final position so
complete the following
steps. (Go to Step 20.)
If YOU ore working in o closet w
recessed oreo,
move the washer/dryer
into final position and remove
cardboard/hardboard from under
washer/dryer. Remove the two foam
shipping pieces between the washer
and dryer and place with the other
shipping
pieces. Remove the two
phillips-head screws located at the top
oiShe access ponei. (See Mraflon ^
Step 25.) Remove access panel and set
access pane! and
Complete the following steps through
the access area.
20
.
^^■Put "hook" end of drain hose
into laundry tub or standpipe. Check for
proper length of drain hose.
21
M ■ KiBefore attaching water inlet
hoses, run water through both Jauc^ts
into a bucket. This will get rid of particles
in water lines that might dog hoses.
Mark which is the hot water faucet.
22
.
J Attach
bottom inlet hose
(inlet marked "H") to hot water faucet.
Attach top inlet hose (inlet marked c )
to cold water faucet. Tighten couplings
to the faucets by hand. Use pliers to
make final two-thirds turn.
Panel E