Before yott start, Electrical requirements, Tools and materials needed for installation – Whirlpool 3397612 User Manual
Page 2: Electrical requirements a, Warning
Attention! The text in this document has been recognized automatically. To view the original document, you can use the "Original mode".
Before yott start...
Check location where washer/dryer will
be installed. Proper Installation is your
responsibility. The washer/dryer must not
be installed or stored in an area where it
will be exposed to water and/or
weather. Make sure you have
everything necessary for correct
installation.
Location:
Should be large enough
to fully open dryer door to 90°. See
Panel G for "Recessed and closet
installation instructions" and
"Product dimensions."
Grounded electrical outlet
is
required. See "Electrical
requirements."
Standpipe drain system:
Needs q two-inch diameter
standpipe with minimum
carry-away capacity of
17 gallons per minute. Top of
standpipe must be at least
28 inches high and no higher
than 48 inches from floor.
Floor drain system
requires
a siphon break. Part
No. 285320, available
from your authorized
parts distributor.
A
warning
Check code requirements:
Some codes limit or
Do Not permit installation of clothes dryers in
garages, closets, mobile homes and sleeping
quarters. Contact your local building inspector.
Check utilities:
Proper water and
electrical supply connections
must
be
available.
Hot and cold water faucets:
Must be within 4 feet of the
back of the washer/dryer
and provide water pressure
of 5-100 PSI.
Do Not store or operate
washer/dryer below 32° F (some
water may remain in washer).
Proper operation of dryer cycles
requires temperatures above 45°F.
See Use & Care Guide for
“Winterizing” information.
Level floor:
1-inch maximum
slope under entire
washer/dryer.
Water heater:
Set to deliver 140°F
water to the washer.
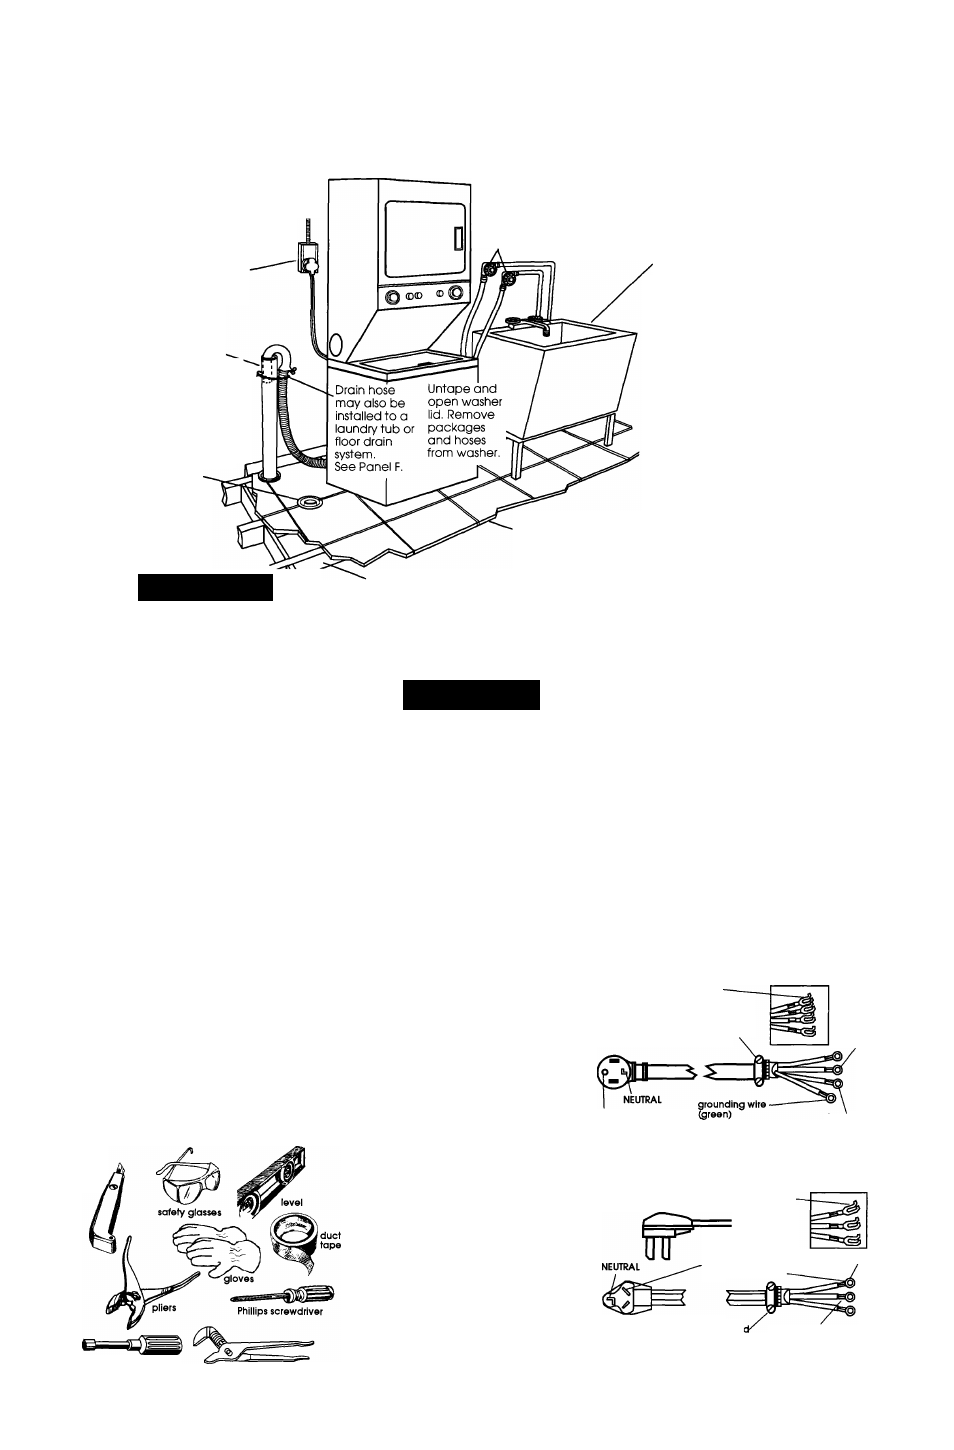
Laundry tub drain system:
Needs a
20-gallon laundry tub, Top of tub
must be at least 28 inches high and
no higher than 48 inches from floor.
If a longer drain hose is needed,
drain hose (Part No. 388423) and
hose extension kit (Part No. 285442)
are available from your authorized
parts distributor.
Dryer may be exhausted from the
rear or left or right side. Exhausting
through the side requires Pqrt No.
279823. See "Exhaust requirements,"
Panels C and D.
Four-inch metal exhaust duct is
required.
SEE RECESSED AREA INSTRUCTIONS
ON PANEL G.
Important: Observe all
governing codes and
ordinances.
Electrical Shock Hazard
It is the customer’s responsibility:
To contact a qualified electrical
installer.
To assure that the electrical
installation is adequate.
Failure to do so could result in death
or serious injury.
Fire Hazard
For your safety, the information in
this manual must be followed to
minimize the risk of fire or explosion
or to prevent property damage,
personal injury or loss of life.
— Do Not store or use gasoline or
other flammable vapors and
liquids in the vicinity of this or
any other appliance.
— Never install washer/dryer up
against draperies or curtains or
on carpet.
— Keep any and all items from
falling or collecting behind the
washer/dryer.
— Replace all access panels before
operating washer/dryer.
Failure to follow these instructions
could result in a fire.
'Support:
Floor must be
sturdy enough to
support washer/dryer
weight, with water and
clothes, of 375 pounds.
Electrical requirements
A
warning
Tools and materials
needed for installation:
V
Electrical Shock Hazard
Electrical ground is required on this
washer/dryer.
Do Not ground to a gas pipe.
Do Not modify the power supply cord
plug. If it will not fit the outlet, have a
proper outlet installed by a qualified
electrician.
Use a new 30-ampere power supply
cord kit. Do Not reuse an old power
supply cord. Possible electrical shock
or fire hazard could occur if old power
supply cord is used.
Do Not have a fuse in the neutral or
grounding circuit. A fuse in the
neutral or grounding circuit could
result in an electrical shock.
Do Not use an extension cord with
this washer/dryer.
Check with a qualified electrician if
you are not sure washer/dryer is
properly grounded.
Failure to follow these instructions
could result in death or serious injury.
electrical installation is adequate and in
conformance with the National
Electrical Code, ANSI/NFPA 70 — latest
edition*, and all local codes and
ordinances.
Copies of the standards listed above may be
obtained from;
' National Fire Protection Association
Batterymarch Park
Quincy, Massachusetts 02269
Power supply cord
Local codes may permit the use of a U.L-
listed, 120/240-volt minimum, 30-ampere,
dryer power supply cord kit (pigtail).
Power supply cord should be Type SRD or
SRDT and be at least four feet long. The
wires that connect to the dryer must end
with ring terminals or spade terminals with
upturned ends. A 3/4", U.L.-listed strain
relief must be installed where the power
supply cord connects to the dryer (see
Figures 1 and 2).
spade
terminals with
upturned ends
NEUTRAL
(white)
3/4" U.L.-listed
strain relief
grounding
prong
ring
terminals
utility
knife
1/4" socket wrench
or nut driver
Panel A
slip-joint pliers
that open to
1-1/2" minimum
If codes permit and a separate grounding
wire is used, it is recommended that a
qualified electrician determine that the
grounding path is adequate.
A four-wire or three-wire, single-phase,
120/240-volt, 60-Hz, AC-only electrical
supply (or four-wire or three-wire,
120/208-volt, if specified on the
model/serial rating plate) is required on
a separate, 30-ampere circuit, fused on
both sides of the line. A time-delay fuse
or circuit breaker is recommended. The
model/serial rating plate is located in
the door well behind the dryer door on
the front of the opening.
It is the personal responsibility and
obligation of the customer to contact a
qualified electrician to assure that the
Four-wire power supply cord
NEMA 14-30P
Figure 1
spade
terminals with
upturned ends
This blade connected
to this conductor. ■
3/4" U.L.-liste
strain relief
ring terminals
NEUTRAL
(white or center)
Three-wire power supply cord
NEMA 10-30P
Figure 2