Operation (continued), Installation! (joist mounting - i), Important – Panasonic FV-13VKML3 User Manual
Page 7: Joist situation, Suspension bracket connect method
Attention! The text in this document has been recognized automatically. To view the original document, you can use the "Original mode".
OPERATION (CONTINUED)
Motion
>
The low speed is determined by air volume preset switch.
>
The delay time is determined by High/Low delay time preset switch.
>The unit maintains the higher speed for an adjustable duration of 0.5 to 60 minutes, after motion
is no longer detected.
mm
y-O
:>:>
Human
active
a
Z
1
Fan active
At low
speed
When motion is
detected, fan runs
at the high speed.
Remains running
at high speed until
the delay time has
passed.
mm
_i
_i
coco
>>
m 00
y - O
:>:>
Cl_ LU
Human
active
Fan active
At low
speed
When manual wall
switch is closed,
fan runs at the high
speed.
When manual wall
switch is opened.
Fan remains running
at high speed until
the delay time has
passed.
(Models of FV-13VKL3 and FV-08VKL3 have only one steady air volume, when the power switch is closed,
FV-13VKL3 works steadily at 130CFM and FV-08VKL3 works steadily at 80CFM, when the power switch is
opened, it will stop running.)
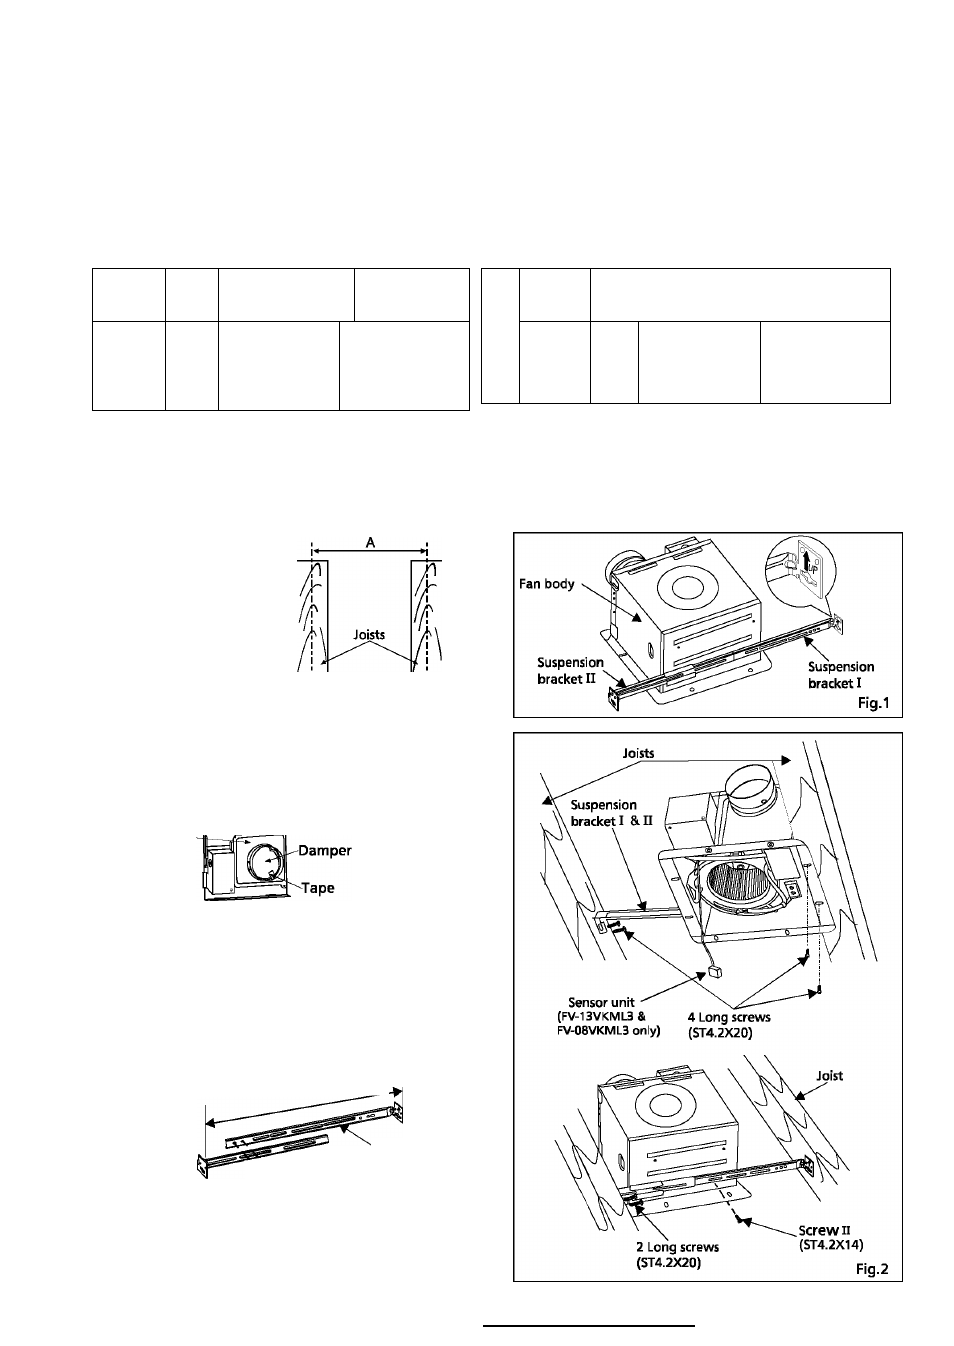
INSTALLATION! (JOIST MOUNTING - I)
Joist situation:
Spacing A is 16 inches
(406 mm) to 24 inches
(609 mm) on center joists
1. If the spacing A is 16 inches (406 mm) to 24 inches
(609 mm) on center joists, please follow the
installation step as below.
IMPORTANT:
Remove the tape from damper and adaptor
before installation. As shown below:
Adaprtor-^
2. Insert the suspension bracket I and ii into the fan
body. (Select the suspension bracket connection
holes as shown below) (Fig.1)
Suspension bracket connect method:
Suspension bracket I and II connect with
screw I as shown below:
Unit: inches (mm)
Suspension
bracket II ^
13 1/4 -15 1/2(336-394)
16 1/2 -18 3/4(419-480)
21 1/4 -23 1/2(540-597)
Suspension
screw
I bracket I
(ST4.2X6)
3. Install the suspension bracket and the flange
of frame to joists by using long screws
(ST4.2X20) and secure it to the fan body by
using screw II (ST4.2X14). (Fig.2)