Go-Ped ESR750H PPV User Manual
Page 7
2.4
Rules to Scoot By (Continued):
· Stop at all stop signs/lights
· Be careful when checking traffic and don’t swerve when looking over your shoulder
· Always go with traffic flow and keep to the far side of the road
· Never ride on sidewalks
· Avoid riding in bad weather, wet, muddy, icy conditions or when visibility is obscured
· Do not do stunts, wheelies or jumps. They will increase your chances of injury and damage to
your scooter/kart.
· You are sharing roads, trails and riding areas with others. Respect their rights, and be tolerant if
they inconvenience you.
· Always yield right of way to pedestrians and animals. Ride in a way that does not frighten or
endanger them, and avoid riding near them whenever possible.
· Keep your speed consistent with the conditions, and keep in mind that speed has a direct
relation to control as well as component stress.
· Never carry passengers.
· Never carry anything that can obstruct vision, or control of your scooter.
· Everyone must be responsible for the environment, ride accordingly.
2.5
Stunts, Wheelies, or Jumps: The electronics in your ESR are sensitive to heavy vibration
and shock loads. These stunts can be fun, but it puts incredible stress on everything. Riders who
insist on jumping risk serious damage to their scooter/kart and themselves.
2.6
Wet Weather Riding: Riding in wet conditions is not recommended and must be avoided.
WARNING: Wet weather impairs traction, braking and visibility, for riders and
others. The risk of accident dramatically increases in wet conditions and should
be avoided.
2.7
Night Riding: Never ride your scooter/kart at night or in conditions of poor visibility.
WARNING: Riding at dawn, dusk, or at times of poor visibility without a lighting
system which meets local regional laws and without approved reflectors is illegal,
dangerous and can result in serious injury or death.
Section 3: Assembly
3.1
Pre-Assembled Scooters.
Some models come completely and fully assembled so there is no assembly
requirement other than an inspection of all components to insure that nothing
was damaged during shipment. If you see any damage or stressed compo-
nents then contact your local authorized Go-Ped® dealer for replacements or
repairs to those components.
3.2
Some Assembly Required.
Some models are shipped in the box partially assembled for shipping pur-
poses. Before doing any final assembly do an inspection of all components to
insure that nothing was damaged during shipment. If you see any damage or
stressed components then contact your local authorized dealer for replace-
ments or repairs to those components.
A. Front Wheel
1. Inspect all components for damage
2. Remove bolt and washers from end of front axle. A1
3. Remove front axle from front fork or bag. A1
4. Insert brake disc into front brake caliper and align wheel with axle bushing.
A2
5. Insert axle through steering arm bushing and into wheel hub. It may be
necessary to align inner wheel spacer between bearings to allow axle
insertion. A2
6. Install axle and tighten axle bolt and nut until snug. A3
7. Check wheel rotation and proper front brake actuation.
The Off-Board charger has its own LED charging status lights. Please read any instructions that
accompanied your Off-Board charger.
Note: The Battery Management System (BMS) that accompanies each Li-Ion battery will protect
the battery cells from over discharging and damaging the cell(s). Before the battery level can drop
near damaging levels the BMS will “Shut Down” all power to the unit in order to protect the cells
from possible harm. If this occurs simply plug the “Off-Board” charger into your unit and charge.
The Off-Board charger will communicate with the BMS systems, correct the fault, and bring the
batteries back to safe operation parameters.
Note: The onboard charger does not communicate with the BMS needed to correct potential faults.
Note: Do not operate your unit with the Off-Board charger connected to your unit.
4.3
Fuel Gauge (Flux Capacitor)
There are three LED’s on the throttle control, which indicate the level of charge in the batteries.
When the scooter is turned on and batteries are fully charged, all three LED’s will illuminate
(green, yellow, red). After some riding, when the batteries are only partially charged the green LED
will turn off, leaving only the yellow and red LED’s illuminated.
After more riding, when the batteries are low the yellow LED will turn off and the red LED will begin
flashing. This indicates that you are nearly out of power and time to recharger the batteries!
If you continue riding after the red LED begins to flash, the scooter will slow and
may eventually turn itself off automatically. This is a safety feature intended to
protect the batteries from damage. If this occurs, fully charge the batteries and
then the scooter will be ready to resume operation.
Note: Li-Ion models will need to be charged by the “Off-Board” charger to
reset the BMS fault. The onboard charger cannot reset BMS faults.
4.4
Power Switch
The power switch is a Red push button marked “ON/OFF” on the right side of the handlebar. Push
the button once to the IN position to turn the scooter on and again to the OUT position to turn the
scooter off. When the scooter is turned on the Flux Capacitor LEDs on the handlebar will be
illuminated.
4.5
Auto-Off Feature
Your unit has an Auto Off feature. If you accidentally leave your scooter on when you are done
riding, it will shut off automatically after 30* minutes. This helps to keep the batteries from being
drained when not in use. To restart your scooter simply turn the scooter off and then on again.
*The 30 minute setting can be changed or turned off by your authorized Go-Ped Dealer.
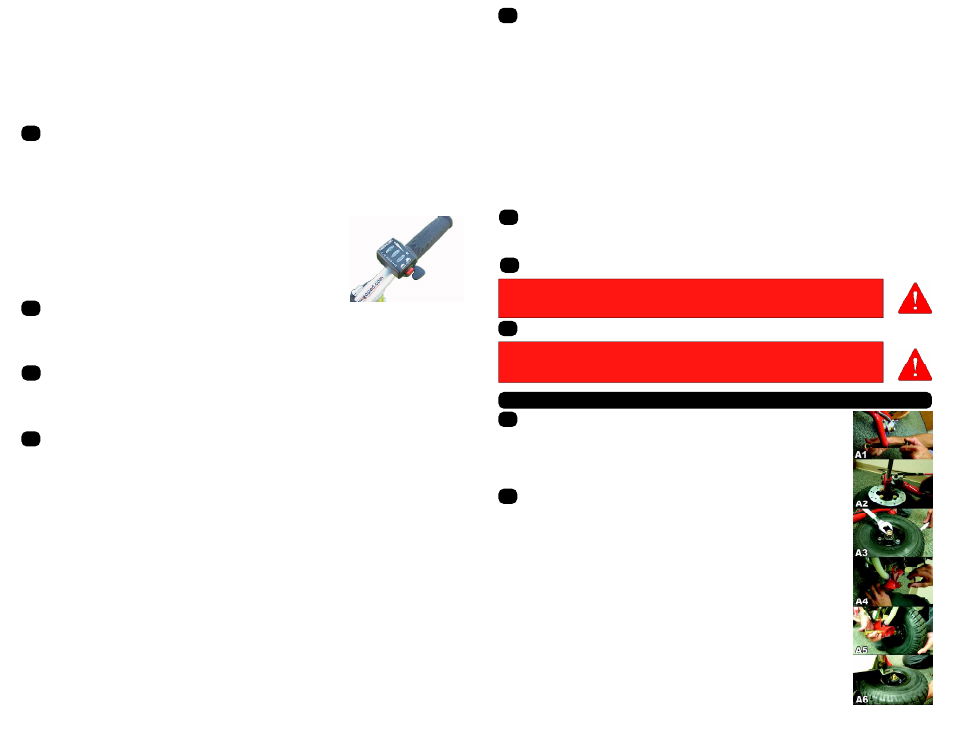
4.6
Economy/Turbo Modes
Your unit is equipped with two modes of operation, Economy and Turbo. Economy mode is
intended for lower speeds and maximizing the range you can travel on one charge.
Turbo mode is
intended for higher speed and faster acceleration. Your range will be lower in this mode.
The Economy / Turbo switch is a black rocker style switch on the throttle control. Do NOT confuse it
with the Red Round Power Switch (see photo)
The Economy / Turbo switch can be changed while stopped or while moving. Be very cautious about
switching into Turbo mode while in motion!
Economy mode limits power drawn to operate the motor . This has a direct effect on maximum
speed and power but will give your ESR the best range and keep the ESR operating efficiently.
Turbo Mode should be used with caution. In this mode, the motor can draw power from the
batteries at an extremely high rate creating tremendous heat in the motor in a very short time. This
is to give the user all of the potential power to achieve greater speeds, hill climbing capability, and
improved acceleration. In this mode, your usable range is greatly limited. It is important for the
operator to be aware that heavy loads on the motor is what creates over heating. Avoiding
frequent accelerations, burnouts, wheelies, towing heavy loads, long steep hill climbs, and the
likes that require the motor to work extra hard is highly advised. If riden beyond normal work load
to the motor, do periodic motor temperature checks by carefully feeling the temperature of the
motor. The best place is at one of the 2 power terminals and if it is too hot to hold your hand/finger
against, then stop riding and give it a chance to cool down before continuing. A motor that has
excess over heating will typically burn through it’s internal brush card before further damage to the
motor and require a new brush card to repair. Replacing a brush card is relatively simple but in
most cases replacing a card could have been avoided with a little user understanding and care.