Attach chain & rail support bracket, Warning, Assembly step 4 – Chamberlain CSO 1/2HP User Manual
Page 9: Attach the chain & rail support bracket, Figure 2 figure 1, Figure 3
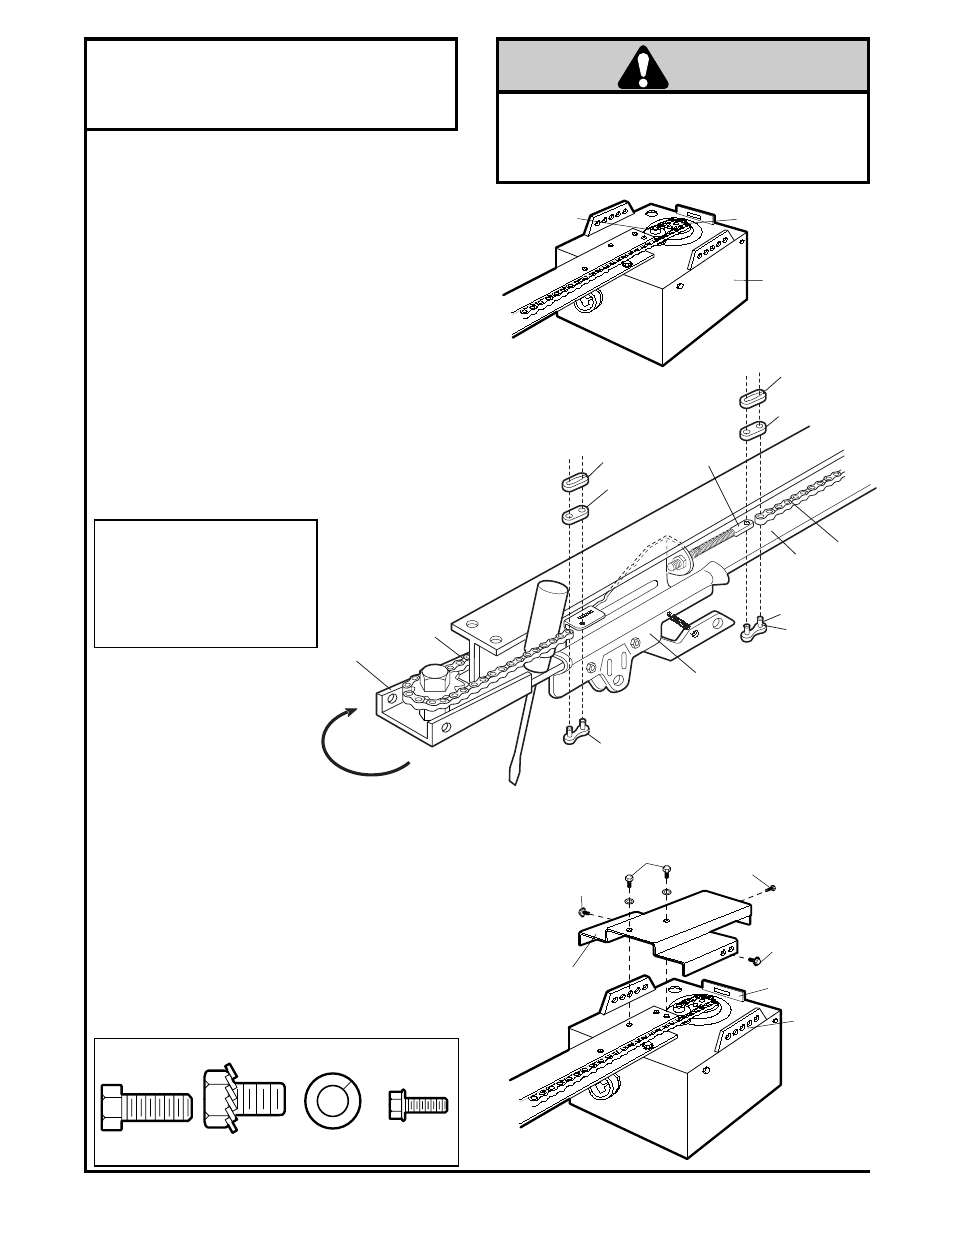
Assembly Step 4
Attach the Chain
& Rail Support Bracket
1/4"-20x5/8" Hex Screws
with Lock Washers
Rail Support
Bracket
5/16"-18x1/2"
Washered Screw
5/16"-18x1/2"
Washered Screw
#8-32x3/8"
Screw
Power Head
Side Flange
Power Head
Back Flange
Sprocket
Chain
Spreader
Power Head
9
To attach the rail support bracket:
• Position the rail support bracket on the power head.
• Attach the bracket to the rail with 1/4"20x5/8" hex
screws and lock washers.
• Attach the bracket to the power head by inserting a
5/16"-18x1/2" washered screw through a hole in
each side flange and a matching hole in the
bracket. Complete the connection by inserting the
#8-32x3/8" screw through the back flange and the
hole in the rail support.
• Remove the chain end from the carton and fasten
it to the trolley with a master link from the
hardware bag. See master link procedure,
Figure 1.
• With the trolley against the screwdriver, dispense
the chain around the pulley.
• Proceed back around the rail to the power head,
Figure 2. Guide the chain around the chain
spreader and sprocket. Be sure sprocket teeth
engage the chain.
• Continue forward to the trolley threaded shaft,
Figure 3.
• Use the second master link to connect the chain
to the flat end of the shaft. If necessary, loosen the
outer nut on the trolley to obtain more chain slack.
Check to make sure the chain is not twisted.
• Remove the screwdriver.
Figure 2
Figure 1
Serious injury can result if fingers become
entangled in moving opener sprocket. Attach
sprocket cover securely. Never operate opener
while your hand is near the opener sprocket.
WARNING
Washered Screw
5/16"-18x1/2" (2)
Hex Screw
1/4"-20x5/8" (2)
Screw
#8-32x3/8" (1)
Lock Washer
(2)
Hardware Shown Actual Size
Chain
Pulley
Bracket
Chain
Master
Link Bar
Trolley
Chain
Rail
Pin Notch
Pin
Master Link
Clip-On Spring
Master
Link Cap
Master Link
Clip-On Spring
Master
Link Cap
Install Chain
In This Direction
Flat End
of Trolley
Threaded
Shaft
Figure 3
Master Link Procedure:
Push pins of master link bar through
chain end and hole in front end of
trolley. Push cap over pins and past
notches. Slide clip-on spring over
cap and into notches until both pins
are securely locked.