Windy Nation Windtura 750 (No Slip Ring version) User Manual
Page 12
12
Step
2:
Locate
the
bag
labeled
“Electrical
Connectors”.
Slide
a
piece
of
shrink
tubing
(included)
on
all
three
slip
ring
wires.
Use
the
electrical
butt
connectors
to
connect
each
generator
wire
to
one
slip
ring
wire
as
shown
in
Step
2
of
Figure
4.
It
does
not
matter
which
slip
ring
wire
is
connected
to
which
generator
wire.
Step
3:
Before
applying
the
shrink
tubing,
test
all
three
of
your
crimp
connections
for
structural
integrity
and
continuity!
A
poorly
crimped
electrical
connection
will
negatively
affect
the
ability
for
power
to
transfer
from
the
generator!
Firmly
pull
on
both
wires
coming
out
of
the
butt
connector
to
test
for
structural
integrity.
Use
a
voltmeter
to
test
for
continuity.
After
you
are
satisfied
with
the
connections,
cover
each
crimp
connection
with
the
shrink
tubing
and
apply
a
heat
gun
to
the
shrink
tubing.
Step
4
(Not
shown
in
diagram):
The
generator/yaw
mount
is
now
sitting
on
the
tower
and
is
connected
to
the
wires
running
down
the
tower
pipe.
At
this
time,
short
the
three
wires
coming
out
of
the
bottom
of
the
tower
by
connecting
all
three
of
these
wires
together.
This
will
help
prevent
the
generator
from
spinning
once
the
blades
are
attached.
Note
that
shorting
all
three
of
these
wires
will
NOT
prevent
the
blades
from
spinning;
it
will
only
make
it
more
difficult
for
the
blades
to
spin.
This
is
done
as
a
safety
precaution.
Keep
these
three
wires
shorted
until
the
Windtura
750
is
ready
for
operational
use.
Bolting
the
Tail
Assembly
Together:
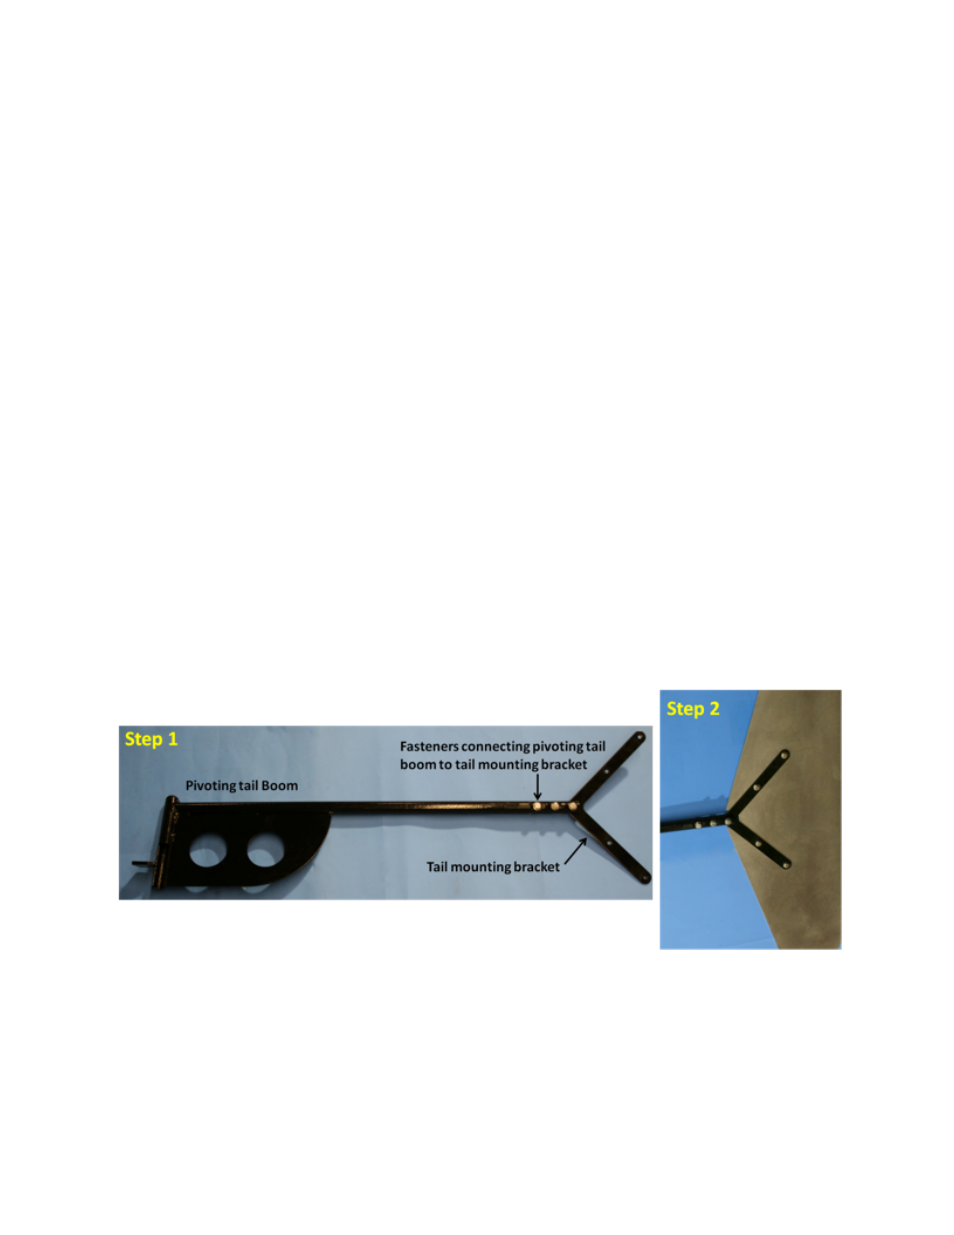
Figure 5: Diagram for connecting the tail assembly
Step
1:
Locate
the
pivoting
tail
boom
and
tail
mounting
bracket.
Locate
the
fastener
bag
labeled
“Tail
Assembly
Fastener
Set”.
Slide
the
tail
mounting
bracket
into
the
slot
in
the
back
of
the
pivoting
tail
boom.
Next,
locate
the
three
1.5
inch
long
bolts
and
insert
these
three
bolts
through
the
three
holes
in
the
pivoting
tail
boom
and
tail
mounting
bracket.
Now,
put
one
flat