Yamaha, Guitar/bass tuner, Precautions – Yamaha YT-1100 User Manual
Page 2: Components, Tuning procedures, Acoustic guitar tuning, Electric guitar/bass tuning, Pitch selection, Battery check, Battery change
Attention! The text in this document has been recognized automatically. To view the original document, you can use the "Original mode".
YAMAHA
GUITAR/BASS TUNER
YT-1100
OWNER'S MANUAL
Thank you for purchasing the YAMAHA YT-1100 Gui
tar/Bass Tuner.
Please read this manual thoroughly and keep it in a
safe place for future reference.
■ PRECAUTIONS
♦ To prevent damage, do not use the tuner in the following locations:
• places where the unit will be in direct sunlight;
• places subject to temperature and humidity extremes;
• places that are sandy or dusty.
♦ To power the tuner, use only a 6F22 or 006P 9V dry cell battery.
Other power sources may damage the device.
♦ For maximum battery life, always be sure the tuner is turned OFF
when not in use.
♦ To prevent possible damage due to leakage of battery fluid, remove
the battery from the tuner if it is not to be used for an extended
period of time.
♦ Do not subject the tuner to strong physical shock or vibration. Do not
use excessive force on any of the parts.
♦ Never use solvents such as benzine or thinner to clean the tuner.
Wipe clean with a soft, dry cloth.
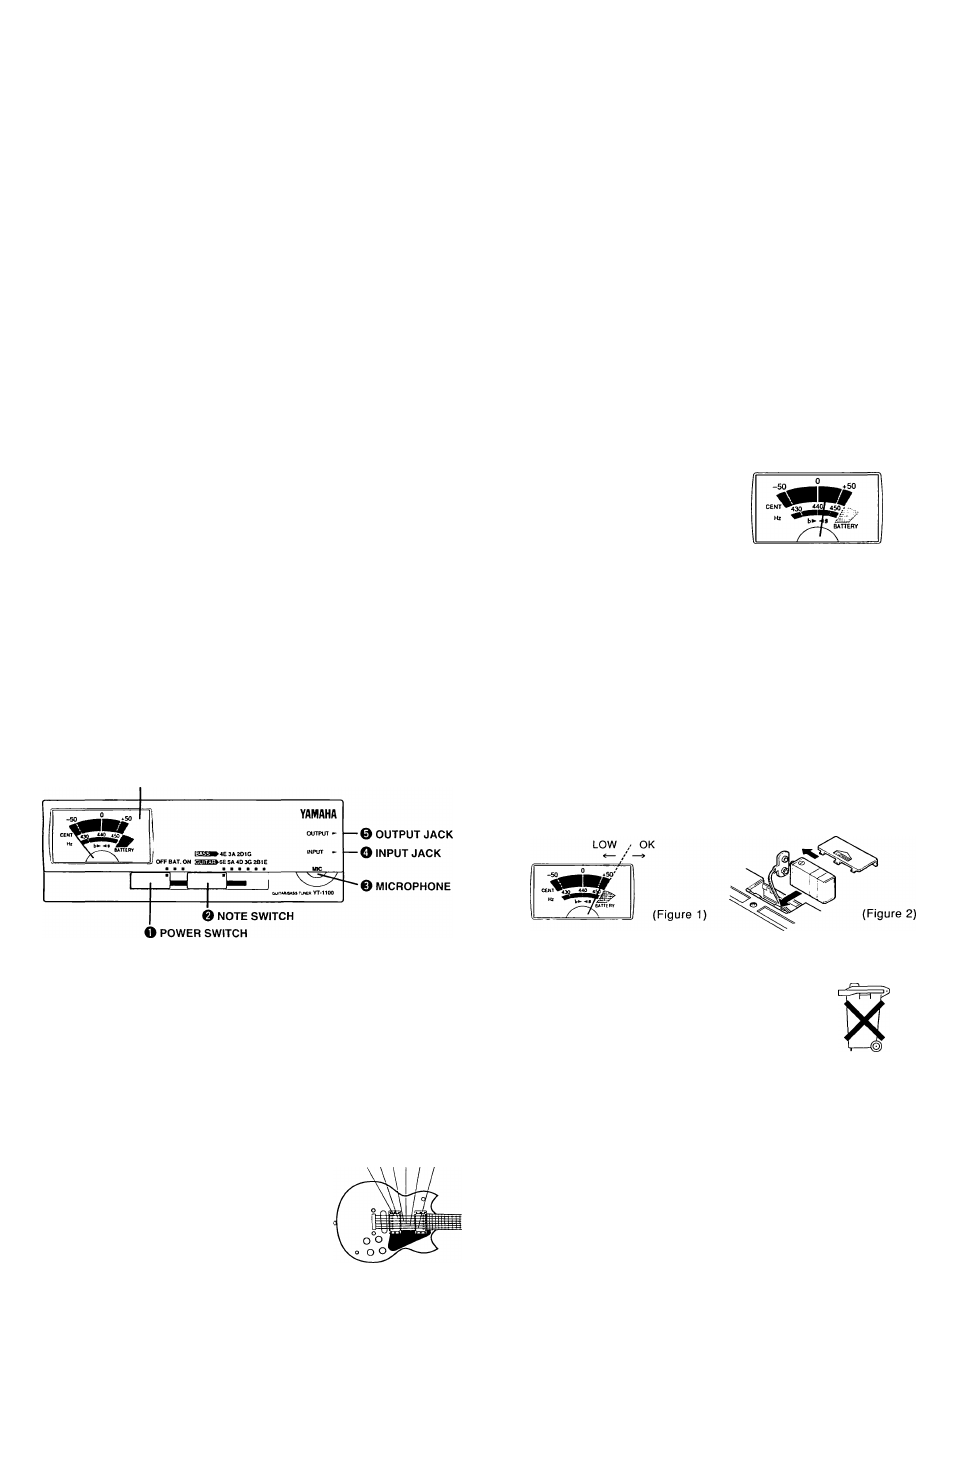
COMPONENTS
O vu
METER
■ TUNING PROCEDURES
• Acoustic Guitar Tuning
1. Move the power switch
O
to the “ON” position.
2. Move the note switch 0 to the desired tuning note.
3. Place the guitar sound hole near the built-in microphone ©.
*
The built-in microphone
©
cannot he used when there is a plug in the
input jack
O-
4. Pluck the string to be tuned. (Do not pluck more than one string at a
time.)
5. Adjust the tuning peg until the meter needle © rests in the middle of
the meter at 440 FIz (0 Cent). If the note is flat, the needle will lean
to the left; if the note is raised, the needle will lean to the right.
6. Repeat steps 4 and 5 to tune the other strings.
• Electric Guitar/Bass Tuning
1. Connect the guitar cord to the INPUT jack O. (At this time, the
OUTPUT jack © can be connected to an amplifier in preparation for
tuning during a performance.)
2. Follow the same acoustic guitar procedures as those outlined above.
■ PITCH SELECTION
The A4 standard pitch can be changed
from 440 Hz to some other pitch. For
example, if an A4 = 444 Hz standard
pitch is desired, tune the strings so
that the meter needle © rests at 444
Hz instead of 440 Hz when tuning.
■ BATTERY CHECK
Move the power switch
O
to the “BAT.” position. The meter needle ©
now indicates the charge remaining in the battery. If the needle rests
to the left of the battery check bar (refer to Figure 1), the battery needs
to be replaced immediately.
• Battery Change
The battery compartment is in the rear of the tuner. Remove the old
battery and replace it with a new one of the same type. Be careful to
connect the battery in the correct polarity.
*
Always turn the power switch
O
to “OFF" before changing the battery .
SPECIFICATIONS
Indicators
Tuning Notes
VU Meter Precision
Standard Pitch
Added Function
Jacks
Power Source
Battery Life
Dimensions
(WxHxD)
Weight
Accessory
VU Meter
6E(4E), 5A(3A), 4D(2D), 3G(1G), 2B, 1E
± 1 cent
A4 = 440 Hz
Battery Check
INPUT, OUTPUT
9V dry cell battery
(006P or 6F22)
Approx. 80 hours
146
X
48.5 x 32.5
mm
(5-3/4"
X
1-15/16"
X
1-1/4")
155 g (5.5 oz) with battery
9V dry cell battery (6F22) x 1
6
E 5A 40 3G 2B IE
*
Specifications and e.xternal appearance are subject to change without
notice.
Bij dit Produkt zijn batterijen geleverd. Wanneer
deze leeg zijn, moet u ze niet weggooien maar
inleveren als KCA.
THIS DIGITAL APPARATUS DOES NOT EXCEED THE “CLASS B” LIMITS FOR RADIO NOISE EMISSIONS FROM
DIGITAL APPARATUS SET OUT IN THE RADIO INTERFERENCE REGULATION OF THE CANADIAN DEPARTMENT
OF COMMUNICATIONS.
FCC INFORMATION (U.S.A.)
1. IMPORTANT NOTICE; DO NOT MODIFY THIS UNIT!
This product, when installed as indicated in the instructions contained in this manual, meets FCC
requirements. Modifications not expressly approved by Yamaha may void your authority, granted by the
FCC. to use the product.
2. IMPORTANT: When connecting this product to accessories and/or another product use only high quality
shielded cables. Cable/s supplied with this product MUST be used. Follow all installation instructions.
Failure to follow instructions could void your FCC authorization to use this product in the USA.
3. NOTE; This product has been tested and found to comply with the requirements listed in FCC Regula
tions, Part 15 for Class ”B” digital devices. Compliance with these requirements provides a reasonable
level of assurance that your use of this product in a residential environment will not result in harmful
interference with other electronic devices. This equipment generates/uses radio frequencies and, if not
installed and used according to the instructions found in the users manual, may cause interference
harmful to the operation of other electronic devices. Compliance with FCC regulations does not guaran
tee that interference will not occur in all installations. If this product is found to be the source of
interference, which can be determined by turning the unit "OFF" and "ON", please try to eliminate the
problem by using one of the following measures:
Relocate either this product or the device that is being affected by the interference.
Utilize power outlets that are on different branch (circuit breaker or fuse) circuits or install AC line filter/
s.
In the case of radio or TV interference, relocate/reorient the antenna. If the antenna lead-in is 300 ohm
ribbon lead, change the lead-in to co-axial type cable.
If these corrective measures do not produce satisfactory results, please contact the local retailer au
thorized to distribute this type of product. If you can not locate the appropriate, please contact Yamaha
Corporation of America, Electronic Service Division, 6600 Orangethorpe Ave, Buena Park, CA 90620
The above statements apply ONLY to those products distributed by Yamaha Corporations of America or
its subsidiaries.