Maintenance and service, Warning – Cub Cadet 53AJ8CT6050 User Manual
Page 17
17
levels. Bahia blades are configured without offset,
and with a maximum amount of sharpened cutting
edge.
Mulch- These blades are generally designed for use
in cutting decks equipped with mulch baffles. The
shape of the blade generally produces higher turbu-
lence in order that the grass can be repeatedly cut
and re-cut into smaller pieces. These blades gener-
ally require more horsepower than other blades.
Mulch blades work best when the grasses are cut at
the highest levels, minimal lengths of grasses are
removed, and grass conditions are generally dry.
MAINTENANCE AND
SERVICE
WARNING:
Disconnect the spark plug wires or remove the
key from the ignition to prevent the engine
from accidentally starting before performing
any maintenance on this mower.
A. Cleaning your Deck
Use the Deck Wash System to rinse grass clip-
pings from the deck’s underside and prevent the
buildup of corrosive chemicals. Complete the fol-
lowing steps after each mowing:
IMPORTANT: Make certain the machine’s dis-
charge chute is directed away from people, chil-
dren, animals, and your house, garage, parked
cars, etc.
a.
Drive the machine to a level, clear spot on
your lawn, near enough to a water faucet
(spigot) for your garden hose to reach.
b.
Make sure that the PTO (mower deck
blade engage) control is in the “OFF” posi-
tion.
c.
Move shift lever or speed control into the
“Neutral” position.
d.
Set the parking brake, and turn the ignition
key to the “STOP” position to stop the
engine.
e.
Thread hose coupler (packaged with this
manual) onto the end of your garden hose.
See Figure 6. Attach the hose coupler to
the water port on your mower deck’s sur-
face. See Figure 6. Turn the water on.
f.
While sitting in the machine operator’s
position, re-start the engine and place
throttle lever in the Fast (rabbit) position.
g.
Move the PTO control to the “ON” position.
h.
Remain in the machine operator’s position,
and with the mower deck engaged for a
minimum of two minutes per wash out,
start with the trim (operator’s left) side, and
allow the underside of the cutting deck to
thoroughly rinse.
i.
Move the PTO control to the “OFF” posi-
tion.
j.
Turn the engine off.
k.
Turn the water off, and detach the hose
coupler from the water port on your mower
deck.
l.
Clean up the grass clippings and other
materials washed from underneath the
mower deck, and dispose of them properly.
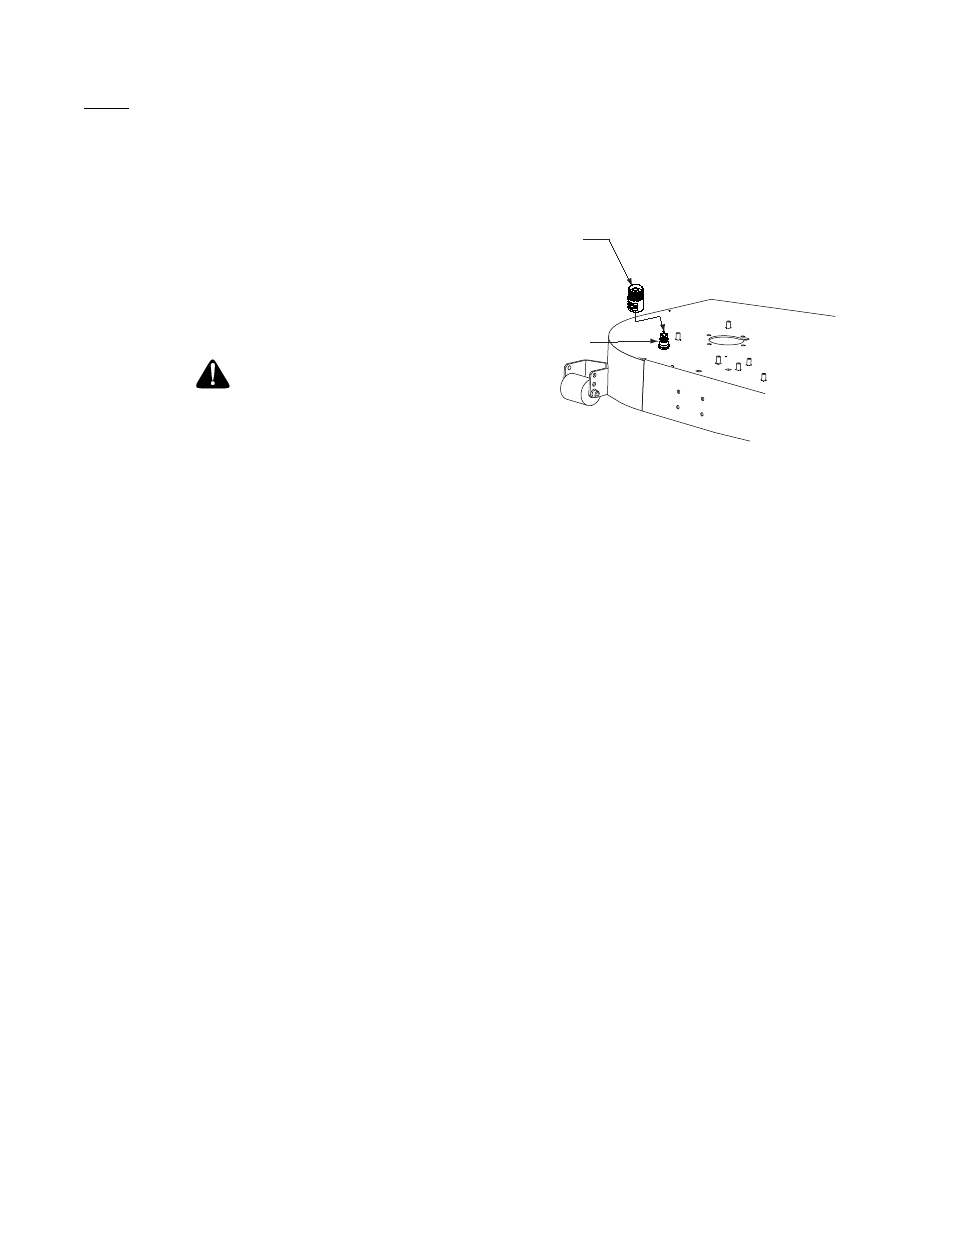
Hose Coupler
(Shown without
Hose Attached)
Water Port
Figure. 6
B.Mower Deck
1.
Removing the Mower Deck:
a.
Apply the parking brake. Remove ignition
key and both spark plug caps.
b.
Lower the cutter deck to the ground. Cap-
ture the lift handle by placing the height of
cut clevis pin in the “lock” position.
c.
Remove tension of the PTO belt by moving
the belt tensioning rod.
Note:
There is a certain amount of spring
tension due to the weight of the deck. When
removing the lift linkage from the deck the ten-
sion of the springs will go from the deck to the
lift handle. Not capturing the lift handle while
removing the lift linkage from the deck will
cause it to snap back.
d.
Detach the mower drive belt.
e.
Remove six linchpins (See Fig. 7) (4) from
the deck and (2) from the front of the
mower. Remove the linchpins on the left
and right rear side of the cutter deck (2);
remove the linchpins on the left and right
front side of the cutter deck (2); and
remove the linchpins on the front of the
mower (2).
f.
Turn front caster wheels outward.
g.
Shift the deck toward the ignition switch
side of the mower and remove.
h.
To install reverse the process.