Cleaning and sanitizing instructions, Rough-in drawing 2 – Wilbur Curtis TLXG2 User Manual
Page 2
CAUTION
Do not immerse in water.
Do not place in dishwasher.
Do not use harsh powders or cleansers containing chlorine.
Do not use a wire brush or pot scourer to clean inside liner.
Cleaning and Sanitizing Instructions
These cleaning and sanitizing instructions are only a guide line to be used for the cleaning and sanitizing of the TLXG15. Your cur-
rent in-house cleaning and sanitizing methods may be just as effective.
For cleaning and sanitizing of the TLXG15, the three sink method is recommended. This method consists of a sink of water filled
with a detergent and water solution, a fresh water rinse, and a sink filled with an aqueous sanitizing solution. Immerse in commercial
BarTabs/Sani-Tabs sanitizing solution. The solution must be warm (75°F.) Let the parts soak at least one minute.
1. Daily, Rinse the unit after use.
a. Rinse unit with hot water and empty completely.
b. Fill unit with hot water.
c. Open unit and empty contents completely.
2. Clean and sanitize the lid assembly.
a. Remove lid from unit and submerse it in cleaning solution, cleaning thoroughly.
b. Using the supplied brush, clean inside the filling tube.
c. Rinse with clean water.
d. Submerse in sanitizing solution for 5 minutes then air dry completely.
3. Cleaning and sanitizing body assembly.
a. Completely fill the unit with cleaning solution. With a sponge brush, thoroughly clean inside liner.
b. Rinse the unit using a fresh water rinse.
c. Fully fill unit with sanitizing solution. Allow to sit for 5 minutes then drain through the faucet.
d. Remove faucet and gauge glass from unit and brush out with cleaning solution.
e. With the faucet removed, clean the silicone elbow fitting (Tank to Faucet Tube). Use the tube brush soaked in cleaning
solution, inserted through the faucet shank. Rinse by pouring water from inside the unit, allowing rinse water to flow into a
sink until water runs clear.
f. Wipe outside of unit with clean cloth moistened with cleaning solution.
g. Place body assembly upside down on rack to thoroughly air dry.
4. Cleaning the faucet parts.
a. Unscrew the bonnet/handle assembly from the faucet and disassembly removing spring, seat cup and shaft.
b. Clean and rinse parts. Place in sanitizing solution for 5 minutes, remove and air dry,
5. When all pieces are completely dry reassemble for use.
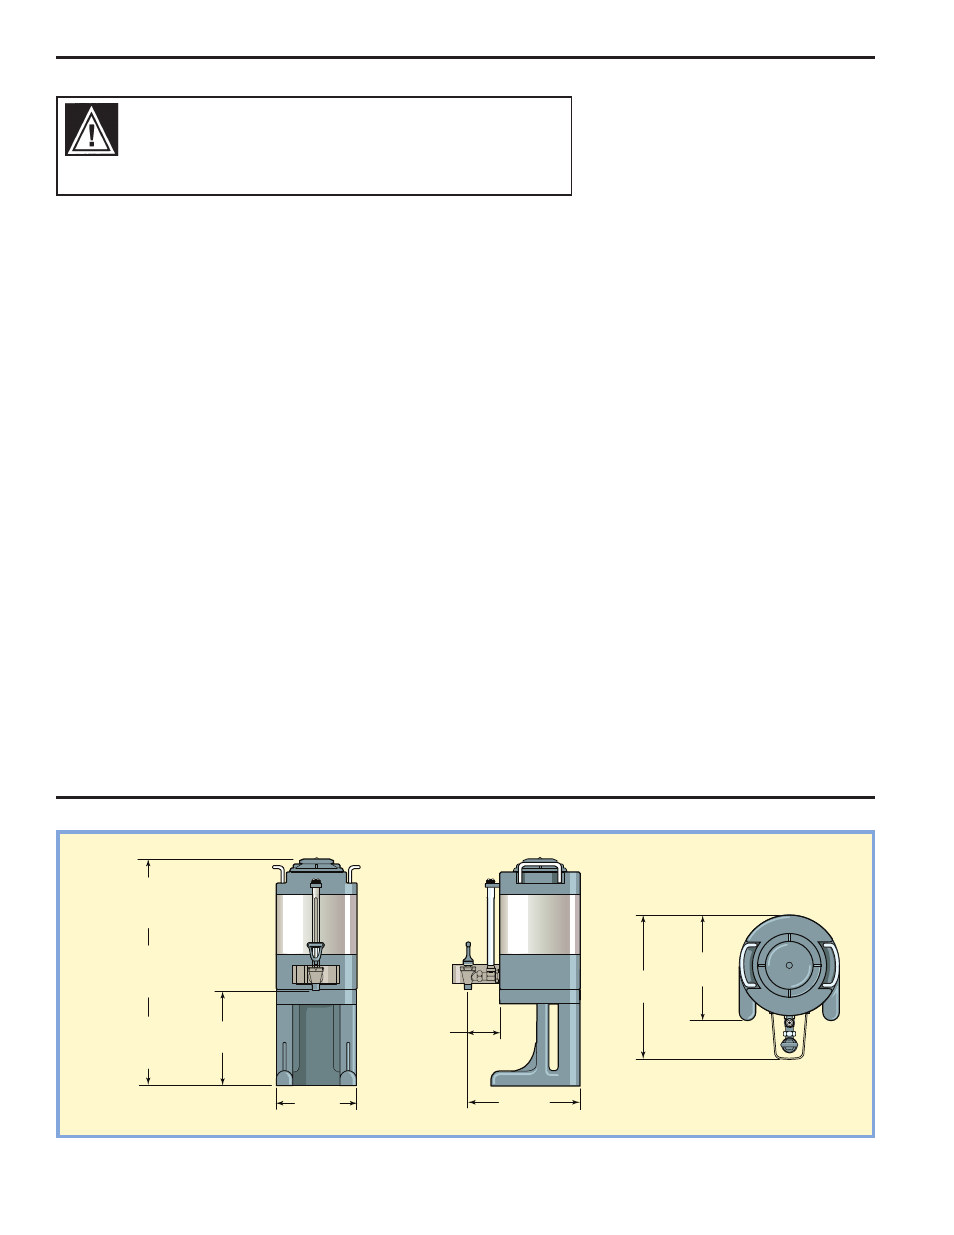
TLXG1
21.13”
(53.7 cm)
TLXG15
23.13"
(58.8 cm)
TLXG2
23.25”
(59.1 cm)
9.00"
(22.9 cm)
9.00"
(22.9 cm)
3.25"
(8.3 cm)
12.50"
(31.8 cm)
13.50"
(34.3 cm)
9.25"
(23.5 cm)
Rough-In Drawing
2