Brewing – Wilbur Curtis MWMGT-12 User Manual
Page 2
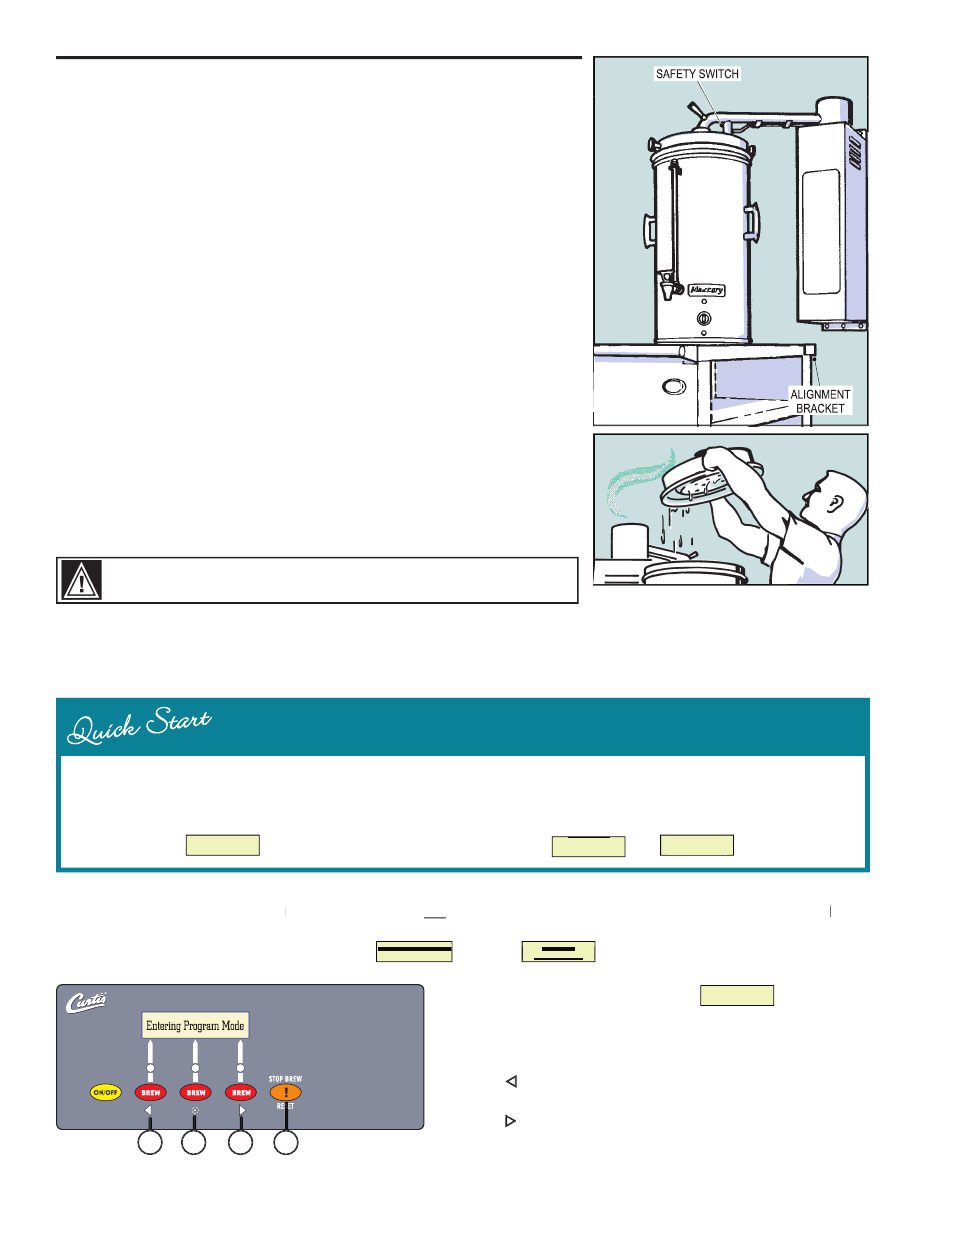
1. Prepare to start machine with the coffee vessel placed on the cart. With the cart locator
affi xed to the wall, the cart will be aligned to allow for the mating of the wall unit with the
vessel.
2. Nest the fi lter paper into the brew basket and add appropriate ground coffee for the
anticipated brew selection.
3. With the fi lter brew basket in place and with the coffee vessel cover positioned, insert the
hot water delivery tube into the center receptacle of the vessel cover. Make sure the tube
is pushed down into the vessel cover and the safety switch is pushed in by the nut locator
on top of the lid. If the safety switch is not pressed fi rmly by this locator, the wall mount
unit will not operate.
4. Push one of the three selector buttons and after a minute or so, hot water will start to
pour out over the ground coffee.
5. Plug the coffee vessel into a 115 volt wall outlet. Turn on the heating elements by setting
the dial to around 5. Check occasionally for proper temperature.
6. When the selected amount has been dispensed, the indicator lamp will turn off. The wall
unit has now shut down automatically.
7. After brewing coffee, lift the cover and tilt to allow any remaining hot water to drain out.
Remove the fi lter basket and discard the used coffee grounds. Replace the lid.
8. Push the aerator button once to completely mix the coffee. This will run for 30 seconds.
9. Make sure to unplug the electrical cord before moving the vessel to another location. To maintain the temperature of the coffee, park the
cart by an electrical outlet where the vessel can be plugged in.
BREWING
Your Curtis GT System is Factory Pre-Set for Optimum Performance.
After connection to water and power; the STANDBY/ON toggle switch must be on. You will hear a beep sound, indicating power is available
to the controller.
The control displays
. Press ON/OFF button and the screen will display
and
alternately.
WILBUR CURTIS
WILBUR CURTIS
WILBUR CURTIS
3 GL 6 GL 10 GL
READY TO BREW
3 GL 6 GL 10 GL
To Go Into Programming
Turn off (dark display) by pressing ON/OFF button (yellow). Press and
ON/OFF
ON/OFF
hold STOP BREW/RESET button (orange) and then press and release ON/OFF button
ON/OFF
ON/OFF
(yellow).
ENTER CODE
– – – –
ENTERING PROGRAM MODE
ENTERING PROGRAM MODE
1
2
3
4
All programming selections are performed with the three center buttons.
The symbols below the buttons are:
Scroll LEFT
SELECTION or ENTER to save new parameter
Scroll RIGHT
Exit
Exit
Exit
Press to select, exits program mode and returns unit to operation.
Scroll RIGHT
2
Continue holding STOP BREW button. Display will read
, wait until
is displayed Enter the 4-digit access code, the digits
button. Display will read
, wait until
is displayed Enter the 4-digit access code, the digits
button. Display will read
, wait until
is displayed Enter the 4-digit access code, the digits
ENTER CODE
ENTER CODE
– – – –
– – – –
button. Display will read
, wait until
is displayed Enter the 4-digit access code, the digits
button. Display will read
, wait until
is displayed Enter the 4-digit access code, the digits
ENTERING PROGRAM MODE
ENTERING PROGRAM MODE
ENTERING PROGRAM MODE
ENTERING PROGRAM MODE
1-4 correspond to the buttons (see illustration below).
The default code set at the factory is 1-2-3-4. Then
will be dis-
played.
WARNING HOT LIQUID, Scalding may occur. Avoid splashing.
PROGRAM MENUS
< SELECT >