Operation – Ryobi JM80 User Manual
Page 12
Page 12
BISCUIT
SLOT(S)
OPERATION
BUTT JOINTS
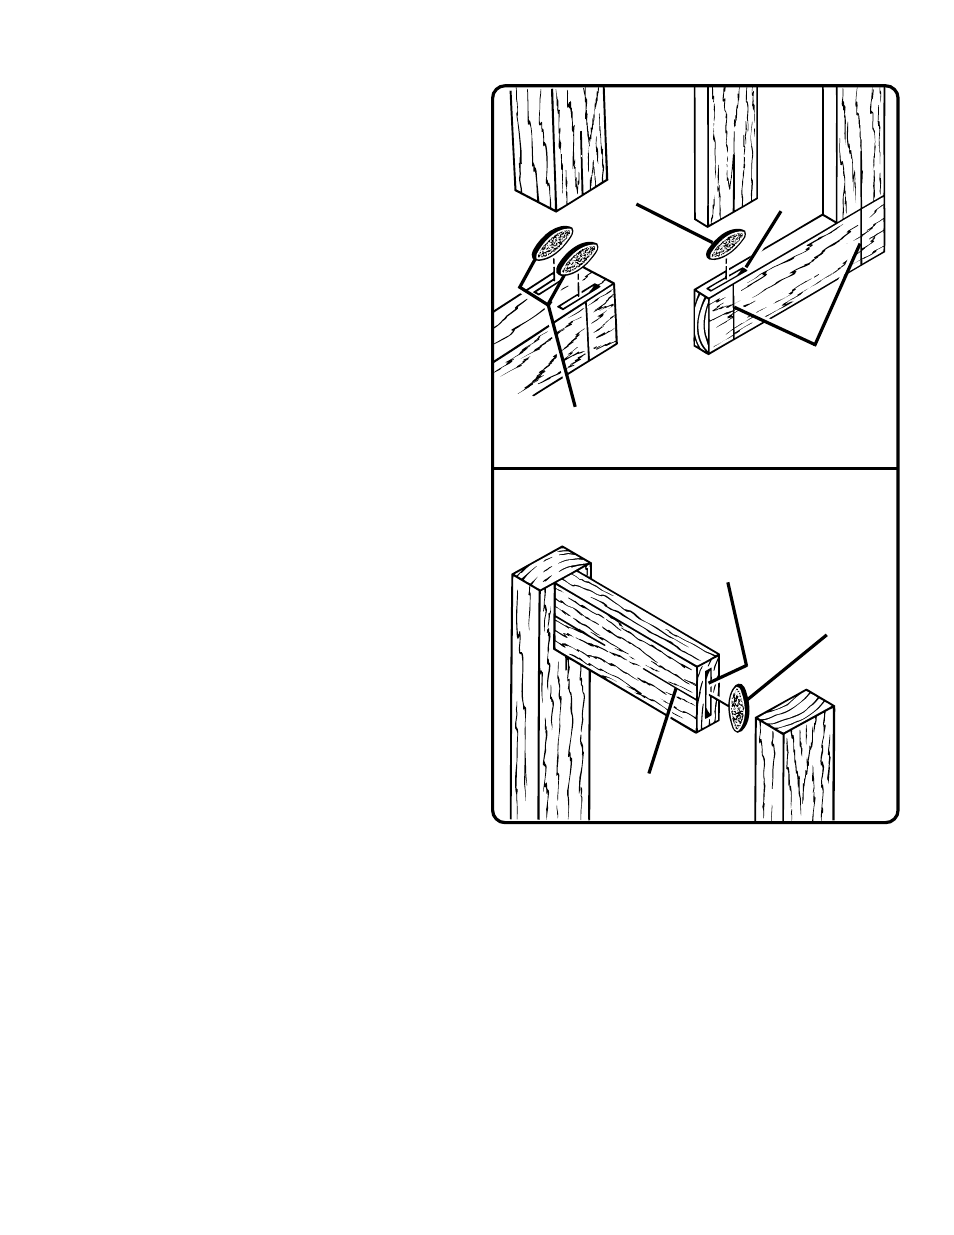
See Figure 9.
A butt joint is one of the weakest joints in woodworking.
This type of joint is mating the end grain of one board with
the edge grain of another. The bonding of glue on this type
of surface is poor. However, by using biscuits you can
create a very strong joint that gives a mortise-and-tenon
effect.
HOW TO MAKE BUTT JOINTS
1. Unplug your plate joiner.
2. Place the two pieces of wood to be joined on a level
workbench. Align them against each other in the
arrangement in which they will be assembled.
3. Using a square, determine the location of each biscuit
spline joint and mark the center of each joint by drawing
a line across the edges of the two boards.
4. Loosen height adjustment knobs and set fence angle at
90
°.
5. Slide the fence up or down until the indicator point is
aligned with the desired dimension on the scale.
REMEMBER: The scale indicates the height of the
fence from the center of the blade.
6. Tighten height adjustment knobs securely.
7. Select the correct depth of cut setting to match the
biscuit size you are planning to use. We suggest that you
make a test cut in a scrap piece of wood from the same
workpiece if possible.
8. Clamp workpiece securely so that it will not move during
the cut.
9. Plug your plate joiner into power supply and prepare to
make your first cut. Grasp and hold your plate joiner
securely with both hands by the front and rear handles.
10. Place the fence against the board and align the indicator
marks on the fence with the centerline mark(s) on the
board.
11. Depress the switch trigger to turn the power on your plate
joiner, then push it forward to extend the blade into the
wood.
12. When the base assembly bottoms out against the depth
of cut adjustment knob setting, pull back releasing
pressure on the spring. Blade will retract from biscuit
slot.
13. Repeat this procedure for cutting the slot in the mating
workpiece.
14. Once all biscuit slots have been cut, place a biscuit in
each joint and dry assemble the workpieces. Make sure
each joint lines up and fits.
15. Finally, disassemble the workpieces and place a bead of
glue in each slot. Also, spread a bead of glue over the
entire surface of the joint. Reinsert the biscuits and
assemble the workpieces.
See Figure 9.
16. Clamp workpieces together until the glue sets up.
Fig. 10
OFFSET BUTT JOINTS
See Figure 10.
The rails of a table or workbench are often offset from the
front of the table legs. When offsets are required, it is
necessary to cut the slots in the rails first, then re-adjust the
fence to cut the slots in the legs.
Keeping this one exception in mind, the procedure for cutting
offset butt joints is identical to the procedure for cutting butt
joints.
For example — If a 1/4 in. offset is desired, you would mark
the centerlines for cutting a butt joint as mentioned in the
procedures for cutting butt joints, and cut the slots in the ends
of the rails. Next you would raise the fence 1/4 in. to the
desired offset and cut the slots in the legs.
Fig. 9
OFFSET BUTT JOINT
BUTT JOINTS
MULTIPLE
BISCUITS STACKED
BISCUIT
SLOT
BISCUIT
CENTERLINE
MARK(S)
CENTERLINE
MARK(S)
BISCUIT(S)