NextoDI NVS2501 User Manual
Page 11
15
USING THE NVS2501 AS A HARD DRIVE
USING THE NVS2501 AS A HARD DRIVE
16
10. Using the NVS2501 as a Hard Drive
The NVS2501 can be connected to your computer for use as an external hard
disk. Three connection methods are supported.
1. Connect to the computer’s USB2.0 slot via the NVS2501 "USB" slot and
the USB cable.
2. Connect to the computer’s eSATA slot via the NVS2501 "eSATA/USB-Host combo"
slot and the eSATA cable.
3. Connect to the computer’s Firewire 800 (IEEE 1394b) slot via the NVS2501
"Firewire 800 (IEEE 1394b)" slot and the Firewire 800 (IEEE 1394b) cable.
Device drivers for the NVS2501 are included in the Microsoft Windows 7, Vista,
ME, XP and 2000 operating systems. Drivers for Windows 98 systems can be
downloaded from the NextoDI website. To download drivers, go to
http://www.nextodi.com/support
http://www.nextodiusa.com/support.htm
When you have successfully connected the NVS2501 to your computer,
the contents of the NVS2501 hard disk will appear in Windows File Explorer.
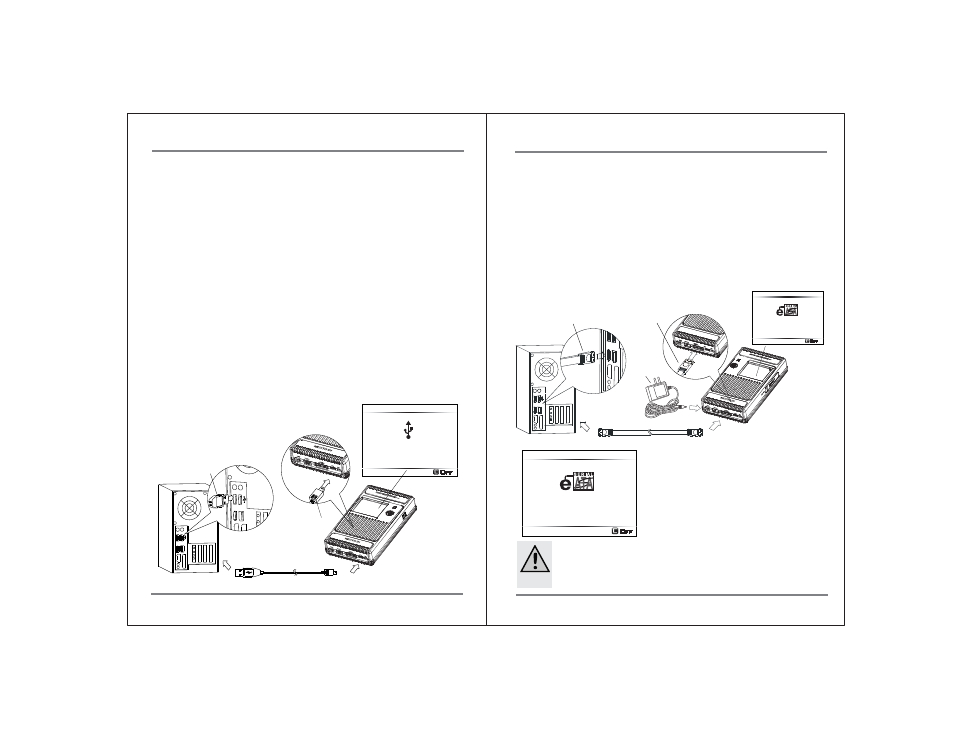
1. Connect via USB
① Turn your computer on. Wait until the operating system is completely booted.
② Turn your NVS2501 on.
③ Connect the NVS2501 "USB" slot via the USB cable with a free USB2.0 port
on your computer. A USB1.1 port can also be used.
④ Check the "PC Connection" on the NVS2501’s LCD display.
⑤ If your computer detects the NVS2501 correctly,
a new drive named [NEXTODI] will appear in
the “My Computer” display.
Off
USB Cable
USB(mini-B)
USB(Standard-A)
PC Connection
Off
Connection Power
PC CONNECTION
The eSATA cable does not provide power.
Use the AC power adapter unit or USB/
Firewire 800 (IEEE 1394b) cable to provide
power. If no power is provided, the NVS2501
shows the “Connect power” message and
waits for external power to be applied.
Caution
● DO NOT connect the eSATA cable during Firewire/USB connection
to the computer. You may lose your data.
2. Connect via eSATA
①
Switch your computer on and wait until the operating system is completely
booted.
②
Switch the NVS2501 on.
③
Connect the NVS2501 "eSATA" slot via the eSATA cable with a free eSATA port
of your computer. The eSATA cable does not provide power.
Use the AC power adapter unit or USB/Firewire cable to provide power.
If no power is provided, NVS2501 shows “Connect power” message and waits
for external power applied.
④
Check the NVS2501 LCD display. If the connection has been made, you will
see "PC connection”.
⑤
If the computer detects NVS2501 correctly, a new drive named [NEXTODI]
appears in the 'My Computer' display
eSATA
eSATA
PC CONNECTION
Off
eSATA Cable
12V Adapter