Friction facing adjustment, Lubrication, Caution – Nexen H-1000 810080 User Manual
Page 7
7
FORM NO. L-20143-J-1209
FrICTIOn FACInG ADJuSTMenT
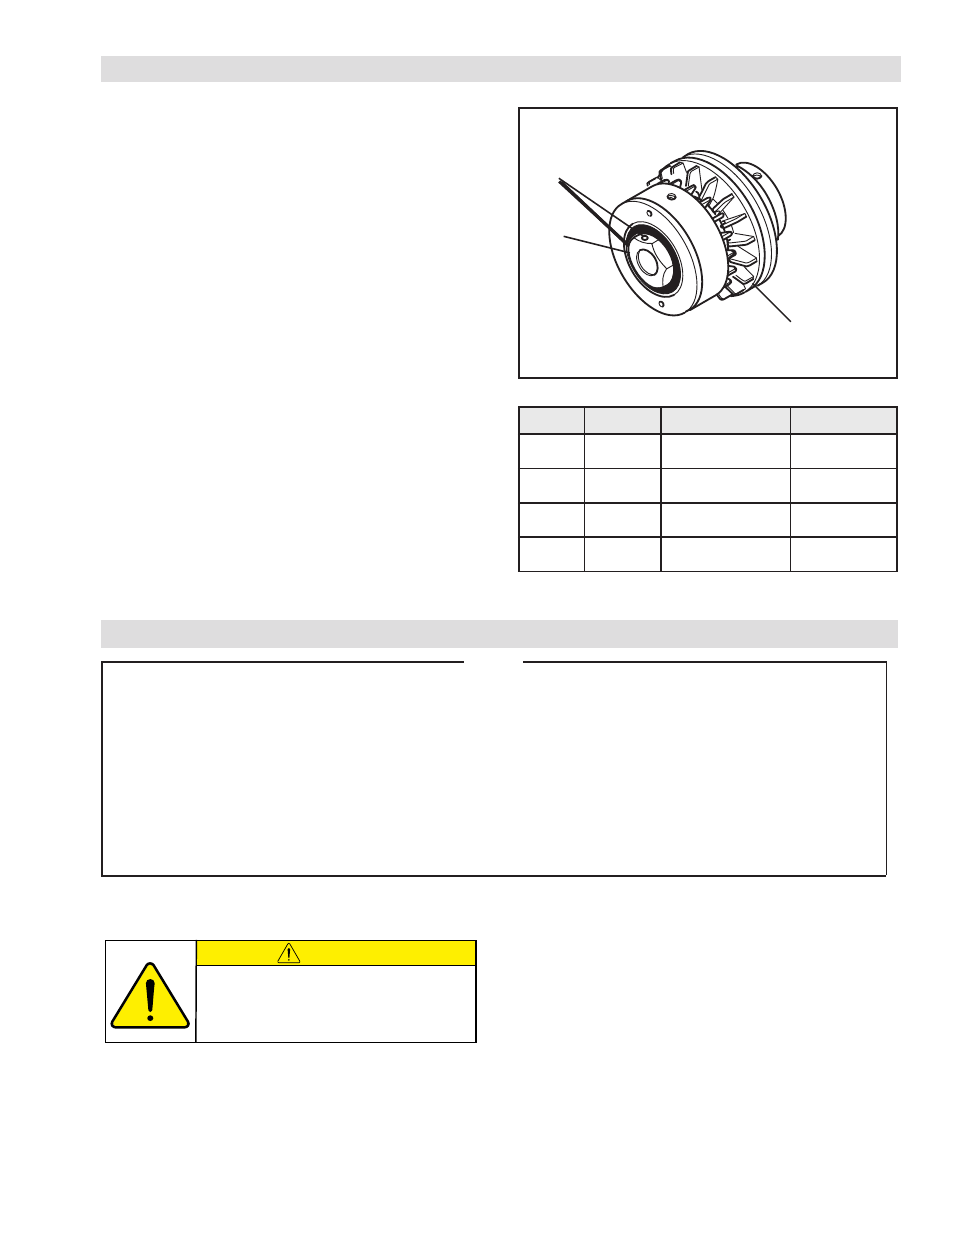
Refer to Figure 4.
1. Ensure the Set Screw (Item 17) that locks the Adjustment
Nut (Item 16) is released to allow the Adjustment Nut to
be rotated on the Hub.
2. Using a 0.020 In. [0.508 mm] and a 0.060 In. [1.514
mm] feeler gauge, check the gap between the Friction
Disc and the Friction Facing.
a. If the gap is less than 0.020 In. [0.508 mm], rotate
the Adjustment Nut counterclockwise until one set
screw hole is over the flat on the Hub and the 0.020
In. [0.508 mm] feeler gauge can be inserted.
b. If the gap is greater than 0.060 In. [1.514 mm],
rotate the Adjustment Nut clockwise until one set
screw hole is over the flat on the Hub and the 0.060
In. [1.514 mm] feeler gauge can not be inserted.
3. Tighten the Set Screw to the recommended torque (See
Table 5).
NOTE: Do not adjust the gap to less than 0.020 In.
[0.508 mm]. The Air Champ II will not disengage
if the gap is closed.
17
16
Check Friction
Facing gap here.
FIGure 4
TABLe 5
L
E
D
O
M
.
O
N
M
E
T
I
N
O
I
T
P
I
R
C
S
E
D
E
U
Q
R
O
T
0
5
4
-
F
D
T
S
7
1
R
T
M
7
1
2
3
-
0
9
1
.
7
.
0
-
4
M
.
s
b
L
.
n
I
2
8
.
6
m
N
7
7
.
0
0
6
-
L
D
T
S
7
1
R
T
M
7
1
2
3
-
0
9
1
.
7
.
0
-
4
M
.
s
b
L
.
n
I
2
8
.
6
m
N
7
7
.
0
0
8
-
M
D
T
S
7
1
R
T
M
7
1
8
2
-
0
5
2
.
0
.
1
-
6
M
.
s
b
L
.
n
I
8
0
.
4
3
m
N
5
8
.
3
0
0
0
1
-
H
D
T
S
7
1
R
T
M
7
1
8
2
-
0
5
2
.
0
.
1
-
6
M
.
s
b
L
.
n
I
8
0
.
4
3
m
N
5
8
.
3
nOTe
nexen pneumatically actuated devices require clean, pressure regulated air for maximum performance and
life. All seals in nexen pneumatically operated devices are lubricated for life, and do not require additional
lubrication.
However, some customers prefer to use an air line lubricator, which injects oil into the pressurized air, forcing
an oil mist into the air chamber. This is acceptable, but care must be taken to ensure once an air mist lubrication
system is used, it is continually used over the life of the product as the oil mist may wash free the factory
installed lubrication.
Locate the lubricator above and within ten feet of the product, and use low viscosity oil such as SAe-10.
Synthetic lubricants are not recommended.
nexen product's bearings are shielded and pre-lubricated, and require no further lubrication.
LuBrICATOr DrIP rATe SeTTInGS
1. Close and disconnect the air line from the unit.
2. Turn the Lubricator Adjustment Knob counterclockwise
three complete turns.
3. Open the air line.
LuBrICATIOn
CAUTION
These settings are for Nexen supplied
lubricators. If you are not using a Nexen
lubricator, calibration must follow the
manufacturer's suggested procedure.
4. Close the air line to the unit when a drop of oil forms
in the Lubricator Sight Gage.
5. Connect the air line to the unit.
6. Turn the Lubricator Adjustment Knob clockwise until
closed.
7. Turn the Lubricator Adjustment Knob counterclockwise
one-third turn.
8. Open the air line to the unit.
- M-800 807682 M-800 807680 L-600 805280 F-450 802880 M-800 950256 H-1000 950357 H-1000 950350 H-1000 950355 H-1000 950354 H-1000 950353 H-1000 950361 H-1000 810052 H-1000 810068 H-1000 810042 H-1000 810032 H-1000 810050 H-1000 810055 H-1000 810040 M-800 950250 M-800 950258 M-800 950253 M-800 950254 M-800 950261 M-800 950257 M-800 950255 M-800 807650 M-800 807668 M-800 807655 M-800 807620 M-800 807610 M-800 807640 M-800 807630 M-800 807651 M-800 807663 M-800 807621 M-800 807611 M-800 807641 M-800 807631 M-800 807643 M-800 807652 M-800 807661 M-800 807622 M-800 807612 M-800 807642 M-800 807632 F-450 950051 L-600 950155 M-800 950252 L-600 950154 L-600 950151 L-600 950150 L-600 950162 L-600 950163 L-600 950156 H-1000 950351 F-450 950055 L-600 950158 L-600 950159 L-600 805272 L-600 805262 L-600 805252 L-600 805242 L-600 805232 L-600 805222 L-600 805212 L-600 805292 L-600 805270 L-600 805275 L-600 805260 L-600 805250 L-600 805240 L-600 805230 L-600 805220 L-600 805210 F-450 950052 F-450 950050 F-450 950063 F-450 950062 F-450 950061 F-450 802852 F-450 802842 F-450 802832 F-450 802822 F-450 802812 F-450 802850