Banner instructions – Xpres Banner User Manual
Page 2
Phone:
Web:
E-mail:
Support:
01332 855 085
www.xpres.co.uk
[email protected]
www.xprestechnical.co.uk
Oakridge Park, Trent Lane
Castle Donington, Derby
DE74 2PY
PLEASE NOTE:
The sellers and manufacturers maximum obligation shall be to replace any product
that has been proven to be defective. Neither the seller nor the manufacturer of the items required
when following these instructions shall be liable for any injury direct or consequential, arising out of the
use of, or inability to use this range.
®
STEP BY STEP
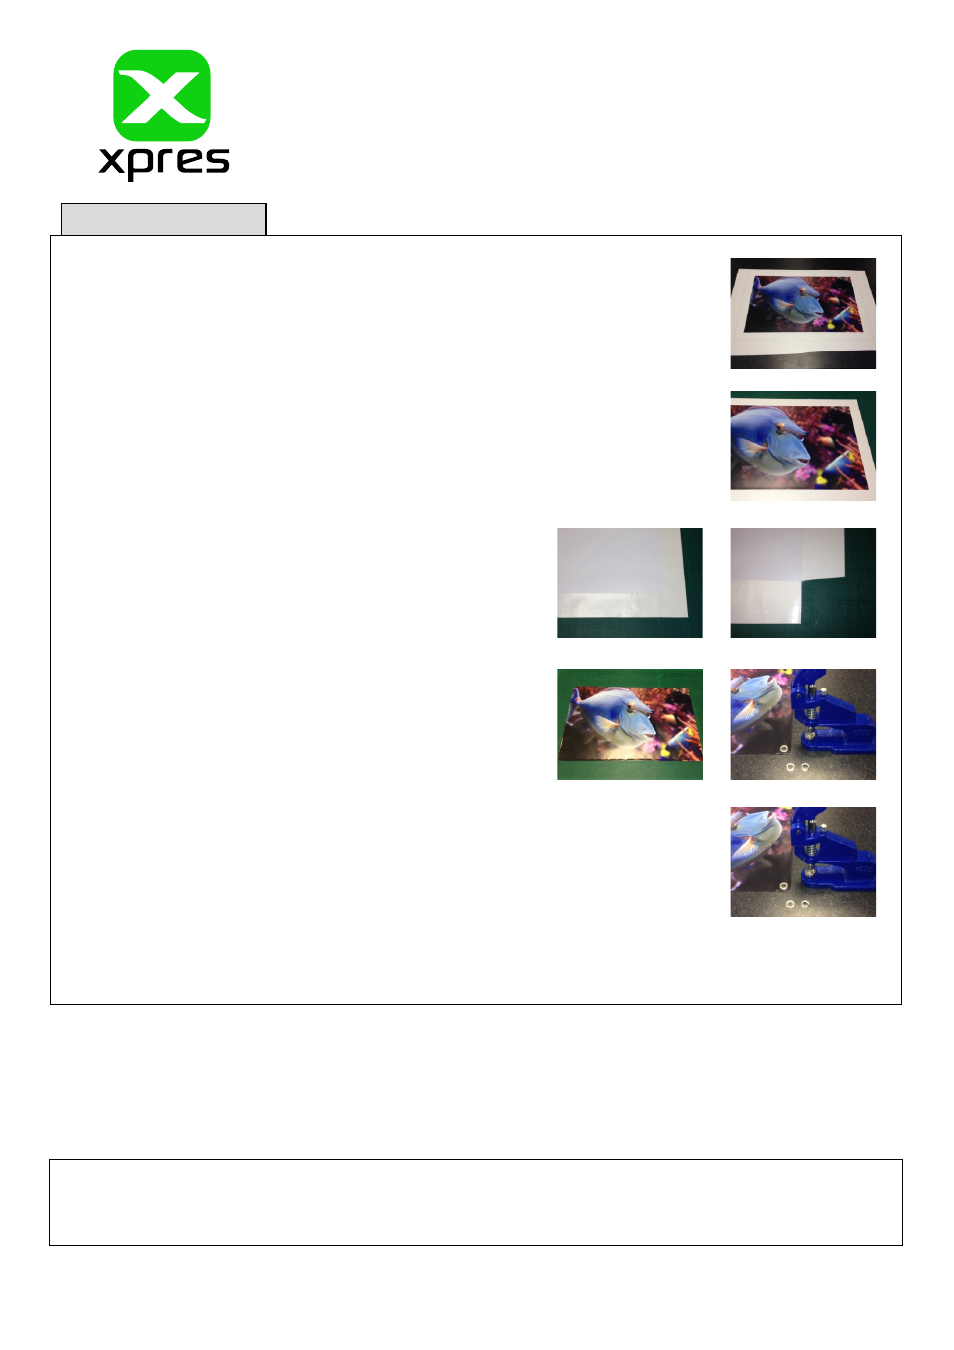
Step 1
Design the banner to size and then using the rectangle tool in CorelDRAW or
other design programme, apply an outline of 40mm on all 4 sides to the artwork.
Step 2
Once print is dry cut to the printed keyline using a sharp knife and a safety
straight edge.
Step 3
Turn the banner over so the print is face down (on a surface
that will not scratch the print) and apply the T-4970-100
tape to the cut edge on all 4 sides, and cut all 4 corners as
in the image.
Step 4
Fold the taped edge over and stick it to the back of the
banner, making sure that the edge of the print is on the fold.
Repeat this on all sides.
Step 5
Turn over the banner and
fit the eyelets using the XP3150 CStep-2 Eyelet
Machine.
Step 6
Banner is ready to be fitted.
Banner Instructions
ITEMS REQUIRED: MD-FL510 - Premium Banner
XP3150 - Eyelet machine with eyes
or
Event Banner - MD-FL440
XP3150GW - Extra Eyes
when using hemming tape option T-4970-100
- 3D SMARTone (25 pages)
- Canvas (2 pages)
- Crystal Print (5 pages)
- Easy Dome (12 pages)
- Gem Tec (8 pages)
- Sign Vinyl Application Guide (2 pages)
- SubliJet IQ EPSON Stylus PRO 4880 (Windows Power Driver Setup): Power Driver Installation & Getting Started Guide (52 pages)
- SubliJet IQ EPSON Stylus PRO 4880 (Windows Power Driver Setup): Print & Setup Guide CorelDRAW X5 (6 pages)
- SubliJet IQ EPSON Stylus PRO 4880 (Windows Power Driver Setup): Print & Setup Guide Photoshop CS5 (5 pages)
- SubliJet IQ EPSON Stylus PRO 4880 (Windows Power Driver Setup): Print & Setup Guide Illustrator CS5 (6 pages)
- SubliJet IQ EPSON Stylus PRO 4880/4450 (Windows Power Driver Setup): Sublimation Cartridge Quick Start Guide (2 pages)
- SubliJet IQ EPSON Stylus PRO 4880 (Windows Power Driver Setup): Sublimation Ink Configuration Guide (1 page)
- SubliJet E Epson Stylus Pro 7700 (Windows Power Driver Setup): Power Driver Installation Guide (16 pages)
- SubliJet E Epson Stylus Pro 7700 (Windows Power Driver Setup): Printer Setup (4 pages)
- SubliJet E Epson Stylus Pro 7700 (Windows Power Driver Setup): Print & Setup Guide CorelDRAW 12 - X4 (3 pages)
- SubliJet E Epson Stylus Pro 7700 (Windows Power Driver Setup): Print & Setup Guide CorelDRAW X5 (6 pages)
- SubliJet E Epson Stylus Pro 7700 (Windows Power Driver Setup): Print & Setup Guide Photoshop Elements 8 - 10 (4 pages)
- SubliJet E Epson Stylus Pro 7700 (Windows Power Driver Setup): Print & Setup Guide Illustrator CS4 - CS5 (6 pages)
- SubliJet E Epson Stylus Pro 7700 (Windows Power Driver Setup): Print & Setup Guide Photoshop CS5 (6 pages)
- SubliJet E Epson Stylus Pro 7700 (Mac ICC Profile Setup): Printer/Profile Installation Guide (17 pages)
- SubliJet E Epson Stylus Pro 7700 (Mac ICC Profile Setup): Print & Setup Guide Photoshop Elements 8 - 10 (7 pages)
- SubliJet E Epson Stylus Pro 7700 (Mac ICC Profile Setup): Print & Setup Guide Photoshop CS - CS4 (8 pages)
- SubliJet E Epson Stylus Pro 7700 (Mac ICC Profile Setup): Print & Setup Guide Photoshop CS5 (7 pages)
- SubliJet E Epson Stylus Pro 7700 (Windows ICC Profile Setup): Printer/Profile Installation Guide (15 pages)
- SubliJet E Epson Stylus Pro 7700 (Windows ICC Profile Setup): Driver Configuration Guide (6 pages)
- SubliJet E Epson Stylus Pro 7700 (Windows ICC Profile Setup): Print & Setup Guide CorelDRAW 10 - 12 (4 pages)
- SubliJet E Epson Stylus Pro 7700 (Windows ICC Profile Setup): Print & Setup Guide CorelDRAW X3 - X4 (4 pages)
- SubliJet E Epson Stylus Pro 7700 (Windows ICC Profile Setup): Print & Setup Guide CorelDRAW X5 (5 pages)
- SubliJet E Epson Stylus Pro 7700 (Windows ICC Profile Setup): Print & Setup Guide Photoshop Elements 8 - 10 (4 pages)
- SubliJet E Epson Stylus Pro 7700 (Windows ICC Profile Setup): Print & Setup Guide Illustrator CS4 - CS5 (4 pages)
- SubliJet E Epson Stylus Pro 7700 (Windows ICC Profile Setup): Print & Setup Guide Photoshop CS (4 pages)
- SubliJet E Epson Stylus Pro 7700 (Windows ICC Profile Setup): Print & Setup Guide Photoshop CS2 (4 pages)
- SubliJet E Epson Stylus Pro 7700 (Windows ICC Profile Setup): Print & Setup Guide Photoshop CS3 - CS5 (4 pages)
- SubliJet IQ Epson Stylus Pro 7890 - IQ Pro Photo (Mac ICC Profile Setup): Printer/Profile Installation Guide (16 pages)
- SubliJet IQ Epson Stylus Pro 7890 - IQ Pro Photo (Mac ICC Profile Setup): Printer Setup (4 pages)
- SubliJet IQ Epson Stylus Pro 7890 - IQ Pro Photo (Mac ICC Profile Setup): Print & Setup Guide Photoshop CS6 (7 pages)
- SubliJet IQ Epson Stylus Pro 7890 - IQ Pro Photo (Mac ICC Profile Setup): Print & Setup Guide Photoshop CS - CS5 (7 pages)
- SubliJet IQ Epson Stylus Pro 7890 - IQ Pro Photo (Mac ICC Profile Setup): Print & Setup Guide Photoshop Elements 8 - 11 (6 pages)
- SubliJet IQ Epson Stylus Pro 7890 - IQ Pro Photo (Windows ICC Profile Setup): Printer/Profile Installation Guide (15 pages)
- SubliJet IQ Epson Stylus Pro 7890 - IQ Pro Photo (Windows ICC Profile Setup): Driver Configuration Guide (3 pages)
- SubliJet IQ Epson Stylus Pro 7890 - IQ Pro Photo (Windows ICC Profile Setup): Print & Setup Guide CorelDRAW 12 - X4 (6 pages)
- SubliJet IQ Epson Stylus Pro 7890 - IQ Pro Photo (Windows ICC Profile Setup): Print & Setup Guide CorelDRAW X5 - X6 (7 pages)
- SubliJet IQ Epson Stylus Pro 7890 - IQ Pro Photo (Windows ICC Profile Setup): Print & Setup Guide Illustrator CS - CS6 (8 pages)
- SubliJet IQ Epson Stylus Pro 7890 - IQ Pro Photo (Windows ICC Profile Setup): Print & Setup Guide Photoshop CS - CS5 (6 pages)