Vintage Cellars KoolR1800 User Manual
Warm side, Read before you start, Center
SUB-FLOOR
(STUD LUMBER)
CENTER
WARM SIDE
CENTER
WARM SIDE
1
2
3
4
5
6
WARM
SIDE
COOL
SIDE
!
!
FRAME
!
ELBOW
TUBE
CONT
AINER
SILICONE CAULKING
PLYWOOD
FLOOR VAPOR
BARRIER
INSULATION
(MIN. R-20)
SEAL ALL
JOINTS
ODORLE
SS
WATERP
ROOF
PAINT
DR
YW
ALL
VAPOR BARRIER
INSULATION
MINIMUM R-20
VAPOR BARRIER
Min. 6’
Min. 2’
c
lear
space
Min.5”
DR
YW
ALL
INSULATED
DOOR
WITH
AIRTIGHT
SEAL
ALTERNATIVE
WALL CUTOUT
RECOMMENDED
OVER THE DOOR
CUTOUT
Min
10”
1
2
3
4
5
6
Watch for live wires !
•
CAUTION!
LOCATION:
Appliance is for indoor use only. Never vent into a laun-
dry closet or similar room which traps warm air. Unit
must vent to an adjacent interior ventilated space close
to the ceiling. Exhaust air must not be obstructed in any
way.
TEMPERATURES:
Select a suitable area, sized to model’s cooling capacity,
where ambient temperature will not exceed the desired
storage temperature by more than 25ºF (14ºC). The
temperature of the air where the unit vents its warm air
must be at least 65ºF and never exceed 80ºF with 70%
R.H. Lower set temperature from default 57ºF (14ºC)
only if ambient condition allows.
Set temperature range: 52ºF - 64ºF (11ºC - 18ºC)
INSULATION:
Install unit where ALL surfaces (walls, floor and ceiling)
are insulated to R-20 and protected by vapor barrier on
both sides. Uninsulated concrete floors will radiate heat
and humidity during summer months, forcing the unit to
work inefficiently. All floors must be INSULATED! Use an
insulated door with weather seal.
POWER:
Outlet (on cool side) power must be a dedicated separate-
ly fused grounded 15-Amp 115 Volt line within reach of
supplied power cord (Europe; 10-Amp 220 Volt). Line
must not be shared. Do not use extension cords.
Electronics must be protected against sudden power
surges. Use a quality surge protector.
SPECIAL NOTE:
This unit is constructed for installation in walls up to 6
1/2” inches thick. If you install it in a thicker wall you will
have to cut out an area around the air vents on the cool
side in order to keep cool airflow unobstructed. Order
longer screws at www.koolrproducts.com.
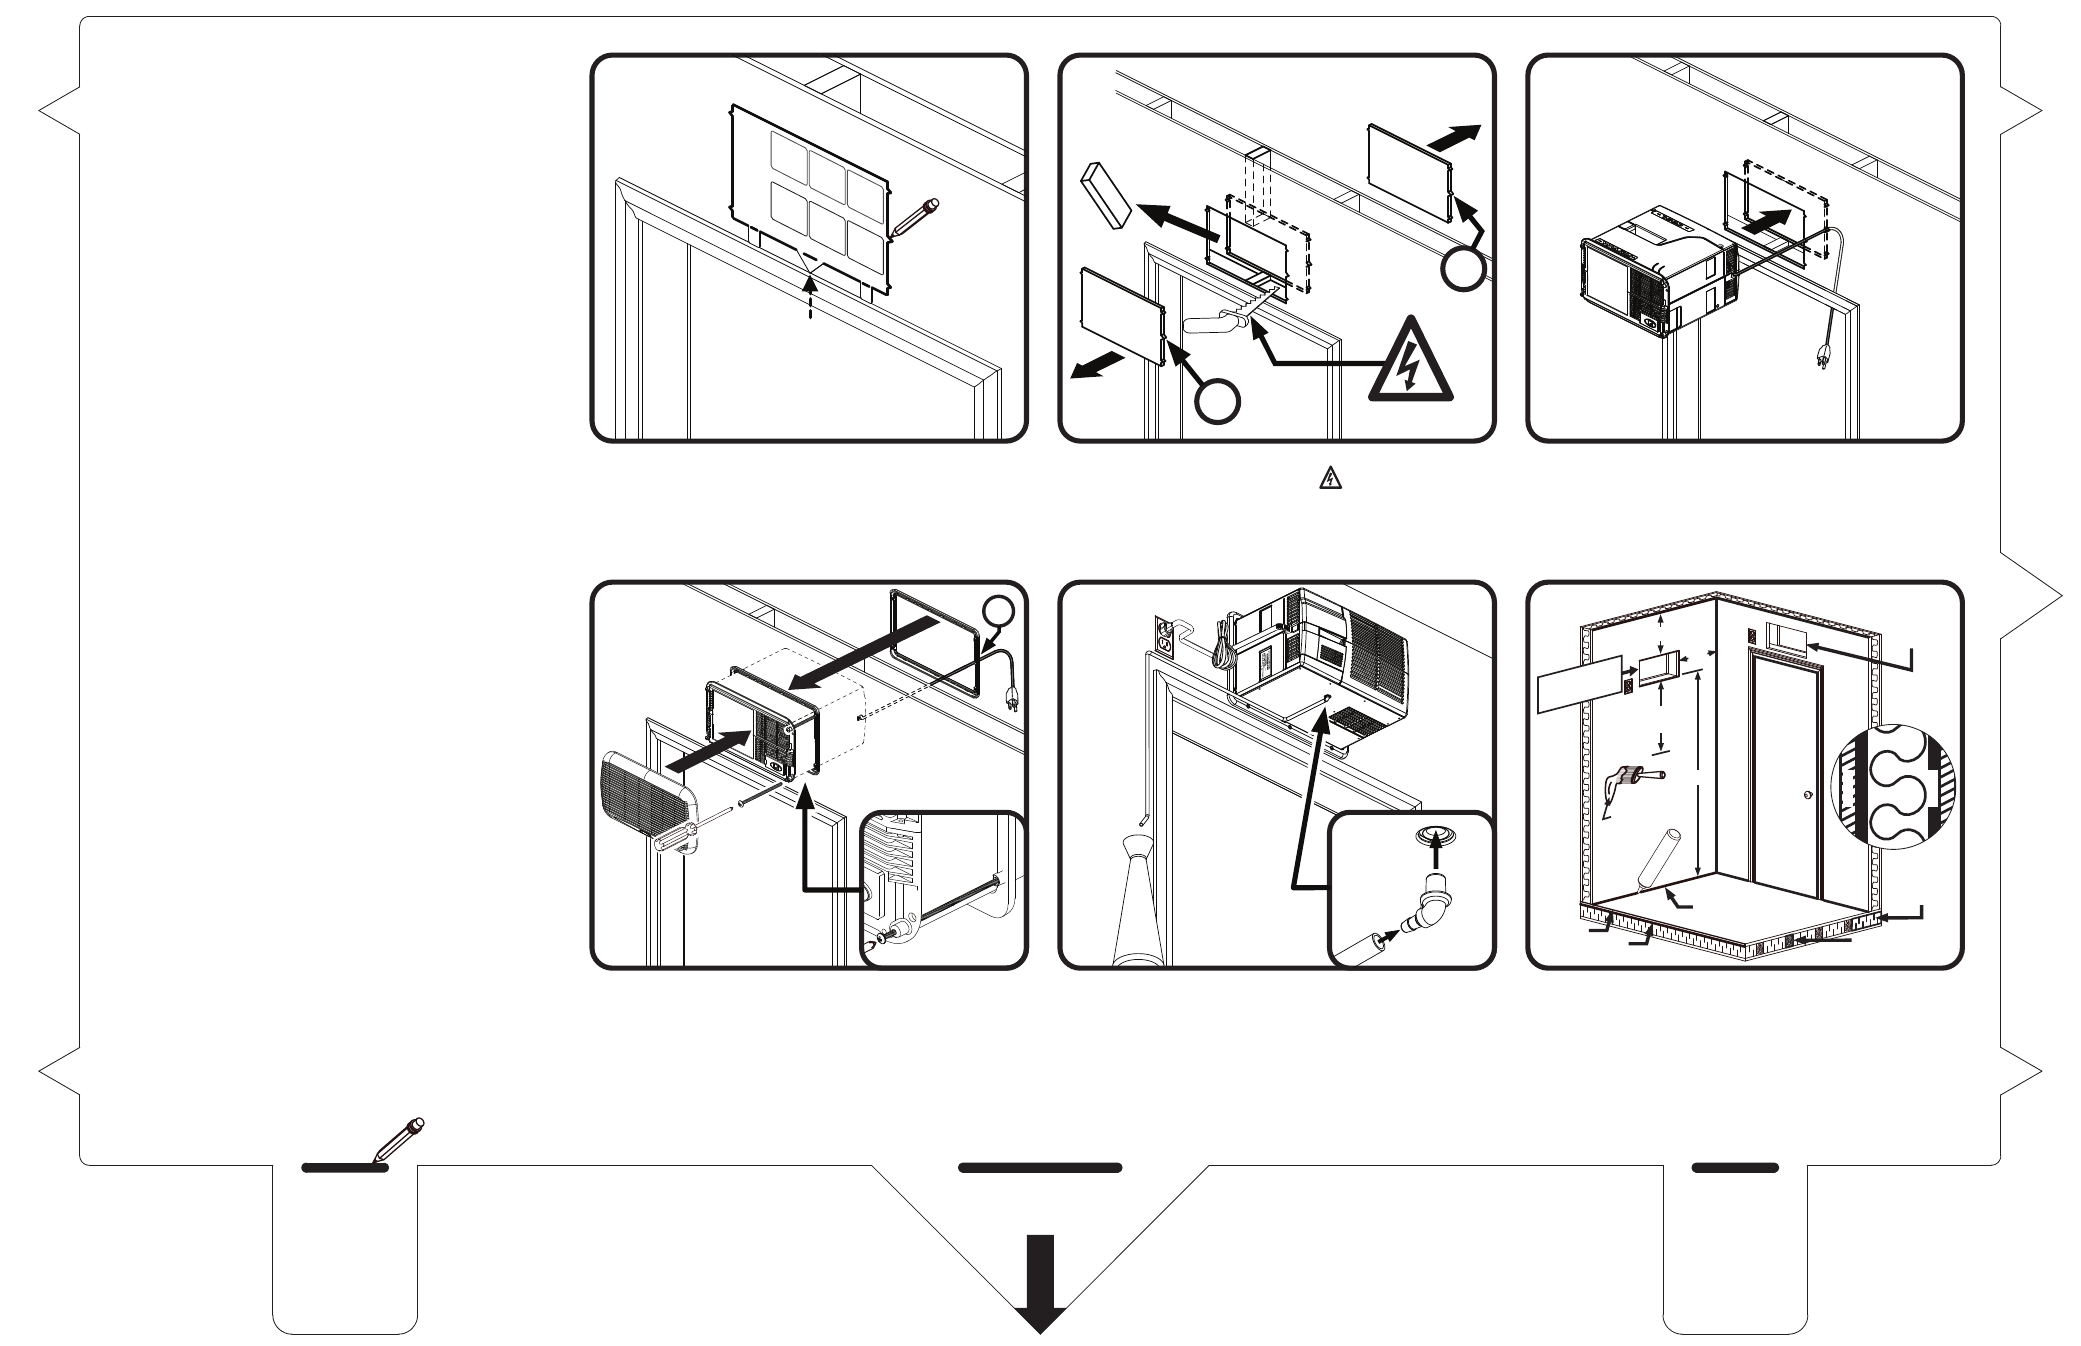
READ BEFORE YOU START
• Center pattern to door frame.
• Trace pattern.
• Flip pattern and repeat for cool side.
• Cut out drywall, warm and cool side.
• Cut out Stud level to drywall cutout.
• Get help to insert cooling unit through hole.
• Guide cord, do not damage drywall!
• Slide over frame on cool side, guide cord
through frame side notch.
• Screw in cooling unit to frame.
• Place grill on unit.
WATER DRAIN
• Add tube to elbow.
• Insert elbow to cooling unit.
• NOTE: Excess condensation is caused by extreme
conditions. This is not required if your room is prop-
erly insulated.
ALTERNATE WALL CUTOUT
• Level pattern, trace both warm and cool side.
• Cut out drywall.
• Screw in cooling unit to frame.
MARK SLITS