Comment changer les pied presseurs, Punto invisible elásticos, Stretch blindhem – SINGER P-1250 PROFESSIONAL Instruction Manual User Manual
Page 25
23
1
2
4
1
2
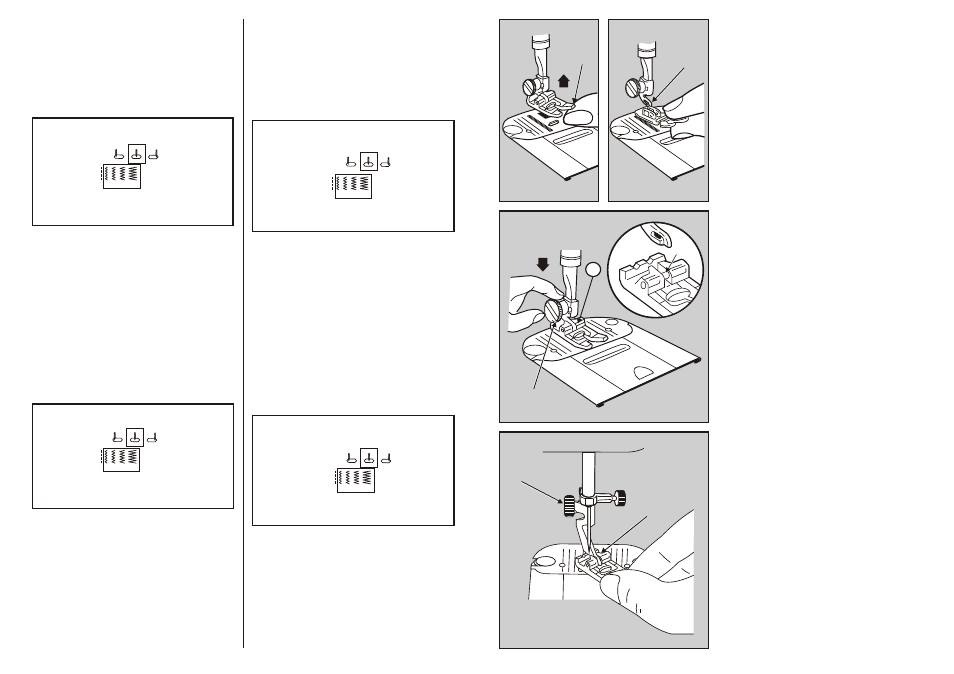
Comment changer les
pieds presseurs à enclen-
chement direct (B,D,E,J,L)
Votre machine est livrée équipée du pied
presseur universel (B). Vous pouvez aisément
changer le pied et le remplacer par touts pieds à
enclenchement direct qui s’adaptent sur la tige
commune.
• Relevez l’aiguille à sa position haute.
• Relevez le pied en le soulevant de l’avant vers
l’arrière.
• Appuyez sur le pied (1) jusqu’à ce qu’il de
détache (2).
• Retirez-le.
• Placez le nouveau pied en le centrant sous la
tige.
• Baissez le releveur du pied presseur pour
engager la tige dans la traverse du pied (3).
• Ne vissez pas mais appuyez fermement sur la
vis (4) jusqu’à enclenchement.
Comment changer les
pied presseurs
• Relevez l’aiguille et le pied presseur.
• Desserrez la vis (1) et retirez le pied avec la
tige (2) en la faisant pivoter vers la droite.
• Pour remettre en place un pied presseur à tige,
accrochez la tige autour de la barre du pied
presseur et resserrez la vis à l’aide d’une pièce
de monnaie.
3
B
Punto invisible elásticos
Este punto puede utilizarse para costura
extensible y para puntadas decorativas.
Inserción de elásticos
Posiciones recomendadas
Selección punto: Punto invisible elásticos
(E)
Posición aguja:
Anchura punto:
Longitud punto: 1-2
Prensatelas:
Uso especial (J)
Plancha aguja:
Uso general (A)
• Ajuste el elástico bien aparejado y deje
25mm para su unión. Solape los dos
extremos y cosa.
• Divida el elástico y la prenda en cuartos
iguales. Coloque el elástico sobre el tejido
y una con alfileres ambos por los cuartos
de unión, manteniendo los extremos
uniformemente.
• Asegure el elástico al tejido con más
puntadas. Después, estire el elástico entre
los alfileres según cose, utilizando ambas
manos para mantener el elástico terso por
delante y por detrás del prensatelas.
Inserción de galones y encajes
El galón se inserta después de cortar el
tejido, pero antes se cose junto.
Posiciones recomendadas
Selección punto: Punto invisible elásticos
(E)
Posición aguja:
Anchura punto:
Longitud punto: ½-2
Prensatelas:
Uso especial (J)
Plancha aguja:
Uso general (A)
• Corte el galón al tamaño deseado.
• Colocar el galón sobre el derecho del tejido
y unirlo con alfileres.
• Coloque la labor debajo del prensatelas de
manera que los puntos caigan sobre los
bordes del galón, como se muestra.
• Una vez cosidos ambos lados del galón,
vuelva el tejido del revés y corte el tejido
sobre ambos lados junto a las líneas de
costura y retirar.
3
4
5
1 2
3
4
5
1 2
Stretch blindhem
This stitch can be used for stretch seams, and
decorative stitching,and elastic apllication
Elastic insertion
Recommended Settings
Stitch Selection: Stretch blindhem (E)
Needle Position:
Stitch Width:
Stitch Length: 1-2
Foot:
Special Purpose (J)
Needle Plate: General Purpose (A)
• Fit elastic for snugness and allow 1 inch (25
mm) for joining. Lap the two ends and stitch.
• Divide elastic and garment into equal quarters.
Place elastic over the fabric and pin the two
together at these points keeping top edges
even.
• Anchor the elastic to the fabric with a few
stitches. Now stretch elastic between the pins
as you sew, using both hands to hold elastic
firmly in front and back of presser foot.
Lace insertion
Lace is inserted after fabric is cut, but before it is
sewn together.
Recommended Settings
Stitch Selection: Stretch blindhem (E)
Needle Position:
Stitch Width:
Stitch Length:
-2
Foot:
Special Purpose (J)
Needle Plate: General Purpose (A)
• Cut lace to desired size.
• Position lace on right side of fabric and pin in
place.
• Place the work under the presser foot so that
the stitches fall over the lace edges, as shown.
• After both sides of lace are sewn, turn fabric
over to the back side and cut the fabric on both
sides close to the stitching lines and remove.
½
3
4
5
1 2
3
4
5
1 2
66