Connecting the arm – Origin Live All non dual pivot arms User Manual
Page 2
Page2
MOUNTING THE ARM ON MK2 ORIGIN
LIVE DECKS ONLY
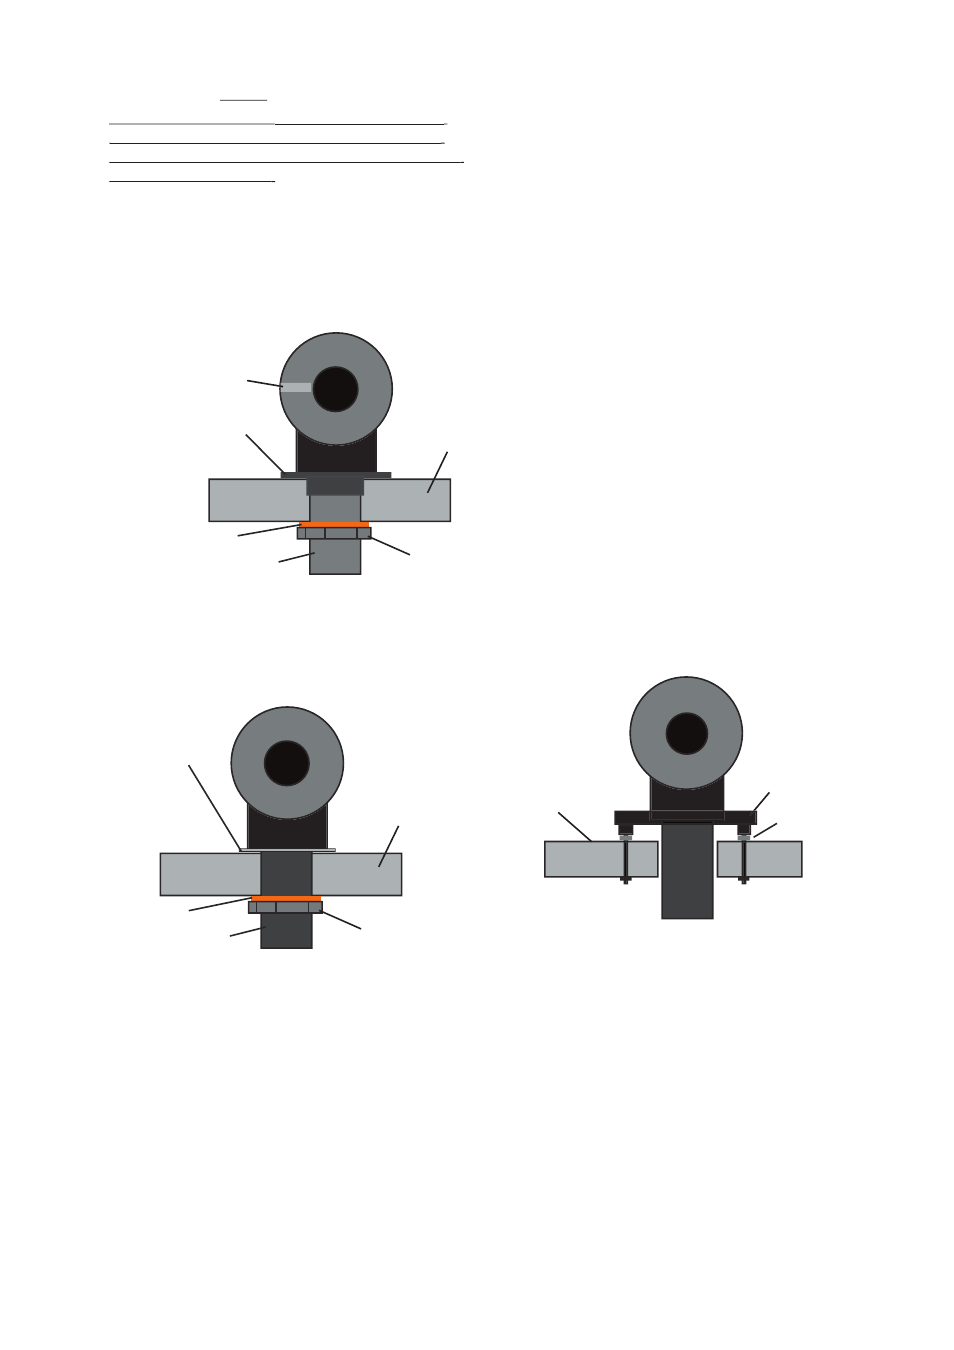
Arms with a threaded base fi t Origin Live decks as per the
t Origin Live decks as per the
diagram below. To adjust the height of the arm, screw the
diagram below. To adjust the height of the arm, screw the
threaded vta adjuster up or down and reclamp the arm using
threaded vta adjuster up or down and reclamp the arm using
the large base clamping nut.
the large base clamping nut.
NOTE - For Origin Live arms with integral vta adjuster
(Encounter and above) you should raise the arm height to
approximately the right level using the threaded vta adjuster
and then use the arm vta wheel for fi ne adjustment.
A R M
24 mm ARMBOARD HOLE WITH VTA ADJUSTER
ARM MOUNT SURFACE
CORK WASHER
LARGE CLAMPING NUT
THREADED ARM BASE
GRUB SCREW POSITION
IS HORIZONTAL
THREADED VTA ADJUSTER
MOUNTING ON ANY DECK WITH 23 TO
25MM ARMBOARD HOLE
Fit the arm as per the following diagram.
A R M
REAR VIEW OF ARM ON METAL OR NON WOOD BASED ARMBOARD
WITH CORK WASHER
ARM MOUNT SURFACE
CORK WASHER
LARGE CLAMPING NUT
THREADED ARM BASE
SPACING WASHERS
OR THREADED VTA
ADJUSTER
IF YOU DO NOT HAVE A VTA ADJUSTER
If you do not have a VTA adjuster, then use the 2 large spacing
washers supplied to set the arm base to the correct height.
Bolt the arm to the armboard or plinth - you only need tighten
the large nut to fi nger tightness or very slightly tighter.
IF YOU HAVE THE ORIGIN LIVE THREADED VTA
ADJUSTER (WHICH FITS MOST DECKS
This adjuster does not fi t the newer Rega arms with 3 point
mounting holes. First thread the adjuster onto the arm. Ensure
that the threaded metal sleeve is the right way up with the
serrated fl ange on the top side. This ensures that the arm goes
all the way down into the sleeve. Once the threaded adjuster is
on, insert the arm through the armboard hole and fi t the cork
washer if desired then the large clamping nut. If you fi nd your
arm is too high with the vta adjuster fi tted, then you should
remove it, as it adds 1.5mm to the height of the arm.
I F Y O U H A V E T H E O L 1 O R R E G A A R M W I T H 3
H O L E M O U N T I N G
The arm is bolted or screwed to the deck using the 3 mounting
holes in the base of the arm. To raise the arm for VTA adjustment
you will need to fi t 3 or more spacing washers under the arm
base holes. One peice spacers are available from Rega if you want
a neater looking solution.
With arms supplied by Origin Live an assortment of spacers and
fasteners is included to cater for most decks. These consist of
FASTENINGS
3 off M3 x 25mm machine screws and 3 off M3 nuts for
through bolting.
3 off 3.5 x 25mm screws to screw into wood or soft armboards.
3 off M4 full nuts to act as 3mm spacers for height adjustment.
3 off M4 thin nuts to act as 2mm spacers
6 off M4 washers to act as 0.8mm spacers .
OTHER PARTS
Counterweight and grub screw, 3mm &1.27mm Allen keys,
alignment gauge, installation instructions.
3 POINT ARM MOUNTING
ARM MOUNT
SURFACE
3 off bolts or
wood screws
Spacers
FOR MK1 ORIGIN LIVE DECKS AND SLIDING
VTA ADJUSTERS
These are no longer current, so these instructions may be found
on the Origin Live web site - see top navigation bar - support
- then drop down list instructions - turntables - Aurora Gold
- page 5 & 6.
Connecting the arm
FIT THE ARM CABLE CLIP
For best performance the arm cable should be supported by a
cable clip screwed into position underneath the plinth - leave a
slight droop on it so that it isn’t “tight”. Clipping the arm helps
prevent vibration feeding into the arm.