Reclining tension adjustment instructions, Reclining sofa glide adjustment instructions, Warning – La-Z-Boy Power Recliner User Manual
Page 9
Reclining Tension
Adjustment Instructions:
17
16
– To reduce the risk of injur y.
•
This unit is equipped with a tension adjustment feature for the reclining
mechanism that is preset at the factory. The tension setting can be changed
for your personal preference. To avoid tip over and insure stability, do not
operate the unit with the tension adjustment wing nuts completely loosened
(see Reclining Tension Adjustment Instructions).
CAUTION – To reduce the risk of damage
•
Make sure the legrest on each unit is closed before tilting forward and
adjusting the tension.
• Do not completely tighten the wing nuts. The tension springs should not
be completely compressed after making adjustments. If this occurs, the
wing nuts must be loosened a minimum of
1
⁄
2
-turn to avoid damage to
the spring tension assembly.
• Do not completely loosen the wing nuts. The spring should not slide on
the bolt after making adjustments. If the spring slides on the bolt,
tighten the wing nut clockwise a minimum of
1
⁄
2
-turn after the spring no
longer slides on the bolt.
• Adjust both wing nuts equally.
Reclining Tension Adjustment Instructions:
You can adjust the tension of the reclining mechanism to customize the reclining
action for your personal preference and individual size.
1. Gently tilt the reclining chair or sofa forward to rest on its arms and top of the
back. Locate the wing nuts, one on each side, toward the back of the recliner
under each reclining seat (F
IGURE
1 - only one side shown).
2. Adjust the tension by turning the wing nuts in
1
⁄
4
-turn increments until the
desired setting is reached.
• A taller or heavier person may choose to increase the reclining tension
by tightening the wing nuts clockwise.
• A smaller person may choose to decrease the reclining tension by
loosening the wing nuts counterclockwise.
3. Return the reclining chair or sofa to the upright position. Test the new setting.
Make additional adjustments if needed following these steps.
WARNING
Reclining Sofa Glide
Adjustment Instructions:
– To reduce the risk of injur y.
•
Provide a clear path for operation of the chair, sofa, back and legrest.
Place tables and area rugs at a distance to allow the legrest to fully extend
without rubbing or inter ference.
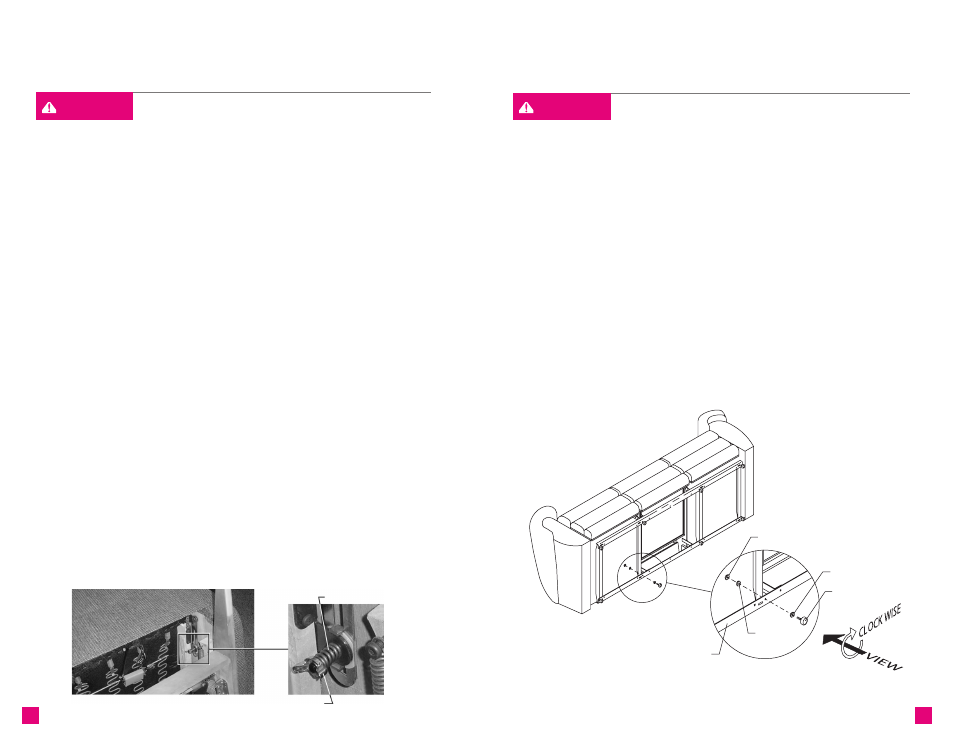
Glide Adjustment Instructions:
Make sure the glides are adjusted to a height that provides a clear path for
operation of the legrest.
Each glide is attached to the base rail by one jam nut and one lock washer on
top of the base rail and one jam nut on the bottom of the base rail (F
IGURE
1).
1. To extend the glide, loosen the upper jam nut by rotating clockwise. Turn the
lower jam nut clockwise to the desired height (F
IGURE
1).
2. T ighten the upper jam nut by rotating counterclockwise (F
IGURE
1).
3. Repeat steps one and two for each adjustable glide on the unit, if needed.
4. Repeat this procedure, as necessary, to level the sofa.
WARNING
F
IGURE
1
Wing Nut
Tension Spring
Upper Jam Nut
Lower Jam Nut
Adjustable Glide
Lock
Washer
Base Rail
F
IGURE
1